
What To Do if Your Vivo Y56 5G Auto Does Not Work | Dr.fone
What To Do if Your Vivo Y56 5G Auto Does Not Work
Embracing the convenience of Android Auto enhances your driving experience. It seamlessly connects your smartphone with your vehicle. However, in the realm of technology, glitches and malfunctions are commonplace. Android Auto, too, may encounter software or hardware issues that disrupt its functionality.
In this guide, you’ll delve into the common problems users face when Android Auto does not work and provide practical solutions to get you back on the road smoothly. From troubleshooting software glitches to addressing hardware concerns, this article aims to equip you with the knowledge to tackle Android Auto problems effectively.

Part 1. A Briefer on Android Auto
Android Auto is a revolutionary application designed to enhance the in-car experience by seamlessly connecting Android smartphones to compatible vehicles. It serves as a co-pilot, offering hands-free navigation, communication, and entertainment options, minimizing distractions while driving.
How Android Auto Works
Understanding the mechanics of this technology is essential for effective Android Auto troubleshooting. It mirrors your Android smartphone’s interface onto your car’s infotainment system. It provides a simplified and optimized version of your device’s features on the road.
Android Auto connects your smartphone to your car’s infotainment system via USB cable or wirelessly, depending on your device and car compatibility. Once clicked, it displays a user-friendly interface on your car’s screen, allowing you to access navigation through Google Maps, make calls, send messages, and control multimedia apps with voice commands or touchscreen gestures.
By integrating familiar smartphone functionalities into your car, Android Auto aims to provide a safer and more enjoyable driving experience, reducing the need for manual phone interactions while on the road. Understanding this foundation will empower you to effectively troubleshoot when issues arise.

Part 2. Common Issues Android Auto Faces + Troubleshooting/Repair
Even if it is such a great technology, sometimes Android Auto won’t connect. It also deals with common issues that can affect its performance. In this section, you’ll delve into these challenges and equip you with practical troubleshooting solutions to fix your Android Auto experience.
Connection Issues
Connection glitches through Bluetooth or USB can cause Android Auto issues. USB connection problems often come from subpar cables.
The solution here is straightforward – invest in a high-quality USB cable. This ensures a stable link between your smartphone and the car’s infotainment system. Meanwhile, Bluetooth pairing problems may require a bit of digital maneuvering. Try restarting your phone, rebooting the car’s infotainment system, or resetting Bluetooth settings to establish a smooth connection.
App-Specific Problems (Certain Apps Not Working)
Android Auto relies heavily on various navigation, communication, and entertainment applications.
If specific apps refuse to cooperate, a quick remedy is to restart the head unit. If the issue persists, consider uninstalling and reinstalling the problematic applications. This step ensures a clean slate for the apps, potentially resolving any underlying compatibility or performance issues.

Screen and Display Problems (Head Unit)
Issues with the screen or display on your car’s head unit can be disconcerting. To troubleshoot, commence with a simple restart of the head unit.
If the problem lingers, escalate the solution by restarting the entire car. Should these steps prove ineffective, seeking professional assistance at a maintenance center is advisable. This ensures a thorough examination and potential resolution of hardware-related problems, providing a comprehensive fix for persistent screen and display issues.
Voice Commands Not Working
Voice commands serve as a cornerstone of the Android Auto hands-free experience. When they falter, it can disrupt the seamless interaction with the system.
Begin by scrutinizing your internet connection, as voice commands rely on a stable link to function effectively. If the issue persists, a basic restart of the head unit might recalibrate the system, restoring the functionality of voice commands.
Understanding that these issues are inherent to any technology, Android Auto users can confidently navigate and troubleshoot these problems with the provided solutions. By addressing these commonplace concerns, users empower themselves to swiftly overcome hurdles, ensuring a seamless and gratifying driving experience with Android Auto.
Part 3. A Quicker Solution: Wondershare Dr.Fone – System Repair
If navigating through various troubleshooting steps seems complicated, especially if the issue resides within your Vivo Y56 5G, a swift and efficient solution comes in the form of Wondershare Dr.Fone - System Repair.

While the methods presented earlier primarily address software glitches, Dr.Fone can tackle more profound issues, offering a quick fix to revitalize your Android Auto experience. It is a comprehensive toolkit that caters to various Android needs, ensuring a seamless and optimized experience. Among its array of features, the System Repair feature in Dr.Fone acts as a reset button for your Vivo Y56 5G.
It addresses issues that go beyond the scope of regular troubleshooting. It gives your phone a fresh start by repairing the Android system and resolving glitches, crashes, and other persistent software-related problems. This revitalizes your telephone and can significantly impact Android Auto’s performance.
Note: If the problem persists and is related to the car’s head unit, a visit to the maintenance center might be necessary after exhausting these software-based solutions.
How To Use Wondershare Dr. Fone’s System Repair
To use Dr. Fone’s System Repair feature, follow the steps below. These steps will work with any Android phone.
- Step 1: Begin by launching Dr.Fone on your computer. From the left panel, access the Toolbox menu and click System Repair. Ensure your Vivo Y56 5G is connected.
 safe & secure
4,014,082 people have downloaded it
- Step 2: On the subsequent screen, select Android as your device.

- Step 3: Initiate the Android System Repair by clicking Start.

- Step 4: Confirm the accuracy of your device details. If needed, edit any information that may be incorrect.

- Step 5: Place your phone into Download mode following the guidelines tailored for phones with or without home buttons. Your phone will commence downloading the dedicated firmware.

- Step 6: Once the firmware is downloaded, verify and proceed with the installation by clicking Fix Now. Confirm the firmware installation by inputting “000000” into the text box in the appearing window. Click Confirm afterward.

- Step 7: Upon completion of the process, your phone should now be restored. Click Done to conclude.

safe & secure
4,276,578 people have downloaded it
Conclusion
In wrapping up this guide, you’ve explored common reasons Android Auto does not work. You’ve also been provided practical solutions to keep your driving experience seamless. Remember, regular maintenance of your car’s head unit and periodic checks on your Vivo Y56 5G can preemptively address potential issues.
By staying proactive, you ensure a consistently smooth ride with Android Auto. For comprehensive system repair and addressing broader Android-related needs, consider trying out Dr.Fone. It’s a versatile tool that can enhance your Android experience and keep your digital journey hassle-free. Take control of your drive and explore the full potential of your Vivo Y56 5Gs with Dr.Fone today.
Vivo Y56 5G Stuck on Screen – Finding Solutions For Stuck on Boot
The market has embraced Vivo Y56 5G for being the pioneers in the industry. Although the company lacked in providing explicit smartphones, they were still able to catch up with the race. Vivo Y56 5G C31, known to provide durability of the next level, is taking up the latest shelves of Vivo Y56 5G smartphones. Although the company promises reliability, there are several problems involving such smartphones.
One prominent solution stated by Vivo Y56 5G users involves the screen stuck in the boot. If your Vivo Y56 5G is stuck on the “Vivo Y56 5G” screen for no particular reason, you will have to read this article. As this article tackles all reasons involving the problem, it comes up with the necessary solutions. These solutions will help Vivo Y56 5G users find solutions for their stuck screens on the boot.
Part 1: What Causes Vivo Y56 5G Screen Stuck on Boot?
Has your Vivo Y56 5G recently been stuck on the boot loop screen? If it is happening or has happened to you, there are some reasons that you need to be aware of. Having an overview of the causes of Vivo Y56 5G being stuck on the Android One screen can help you redirect yourself toward to right solution. Go through the list of all causes and find more about the issue involving screens stuck on boot in Vivo Y56 5G smartphones:
- The Device is Damped in Liquid
It is entirely possible that your Vivo Y56 5G smartphone is immersed in water. With a smartphone dipped in liquid, the Vivo Y56 5G device can turn useless. If you have tried starting it again, it won’t run and might get stuck on the boot.
- Soft-Bricked Device
There are multiple conditions where your Vivo Y56 5G smartphone can get soft-bricked. It majorly happens when a particular function in the Vivo Y56 5G device stops working. To counter the problem, it is essential that you can get your device stuck on the boot screen.
- Outdated Device
If the equipment wears out after a certain time, there is a need to have it changed. With such obsolete models of Vivo Y56 5G, you will surely face issues like a screen stuck on the boot. Smartphone equipment cannot be revamped, and you will have to go for newer options.
- Software Update Required
A software update on your Vivo Y56 5G smartphone might be causing issues with the screen stuck on the boot. The best way to get rid of this problem is to update your system software to the latest version.
Part 2: 5 Solutions To Solve Vivo Y56 5G Screen Stuck on Boot
Do you seek to resolve the problem of the Vivo Y56 5G Plus stuck on the Android One screen? There are specific techniques that can be tried as a remedy. These solutions are tried and recommended by experts. Go through the details provided below to solve the issues with your stuck Vivo Y56 5G screen.
Solution 1: Force Restart Vivo Y56 5G
The first and most proclaimed technique to refresh Vivo Y56 5G devices under such a problem is to force restart them. If the Vivo Y56 5G device is stuck, you will have to perform this process by pressing the “Power” and “Volume Up” keys for 15 seconds. Continue holding the buttons until the Vivo Y56 5G device vibrates or restarts by showing the screen again.

Solution 2: Leave the Phone For a While To Drain Its Battery
A conventional way to solve the issue of a stuck screen in Vivo Y56 5G is to leave the phone in its position. As you let its battery drain out, the phone will turn off, and you can activate the Vivo Y56 5G device again by charging it.
Once you restart it this way, all the procedures will initiate again, and the Vivo Y56 5G device will be as good as new. Draining the battery has given you the leverage to regain control over the Vivo Y56 5G device again.
Solution 3: Check For Updates on Vivo Y56 5G Smartphones
Another quick remedy to try on your Vivo Y56 5G smartphones involves updating their software. If there is any prevailing software update to install on the smartphone, you will have to check and update it by following the steps guided below:
Step 1: Open the “Settings” of your Vivo Y56 5G smartphone and continue to the “System” section in the list of options. You will have to access the “Advanced” options in the “System” menu.

Step 2: As you lead to the advanced options, look for “System update” in the provided options. Look for the “Check for update” button. This will check if your Vivo Y56 5G needs any software updates or not.

Solution 4: Using Wondershare Dr.Fone
One of the finest options available to perform is using a third-party platform that promises smooth operability. Wondershare Dr.Fone is a platform designed to provide such smartphones another life to survive. Its unique functionality repairs all the issues with a smartphone and makes it as good as a new one.
If your Vivo Y56 5G Plus is stuck on the Android One screen, this platform is the ultimate solution for you. With the support of the latest devices and software versions, Dr.Fone – System Repair (Android) offers the best results. To know how to repair your Vivo Y56 5G smartphone with the help of this tool, look through the steps featured next:
Step 1: Open Dr.Fone and Select System Repair
As you launch Dr.Fone after downloading it on your computer, continue to the “System Repair” option. You will have to start by connecting the Android device to the computer through a USB cable. Select “Android Repair” from the options available and continue to the following options.
Step 2: Define Device Information and Confirm
You will be directed to the Vivo Y56 5G device information screen, where you must define the identification parameters of the Vivo Y56 5G device. Select the brand, name, model, country, and carrier details for proper system recovery. On clicking “Next,” you will receive a warning where you will have to type the number “000000” to proceed with the method.
Step 3: Put Your Vivo Y56 5G in Download Mode
Following this, you will have to put your Vivo Y56 5G in Download Mode. For that, you need to follow the steps according to the condition of the Vivo Y56 5G device:
- For Devices with Home Button:
Power off your Android and continue to press and hold the “Volume Down,” “Home,” and “Power” buttons for a few seconds. After holding them for almost 10 seconds, release and press the “Volume Up” button to enter the mode.
- For Devices without Home Button:
Turn off the Android device and hold the “Volume Down,” “Bixby,” and “Power” buttons simultaneously for a few seconds. On releasing the buttons, press the “Volume Up” button to enter Download Mode.
Step 4: Start Downloading and Verify Firmware
To proceed, tap the “Next” button to download the firmware. As you verify the firmware, the repairing process starts on your Vivo Y56 5G device.

Solution 5: Contact the Customer Service Center of Vivo Y56 5G
If the issue of the Vivo Y56 5G stuck on the “Vivo Y56 5G” screen continues, you will have to contact the Vivo Y56 5G device’s customer support. With no proper method left for the Vivo Y56 5G device, the only effective technique is to visit the authorized store for Vivo Y56 5G smartphones and claim the issue with the Vivo Y56 5G device. In this way, you might receive or get a fully repaired device with no additional charges if the Vivo Y56 5G smartphone is under warranty.
Part 3: How to Avoid Vivo Y56 5G Screen Stuck on Boot?
What if you come to know that you can avoid the Vivo Y56 5G screen stuck-on boot problem? There are a set of tips and tricks that you can follow to explain how to prevent such an issue in the first place. Follow these tips to learn more about saving your Vivo Y56 5G from such miserable conditions:
1. Protect from Malware
The first thing to protect your Vivo Y56 5G smartphone from getting stuck on the boot is to keep it safe from unauthorized and malicious data. The best thing to keep a device secure is to follow all security protocols and avoid bypassing them. If you try downloading something not authorized by the Play Store itself, for instance, an APK, it can make your device vulnerable to malware.
2. Keep Your Device Updated
If you feel frustrated by issues like Vivo Y56 5G being stuck on the Android One screen, the best thing to avoid such a problem is to keep your device updated at all costs. Whenever there is an update on your Vivo Y56 5G smartphone, make sure to install it on time and properly. Do not leave updates uninstalled for no reason, as they can hinder the Vivo Y56 5G device’s speed and performance.
3. Do Not Fool Around with System Files
Changing or modifying system files can be fatal for smartphones. Thus, to keep your Vivo Y56 5G safe, you need to keep your hands away from such important files. Modifying a single file can make your device useless or put you in situations like a Vivo Y56 5G smartphone stuck on the boot. For that, the best tip is to keep yourself out of engagement.
4. Use Wondershare Dr.Fone To Manage All Data With Ease
As you have observed, the power of Dr.Fone can be a perfect phone manager for you at all times. While providing system repair services, it can also help you manage your device’s data and other statuses. Thus, consider keeping Dr.Fone close to your device and its operations. In this way, you will be able to have complete control over all types of data present in the Vivo Y56 5G smartphone.
safe & secure
4,675,795 people have downloaded it
Conclusion
With that, this brings the article on Vivo Y56 5G smartphones to a conclusion. If you are still facing issues with your Vivo Y56 5G stuck on the “Vivo Y56 5G” screen, this article is the perfect solution for your problem.
With all the provided methods, we do hope that you will be able to restore the status of your Vivo Y56 5G smartphone and make it functional. For the finest results, you have also discovered Dr.Fone – System Repair (Android) as the best solution for repairing such devices.
Gmail Not Working on Vivo Y56 5G: 7 Common Problems & Fixes
Ever since Android is introduced, it has almost eliminated the need of computers to work through Gmail. Gmail carries much importance especially when you’re a working person. A lot of work is done through mails on daily basis. But maybe today is not your lucky day. Maybe Gmail is giving you a hard time today. Is it? Is your Gmail not responding or keeps stopping you from going further? Well! There is no need to be bothered anymore. We are discussing some of the general Gmail problems along with their fixes. So, if your Gmail is not working on Android, you can go through this article and find the relevant solution.
Problem 1: Gmail App not responding or keeps crashing
First and foremost, the most common situation people meet with is when there Gmail keeps crashing. Or simply, it doesn’t respond at all. When you open it, it stuck for a few seconds and then you have to close it. It seriously is an annoying issue. If your Gmail is also not responding or crashing and you aren’t able to work properly, following are the solution you can follow.
Clear Cache
The first thing you can do to fix Gmail not responding issue is to clear the cache of Gmail. This has higher chance to get the issue resolved. To do this:
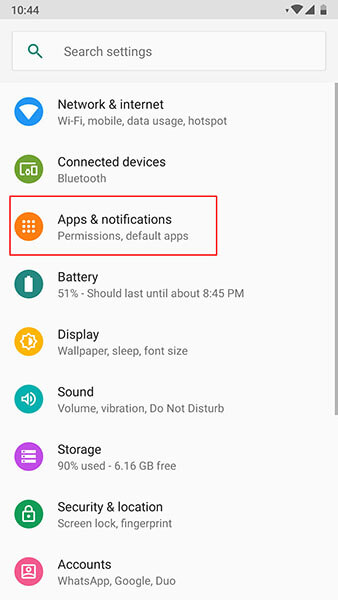
Go to “Settings” and look for “Apps & Notifications”. Please note that the option may vary in some Android phone like it maybe “Application” or “App Manager”. So, don’t panic and look for the option carefully.

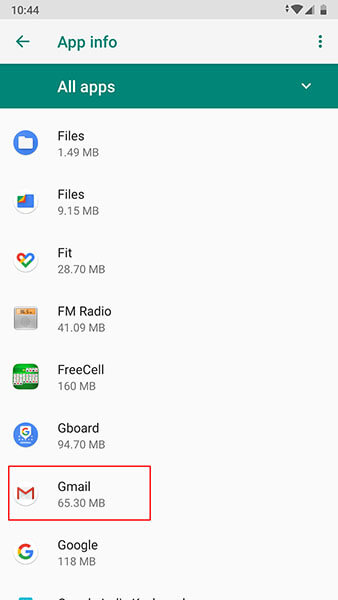
Now, from the apps list, search “Gmail” and tap on it.
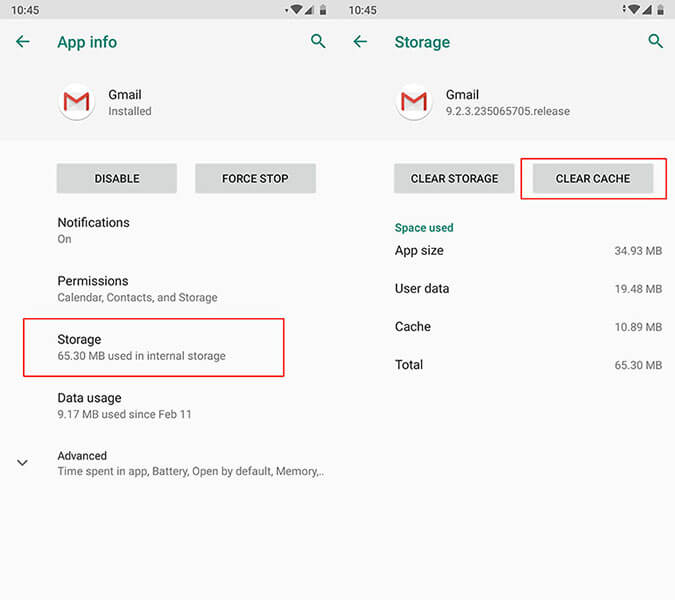
Go to “Storage” followed by “Clear Cache”.
Restart the Vivo Y56 5G device
Restarting the Vivo Y56 5G device in the first place simply resolves many problems and so in the instance when Gmail keeps stopping. Simply long press the power button of your device and restart the Vivo Y56 5G device. See of the problem gets vanished or not.
Factory Reset the Vivo Y56 5G device
The next option that you can try is resetting your device. This will lead to data loss so we suggest you to take backup firstly and then proceed with this method.
Hit on “Settings” and search for “Backup & Reset” option.
Tap on “Reset” or “Erase all data” (the option name again may vary).

If unfortunately the above solutions don’t work, there is a requirement to flash the stock Android ROM again. Before you wonder how, there is a professional one-click tool that can surely be of assistance. It is Dr.Fone - System Repair (Android) . The tool takes special care of the Android phones and fixes almost every system issues with ease. It takes no special technical skills and performs efficiently.
Problem 2: Gmail won’t sync between all ends
The next most common problem where people get stuck with is when there Gmail won’t sync. Here are the solutions to this particular problem.
Make Space in the Phone
When Gmail stops syncing, one of the things that can save you is clearing the storage. It is the space that maybe the culprit and therefore the syncing don’t work at all. We would like to suggest you removing the unwanted apps to clear the storage or deleting the downloaded files. You can also transfer the important files to your computer and make the space vacant.
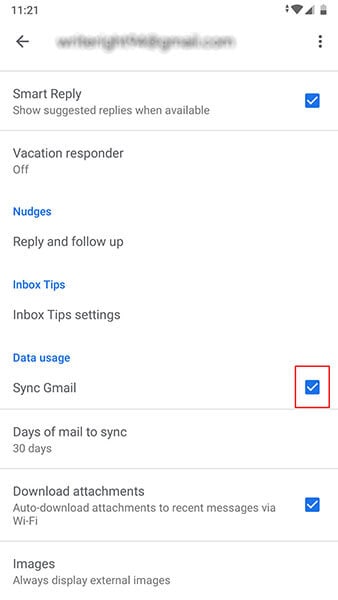
Check Gmail Sync Settings
When still the Gmail not working issue persists and you can’t sync, make sure to check the Gmal sync settings. For this, follow the steps below:
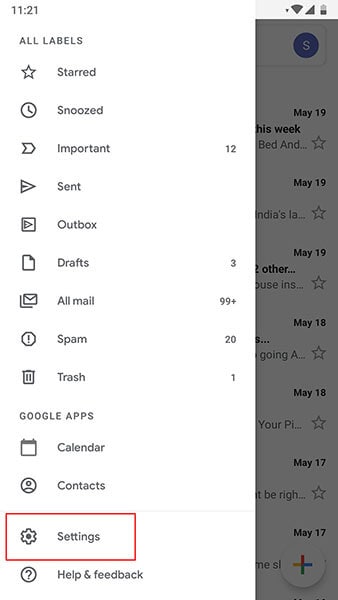
Launch the Gmail app and tap on the menu icon (three horizontal lines).
Tap “Settings” and choose your account.
Check the box next to “Sync Gmail” if it’s not checked.
Restart the Vivo Y56 5G device
Again, restarting can also be helpful in this situation. When you boot the Vivo Y56 5G device again, check if your Gmail can sync or not.
Problem 3: Gmail won’t load
In case you are using the Gmail over your web browser and it has tested your patience in loading, here are the solutions that could prove to be fruitful for you. Please check these out.
Ensure to Use Gmail Supported Browser
First of all, you need to make sure that the browser you are using works with Gmail or not. Gmail can smoothly perform in Google Chrome, Firefox, Safari, Internet Explorer and Microsoft Edge. However, the browsers should be updated. So, please make sure that these browsers are running on the latest versions. Moreover, in case you use Chromebook, don’t forget to update the operating system in order to let it support Gmail.
Clear Cache of web browser
If you tried the above method but to no avail, try to clear the cache and cookies of the web browser. But by doing so, the browser history will be removed. As well as, the records of the websites you previously enjoyed will also be lost.
Check browser extensions or add-ons
If not the above one, try this tip. It encourages you to check your browser extensions. Perhaps these are interfering with the Gmail and due to this conflict, Gmail won’t load. You can either turn off these extensions and plug-ins temporarily or make use of the incognito mode of the browser where there are no such things like extensions and plug-ins.
Problem 4: Gmail can’t send or receive
Gmail also gives you problem in sending or receive mails and messages. And to troubleshoot such issue, following are the solutions mentioned.
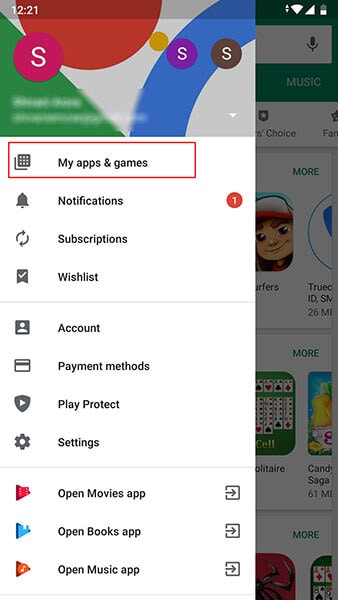
Check the Latest Version of Gmail
This issue is likely to emerge when you are using an outdated version of Gmail. And therefore, the first solution says you to check if the Gmail update is available. You can go to the Play Store and from the “My apps & games” option, you can see if Gmail needs to be updated or not.
Verify Internet Connection
Another thing that carries weight while you can send or receive mails is the internet connection. As we all know that Gmail won’t respond if the Vivo Y56 5G device is not connected to the internet. Therefore, you are advised to turn off Wi-Fi and then enable it again. Also, please ensure to switch to Wi-Fi if you are using the cellular data. This may hamper the process and stop you from receiving or sending mails.
Remove you Account and Add Again
If still Gmail keeps stopping you to go ahead, make sure to once sign out from it. To do this:
Open your Gmail app and go to “Manage accounts on this device”.
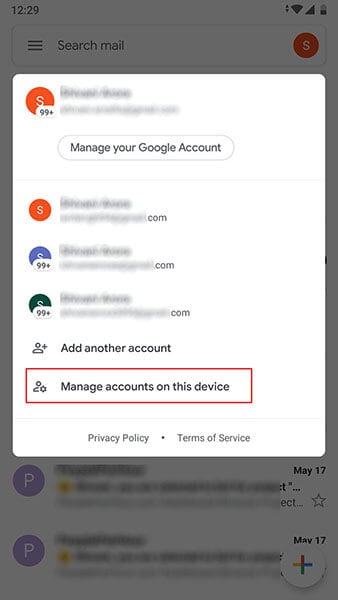
- Now, tap on the account you are working with. Tap on “REMOVE ACCOUNT” thereafter. After this, you can again sign in and then check if the problem is gone or not.

Problem 5: Stuck in sending
Now, here is another annoying problem that doesn’t let Gmail working on Android properly. This problem addresses the situation where users send a mail but it gets stuck on sending. If this is the problem that you are going through, the following solutions will help you.
Try Alternative Gmail Address
First of all, if Gmail is not working due to stuck in sending issue, we advise you to make use of some other Gmail address to send the mail. If the problem still occurs, jump to the next solution.
Check Network Connection
As already mentioned, be sure of an active internet connection while working with Gmail. When you are not using a stable connection, it may lead to stuck on sending, Gmail crashing and many other issues. You can fix the issue by doing these three things:
- Most importantly, use only Wi-Fi rather than cellular data if you want a smoother process.
- Turn off Wi-Fi and then turn it on again after nearly 5 seconds. Do the same with the router. Plug it out and the plug in.
- Lastly, turn on Airplane mode and after a few seconds, turn it off again.
Now try to send the mail and see if things are still the same or not.
Check Attachments
Large attachments can also be the reason for this issue. We would here like to suggest you to check the attachments you are sending. If these are not so important, you can remove them and send the mail. Or if it is not possible to send the mail without attachments, compressing the files can be a solution.
Problem 6: “Account not synced” issue
Many times, the users get the error that says “Account not synced” while they try to work with Gmail. And this is the 6th problem we are introducing. The ways mentioned below will assist to get out of the trouble.
Make Space in the Phone
When Gmail stops to further the process by prompting “Accounts not synced” issue, be sure that your Vivo Y56 5G has some storage in it. If not, create it straight away. As we also mentioned in one of the above solutions, you can either delete the unnecessary files or transfer the important files to the PC to make the space in the phone. Go along with this tip and see if it works.
Check Gmail Sync Settings
As another solution, check Gmail sync settings to get the issue fixed.
Simply open Gmail and hit the menu icon which is three horizontal lines on the top.
Go to “Settings” and choose your account.
- See the tiny box beside “Sync Gmail” and check it if it is not.
Restart the Vivo Y56 5G device
If the above method went futile, simply restart your device. Take help of the Power button on your device. Long press it and from the options, restart it. This will hopefully work for you.
Problem 7: Gmail app running slow
The last problem that you may face is the slow-going Gmail app. In simple words, you may experience that Gmail app is operating extremely slowly. To fix this, following solutions will help you.
Restart the Phone
It is a universal method to fix minor Android system issues. And here too, we would like you to restart your Vivo Y56 5G in the first place when you find that Gmail is not responding due to the sluggish behavior.
Clear Storage of Device
Usually all the apps start running slow when the Vivo Y56 5G device is not having sufficient space. As the apps need space to function quickly and appropriately, having the Vivo Y56 5G device on low storage can prove to be a bad luck for Gmail. So, make sure you wipe out the items you no longer needed on your device and create some room so that the Gmail responds nicely and won’t be running slow anymore.
Update Gmail App
As the last tip that will indeed help you is to update the Gmail app. Until you update the app when required, Gmail keeps stopping you from working and you will definitely get frustrated. Therefore, go to Play Store and look for the Gmail update. If it is available, welcome it with smile and bid farewell to the problem of slow running Gmail.
What if your problem still doesn’t get resolved after following these 3 tips? Well! If that is the case, we will again recommend you to make use of an expert one-click tool to flash the stock Android ROM.
Dr.Fone - System Repair (Android) is going to help you serving the purpose. This mighty tool possesses huge success rate and one can rely on it for its simplicity and security. It is designed to work with numerous problem related to Android system. So, no matter if your Gmail keeps crashing or keeps stopping, it has the solution for everything.
Dr.Fone - System Repair
Fix all Gmail issues caused by Android system:
- Gmail app corruption or not opening
- Gmail app crashing or stopping
- Gmail app not responding
Also read:
- [New] 2024 Approved Seamless OBS Integration on Your Mac A Detailed Walkthrough
- [Updated] In 2024, Studio Techniques Decoded XVideoStudio Edition
- [Updated] In 2024, Top 5 PS1 Games Emulators - Resurrecting Console Legends on PC
- 4 Ways to Fix Android Blue Screen of Death On Vivo Y78t | Dr.fone
- 6 Proven Ways to Unlock Nokia G22 Phone When You Forget the Password
- 9 Solutions to Fix HTC U23 System Crash Issue | Dr.fone
- 9 Solutions to Fix Samsung Galaxy Z Fold 5 System Crash Issue | Dr.fone
- Android Screen Stuck General Oppo A18 Partly Screen Unresponsive | Dr.fone
- Ford's Off-Road Legend as an RC Model - The Ultimate Review of Galaxy F-150 RTR
- Full Solutions to Fix Error Code 920 In Google Play on Google Pixel 7a | Dr.fone
- Google Play Services Wont Update? 12 Fixes are Here on Infinix Note 30 Pro | Dr.fone
- Guide to Revitalizing Your Mac with a Fresh DNS Cache Clear Out
- How to Resolve Realme Narzo N53 Screen Not Working | Dr.fone
- How to Unlock Google Pixel 8 Bootloader Easily
- In 2024, Incorporating Secondary Footage A Filmmaker's Guide
- New Discover How You Can Use Vectorscope to Adjust Luminance, Color Grading, and More in Your Video Editing Projects for 2024
- What to Do if Google Play Services Keeps Stopping on Vivo Y36 | Dr.fone
- Title: What To Do if Your Vivo Y56 5G Auto Does Not Work | Dr.fone
- Author: Ariadne
- Created at : 2024-12-19 17:50:04
- Updated at : 2024-12-23 20:01:44
- Link: https://howto.techidaily.com/what-to-do-if-your-vivo-y56-5g-auto-does-not-work-drfone-by-drfone-fix-android-problems-fix-android-problems/
- License: This work is licensed under CC BY-NC-SA 4.0.