
What To Do When Nokia 130 Music Has Black Screen of Death? | Dr.fone
What To Do When Nokia 130 Music Has Black Screen of Death?
Have you ever got the error of freezing the Android device home screen? Or the notification light keeps blinking without anything shown on display? Then you are facing Android black screen of death.
This scenario is common with many Android mobile users, and they always hunt for solutions to get rid of this Android black screen problem. Here are some more situations that can assure you that you are facing Android black screen of death.
- The light of the phone is blinking but the Nokia 130 Music device is not responding.
- The phone is hanging and freezing very frequently.
- The mobile is rebooting and crashing more often and the battery is draining a lot faster.
- Phone restarts on its own.
If you face these situations, you might be facing the Android black screen of death issue. Follow this article, and we’ll discuss how to get rid of this annoying problem at ease.
Part 1: Why Android device gets black screen of death?
Similar to the “Blue Screen of Death “ (BSOD) on computers, the Android Black Screen of Death indicates a severe system crash or malfunction. When this issue occurs, the Nokia 130 Music device’s display remains blank, and you are unable to interact with the Nokia 130 Music device, access apps, or perform any actions. The cause of the Android black screen of death can vary, but some common factors include:
- Install incompatible apps or apps with bugs and viruses.
- Have bugs or errors in the Android operating system.
- Keep the mobile charged for long after it’s fully charged.
- Use a non-compatible charger.
- Use an old battery.
- Incorrectly install or incomplete system updates.
- Excessive heat due to heavy usage or environmental factors.
If you face the situations mentioned above, this is clearly a case of the Android screen black. But don’t worry about that. You can follow the article below to get rid of this situation on your own.
Part 2: How to rescue data when Android gets black screen of death?
This annoying Android black screen of death is making it impossible to access your internal data. So, the possibility is that you might lose all the data. We have a solution for all of your data recovery problems from a damaged Android device.
The solution for recovery data is the Dr.Fone - Data Recovery (Android) toolkit by Wondershare. This tool is highly appreciated worldwide and very popular for its feature-rich user interface. This tool can perform a lot of functions that can successfully recover the data from a damaged device.
Use this revolutionary toolkit to get the data back from the black tablet screen of death. Connect the Nokia 130 Music device with the PC after installing this tool and follow the on-screen instruction, and all of your data will be transferred to your PC. Unfortunately, the tool is supported on selected Nokia 130 Music Android devices as of now.
Dr.Fone - Data Recovery (Android)
A Dedicated Tool to Retrieve Data from Broken Android Devices .
- Recover data from broken devices or devices that are damaged in any other way, such as those has black screen.
- Recover photos, videos, contacts, messages, call logs, and more.
- Highest retrieval rate in the industry.
- Compatible with most Nokia 130 Music devices.
3981454 people have downloaded it
Part 3: 9 Solutions to fix the black screen of death of Android
- 3.1 One click to fix the black screen of death

- 3.2 Force restart your Nokia 130 Music
- 3.3 Check and clean your phone
- 3.4 Remove the battery
- 3.5 Recharge the Nokia 130 Music device
- 3.6 Wipe cache partition to fix black screen of death
- 3.7 Uninstall incompatible apps
- 3.8 Reboot to safe mode
- 3.9 Factory reset to fix Android black screen of death
3.1 One click to fix the black screen of death
Facing an Android device with a black screen of death, I believe, is one of the gloomiest moments of one’s life, especially for those who know little about the technical part of Android. But here is the truth we have to admit: most cases of the black screen of death arise due to system glitches in Android.
What to do? Shall we find someone who is tech-savvy to seek help? Come on, this is the 21st century, and there are always one-click solutions to deal with technical issues for laymen like you and me.
Dr.Fone - System Repair (Android)
Fix Black Screen of Death for Android In One Click
- Fix all Android system issues like a black screen of death, OTA update failures, etc.
- Update the firmware of Android devices. No technical skills are required.
- Support all the new Nokia 130 Music devices like Galaxy S22, S23, etc.
- Click-through operations to bring Android out of the black screen of death.
3,364,231 people have downloaded it
Here are the easy steps to get your Nokia 130 Music out of the black screen of death:
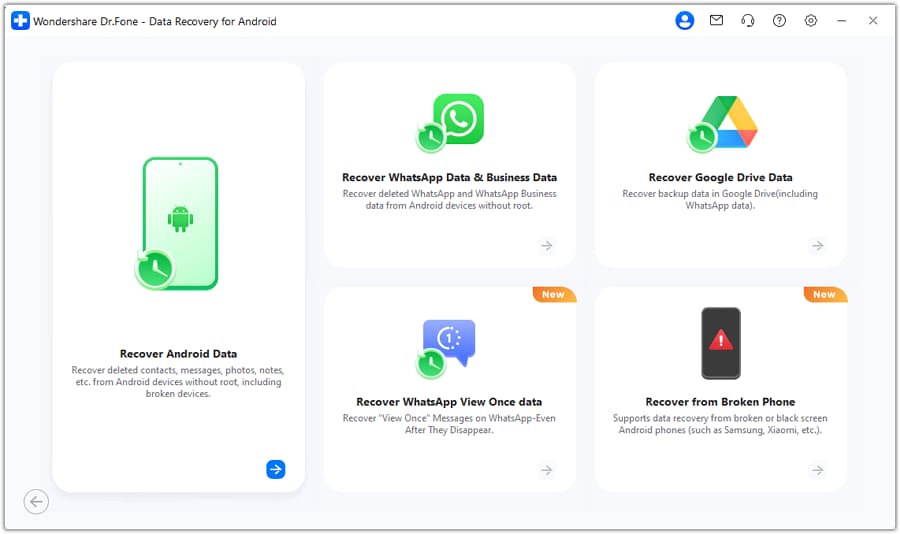
Download and install the Dr.Fone tool. After launching it, you can see the following screen pop up.
Select “System Repair” from the home page, and then click on the “Android “.
Click “Start” to commence the Android system repair. In the next screen, select and confirm your Android model details like name, model, country, etc. and go on.
Boot your Android into Download mode by following the on-screen demonstrations.
Then the tool will download the Android firmware and flash the new firmware to your Nokia 130 Music.
A moment later, your Nokia 130 Music will be repaired completely, and the black screen of death will be fixed.
Video guide: How to fix the Android black screen of death step by step
 safe & secure
3.2 Force restart your Nokia 130 Music
Because it is the quickest and most painless solution, most people do this when their Android phone screen goes black too fast. The majority of phone issues can be resolved by performing a hard reboot. Here are the necessary measures if you haven’t tried this method before.
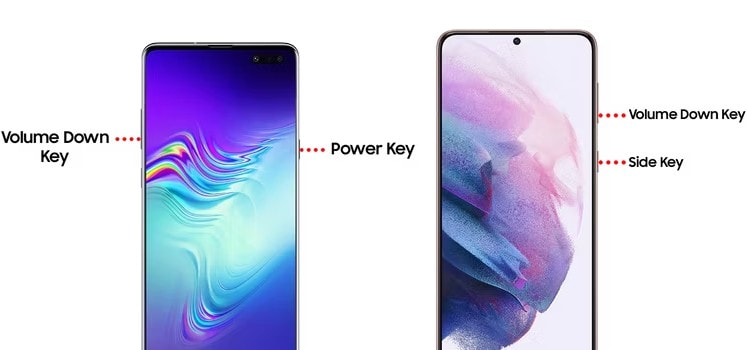
To reboot your Nokia 130 Music, you may need to press a specific key combination, depending on the model you have, but most Android devices can be force restarted by doing the following steps:
Step 1: Press and hold the power button for about 10-15 seconds. Keep holding it until the Nokia 130 Music device restarts.
Step 1: For Nokia 130 Music devices, press and hold down the Power and Volume Down buttons for about 7 seconds.
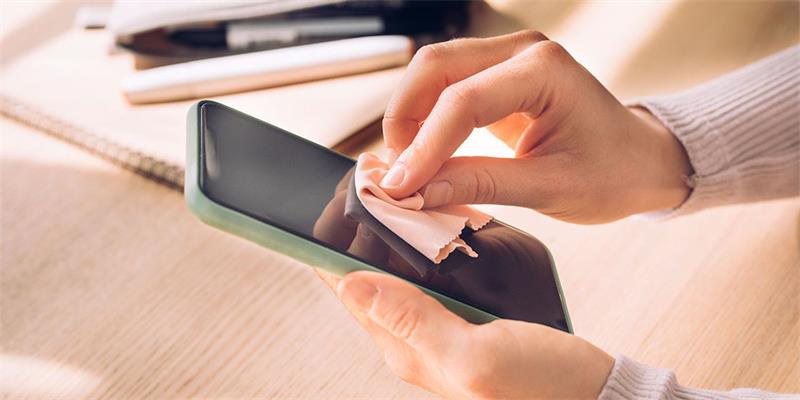
3.3 Check and clean your phone
This method might not be popular with Android users, but this can do wonders when dealing with an Android black screen of death issue. To do this, follow the steps provided below:
Step 1: Ensure your phone’s buttons and ports are not stuck before anything else.
Step 2: See if dirt prevents you from turning the Nokia 130 Music device on. Then, quickly press and release the button a few times.
Step 3: If the phone isn’t charging normally, ensure the charging port isn’t clogged with dust and debris by checking and cleaning it. You can gently blow out any debris in the charging port or use a wooden toothpick to pry it open.
Step 4: After you’re done with the cleaning, it’s best to charge the phone for at least 10 minutes. Just give it a quick charge and then try to restart it.
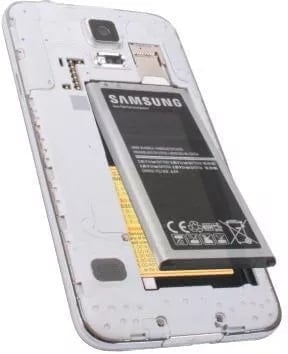
3.4 Remove the battery
If your phone’s battery is removable, you can try taking it out and trying again if restarting and cleaning it doesn’t fix the problem.
Step 1: To get started, take the phone apart by starting at the back.
Step 2: After 20 to 30 seconds, take out the battery and put it back in.
Note: When replacing the battery, ensure the metal contacts correctly connect to the phone.
This easy and straightforward method should help you fix your Android screen black issue, but if it doesn’t, continue reading, as this article got more techniques you can try.
3.5 Recharge the Nokia 130 Music device
If your Nokia 130 Music screen suddenly goes black, let the battery die completely. Then once the battery is completely dead, you should plug it in to charge and turn it on by pressing the Power button. Try to check if you still encounter the issue after doing so.
3.6 Wipe cache partition to fix black screen of death
If your Nokia 130 Music turns on, but the screen remains black, clearing the cache partition should solve the problem. After all, keeping caches on your phone would cause it to run more slowly and cause other problems. Therefore, the issue can be resolved by clearing the cache partition. Check the following steps on how to do this below:
Step 1: Turn off your Nokia 130 Music.
Step 2: Boot the Nokia 130 Music device into Recovery Mode.
Note: The steps necessary to enter recovery mode will vary depending on your specific Android phone model. To ensure you’re doing the correct steps for your device, consult the user manual or look it up online. The following instructions work for Nokia 130 Music devices:
- For older Nokia 130 Music devices with the home button: Press and hold the Volume Up button, the Power button, and the Home buttons simultaneously.
- For newer Nokia 130 Music devices without the home button: Press and hold the Volume Up button and the Power button together.
- If the Nokia 130 Music device logo appears, release your grip, and the phone will restart.
Step 3: Find the Wipe cache partition option using the volume controls after entering Recovery Mode.
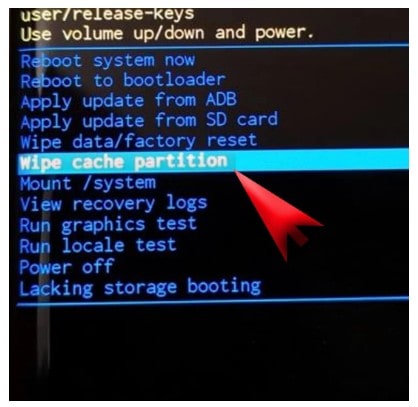
Step 4: Select Wipe cache partition by pressing the Power button.
Step 5: On the next screen, use the Volume Down button to highlight “Yes” and then press the Power button to confirm the cache wipe.
Step 6: The cache partition will be wiped, and you will see the “Cache wipe complete” message on the screen.
Step 7: Use the Volume Down button to navigate to the “Reboot system now” option and press the Power button to reboot your Nokia 130 Music device.
After rebooting, you can see that you have successfully got rid of the annoying Android black screen of death. For most of the cases, this method solves the problem. If not, you have to move to the next method.
3.7 Uninstall incompatible apps
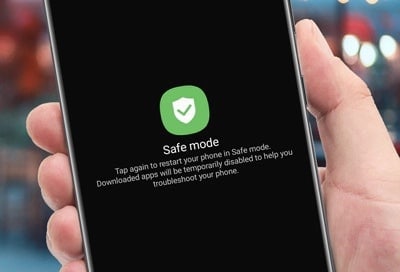
Android screen black can be a result of installing a bug or incompatible apps. If you have recently installed an app that crashes frequently, that may be the reason for the issue. Uninstalling the app from the Nokia 130 Music device may solve the problem with ease. For doing this, you need to boot your device in Safe mode. Follow the below steps.
Step 1: Power down your device by pressing and holding the Power button until a menu appears.
Step 2: Navigate to Safe Mode by pressing and holding the Power Off button.
Step 3: Tap the “Safe mode” icon to enter Safe mode. You should now see Safe Mode at the Nokia 130 Music device’s bottom.
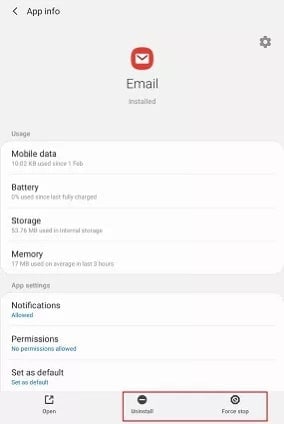
Step 4: After selecting Settings, head to the Apps section.
Step 5: Select the app by clicking on it; the App Info window should appear. To uninstall the app, tap the Uninstall option from the menu below the screen.
Step 6: Now restart the Nokia 130 Music device by pressing the power button and let it boot up in normal mode.
If the app is the reason for Android black screen of death, then after uninstalling, you can get rid of this issue. If not, now you have to factory reset your device to solve the problem.
3.8 Reboot to safe mode
Even after multiple attempts to launch them, certain applications act suspiciously and cause the Nokia 130 Music device to crash. When an Android phone suddenly goes black, you can often isolate the problem to a specific app by booting into Safe mode.
Step 1: Begin by restarting your phone. To do that, press the Power button until a menu appears.
Step 2: Press the Power Off button to enter Safe mode.
Step 3: Activate Safe mode by clicking the “Safe Mode” icon.
Step 4: To return to Normal mode, turn off your device and then turn it back on.
3.9 Factory reset to fix Android black screen of death
The factory reset is the option that enables the factory state of your device by erasing all data, settings, bugs, and apps. Your device will be fresh like factory condition after this reset. Worth mentioning here, you’ll lose all the internal data and installed apps after this reset. So, to overcome the Android tablet black screen of death, you must perform this action as the last option. Follow the below steps carefully.
Step 1: Turn off the Nokia 130 Music device. Then press the Volume Up + Power button + home button (or press Volume Up + Power buttonS) altogether and let the mobile boot into recovery mode.
Step 2: After booting up in recovery mode, you can find the “Factory data reset” option. Navigate to that option with the volume up and down arrow and select it with the power button.
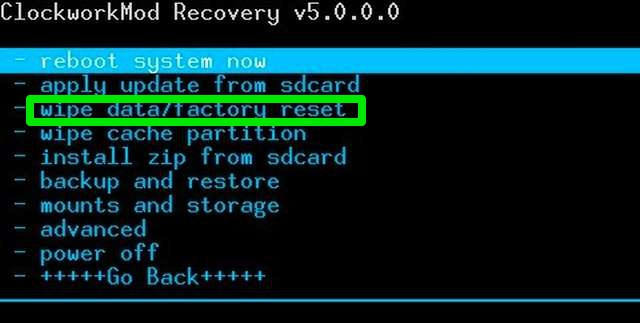
Step 3: In this step, you need to confirm your action by tapping on the “Yes” option. After this, your device will start erasing. This may take a while to complete the whole process.
Now, your device will reboot automatically and you can see the Android black screen of death problem is solved.
Part 4: How to avoid Android black screen of death?
These are the general methods to overcome the situation of Android screen black. But to avoid this situation, here are a few tips to follow –
- Install apps from trusted suppliers only.
- Use security or antivirus software on your device.
- Take a backup at regular intervals.
- Always keep Android OS updated.
- Don’t keep your mobile charged for a long duration after a full charge.
- If your battery gets old, replace it soon.
- Keep your device’s storage well-maintained. Regularly delete unnecessary data.
- Close unused apps running in the background to conserve system resources.
- Prevent phone overheating by avoiding excessive usage, and not exposing it to direct sunlight for extended periods.
By following these steps, you should avoid the most unpleasant situations, such as the Android screen black. We all know that “Prevention is always better than cure”.
The Bottom Line
There could be a lot of reasons why an Android black screen issue occurs, but the important thing is knowing the correct ways how to fix it. And this article has covered nine proven methods to help you fix an Android phone screen black problem.
But among the methods discussed above, Dr.Fone – System Repair just stood out as this program does not only help you with a black screen of death problem, but it covers many other Android system issues too. It’s also a highly intuitive program that requires no skills to operate.
safe & secure
How to Fix Error 495 While Download/Updating Android Apps On Nokia 130 Music
Error 495 is a common error that occurs while downloading or updating apps from Google Play Store. This error is usually caused by a problem with the Google Play Store, and it can be fixed by clearing the cache and data of the Google Play Store app. If you are experiencing this error, follow the steps below to fix it.
In this article, you will learn why the Android error 495 pops up, possible solutions to bypass, as well as a dedicated repair tool to radically fix error 495.
We always like to explore every new feature or the features that already exist on our devices. We have a tendency to be the master of our device and want to know every bit of the handset. Unexpected errors ruin that experience and it is just frustrating to experience these errors. And the worst part is that we have no idea where we are wrong or what we did that led to the error. Same is the case with the error 495 which occurs due to downloading or updating of Android Apps. You may have spent countless hours on the internet to find the right solution for error code 495 but even after following many of the most guaranteed steps sometimes the error still doesn’t go away.
However, this article will provide you various methods to get rid of the Error 495 play store problem that you face and you will not have to depend on any other sources for your solution.
Reasons for Google play error 495
Android Apps are most commonly downloaded from the Google Play Store with the help of Wi-Fi or Cellular Data. One may come across many types of errors. Mostly the errors come in during the download or update or installing time. Error 495 occurs when the user isn’t being able to download or install an app over Wi-Fi, but the user is able to do the same thing over cellular data.
Technically speaking, the issue is caused when the connection to the Google Play servers, where the app is hosted, times out. Which is unable to resolve by itself.
Also, there could be another reason that it cannot sync with the servers.
Now that we know the possible reasons for the error 495, let us also know how to get rid of it in the sections below.
Solution 1: One Click to Fix error 495 by Android Repair
Tried several methods to make the error 495 disappear, but nothing works? Well, many people have experienced the same frustration. The root cause is that something is wrong with the Android system. You need to have your Android system repaired to fix error 495 in this situation.
Note: Having your Android system repaired may lose existing data on your Android. Backup the data on your Android before the Android repair.
Dr.Fone - System Repair (Android)
Best tool for fundamental Android repair in one click
- Fixes all Android system issues like error 495, system UI not working, etc.
- One click for Android repair. No special technics needed.
- Supports all the new Nokia 130 Music devices like Galaxy Note 8, S8, S9, etc.
- Step-by-step on-screen instructions provided to fix error 495 without any hassle.
3,390,486 people have downloaded it
With Dr.Fone - System Repair (Android) , you can easily fix error 495 in few steps. Here is how:
- Download, install, and launch Dr.Fone - System Repair (Android). Connect your Android to your computer with a USB cable.

- Select the option “Repair” > “Android Repair”, and click “Start”.

- Select the Nokia 130 Music device information like brand, name, model, etc., and confirm your selection by typing in “000000”.

- Press the stated keys to boot your Android in download mode to download the firmware as instructed.

- After the firmware is downloaded, the program will automatically start to repair your Android.

Solution 2: Clear the Google Service Framework cache to Fix error 495
Step 1:
Go to the “settings” of your device. Once the series of sections comes up, tap on the “APPS” section.
Step 2:
Click on ‘All Apps’ or ‘Swipe to All’ and the open the section named “Google Services Framework App”
 .
.
STEP 3:
Open “App Details” and the screen shown in the image should come up on your device. As shown in the image, follow the three steps. First, tap on “Force Stop” and then second, tap on the “Clear Data” option and finally go ahead and tap on the “Clear Cache” option.
Following the above steps should solve your problem of Google Play Error 495. And you can enjoy back to using the apps which you couldn’t download or update due to the Error 495.
Solution 3: Reset App Preference in Google play Store to Fix error 495
STEP 1:
Go to the settings section in your device. It will be differently placed for different devices and different users.

STEP 2:
Once the Settings section is open. A lot of further sections will pop up. No find the section named “Application Manager” or “Apps”. After locating it, tap on that section.

STEP 3:
Now go ahead and tap or slide to a section named “ALL”.
STEP 4:
After reaching the “ALL” section tap the touch button to open menu/properties and choose an option named “Reset Apps” or “Reset App Preferences”.
There’s no need to be alarmed because on clicking the reset option, the apps won’t be deleted but it is only going to re-set them. And hence solving the Error 495 created in the Google Play.

Solution 4: Fix Error Code 495 by installing a VPN app
The Error code 495 can be easily removed in another interesting way too. On downloading a Virtual Private Network (VPN) and then operating the play store automatically solves the error 495.
STEP 1:
Install Hideman VPN (using any other VPN will also make it work) from Google Play store. (If the error persists for this app too then download it from a different app store or by using a third-party store).
STEP 2:
Now open the app and select the United States as the country of connection and press the option named Connect.
STEP 3:
Open Google Play Store and Download any app without the Error Code 495 coming in and bothering.
This fix will work for most of the Google Play Errors and not just only The Error Code 495.
Solution 5: Remove your Google Account & Reconfigure it to fix error 495
Removing the Google account and re-configuring it is a very common method adopted to get rid of the Error 495. Adopt the following steps to complete this method.
STEP 1:
Go to the “Settings” section of your device. Like it was mentioned before, different devices and different users will have the placement of the settings section in a different place.

STEP 2:
Go to the accounts section in the settings tab.

STEP 3:
In the accounts section tap on the Google Account part
STEP 4:
Inside The Google section, there’ll be an option called “Remove Account”. Tap on that section, to remove your google account.

STEP 5:
Now go ahead and re-enter/ re-register your Google account and check if the Error 495 still persists.
Now you have completed all the steps and your problem should be solved.
Solution 6: Fix error code 495 by Removing your Google Play Store Data & Cache
One of the best and most accurate methods in the series of various steps in eradicating the Error Code 495 in Google Play Store is by removing the Google play Store Data and Cache. In order to do so follow the steps mentioned below. After following the steps it is guaranteed that the Error code 495 will be done with and you won’t experience any such problems in the future.
STEP 1:
Go to the “Settings” section into your mobile device. The settings can be accessed by scrolling down and pulling down the drop-down menu and most likely the settings app will be on the top-right corner. Otherwise, it will be found after opening the app drawer.

STEP 2:
Once after opening the settings section, select the “Installed apps” or the “Apps” section.

STEP 3:
Find the “Google Play Store” section and select that too.
STEP 4:
Tap on the “Clear data” & “Clear Cache”.

Doing the above steps will clear your caches of the Google Play Store. Now you have a new google Play store.
Hence in this article, we got to know about the error 495 and the possible solutions to it as well. Also, this article explains how Error code 495 can be removed by 5 different ways. These are the best ways by which you can remove or get rid of the Error Code 495. In case one of the method fails, use the other one to rectify this recurring error 495 on your Nokia 130 Music.
11 Ways to Fix it When My Nokia 130 Music Won’t Charge
What would you do if your phone or other device’s battery is draining? You will plug it into a power source. Right? What if you realize that your phone won’t charge? My phone won’t charge, and the Nokia 130 Music tablet won’t charge is a common problem.
Android devices are very prone to this problem, and hence Android device owners complain frequently that My Nokia 130 Music won’t charge even when it is plugged into a power source properly. The reason behind the phone won’t charge, or Nokia 130 Music tablet won’t charge are not very complicated and, therefore, can be dealt with by you sitting at home.
A charging problem can occur due to a temporary software crash. It is also possible that a corrupted device cache may be causing such a glitch. Another reason for phones not to charge normally or charge slowly is an inappropriate power source or defective charging cable and adapter. All these and many more problems will be cured in the 10 solutions to fix My Nokia 130 Music won’t charge error.
So if you’re still thinking about why won’t My Nokia 130 Music charge, read on to find out solutions to fix My Nokia 130 Music won’t charge problem.
Part 1. One-click solution to fix Android phone won’t charge
While you are upset over ‘why My Nokia 130 Music won’t charge?’, would you mind us helping you around?
Well, we have got Dr.Fone - System Repair (Android) at your fingertips to get rid of this annoying phone won’t charge issues (caused by system corruption). Whether the Nokia 130 Music device froze or became unresponsive, bricked, or got stuck on the Nokia 130 Music logo/blue screen of death or apps started crashing. It can fix every Android system problem.
Dr.Fone - System Repair (Android)
Easy-to-operate program to fix Android phone won’t charge
- As it supports all the latest Nokia 130 Music devices, it can even easily fix the Nokia 130 Music tablet won’t charge issue.
- With a single click, you can fix your entire Android system issues.
- The very first tool is available in the market for Android system repair.
- Without any technical knowledge, one can use this software.
- This tool is intuitive with a high success rate.
3981454 people have downloaded it
Note: When you are stressed over ‘why won’t My Nokia 130 Music charge’, we are ready to eliminate the tension and make things easier for you. But, before you start fixing the phone won’t charge the problem, make sure to back up the Android device . This fixing process might wipe out all the Nokia 130 Music device data.
Phase 1: Preparing and connecting the Android device
Step 1: Install and then run Dr.Fone - System Repair (Android), the ultimate Android repair software on your PC. Hit the ‘System Repair’ tab, followed by connecting your Nokia 130 Music.
Step 2: Tap on the ‘Android Repair’ option and then click ‘Start’ for moving ahead.
Step 3: Mention the detailed information about your Nokia 130 Music under the Nokia 130 Music device information section. Press ‘Next’ then on.

Phase 2: Get to ‘Download’ mode for repairing the Nokia 130 Music device
Step 1: It’s essential that you put the Android device under ‘Download’ mode to resolve the phone won’t charge the issue. Here comes how to do –
- With a ‘Home’ button device, switch off it before holding down the set of keys, including ‘Power’, ‘Volume Down’, and ‘Home’ key for 5-10 seconds. Let them go and hit the ‘Volume Up’ key for entering the ‘Download’ mode.
- If the ‘Home’ button is not there, you got to turn down the Nokia 130 Music device and altogether hold down the ‘Volume Down’, ‘Bixby’, and ‘Power’ keys between 5-10 seconds. Soon after you release the keys, tap the ‘Volume Up’ button for entering the ‘Download’ mode.

Step 2: Click ‘Next’ to start downloading the Android firmware.

Step 3: Now, Dr.Fone - System Repair (Android) would verify the firmware and then start repairing the Android system on its own. It will ultimately fix your ‘why won’t My Nokia 130 Music charge’ trouble.

Part 2. 10 common ways to fix Android won’t charge
1. Check/replace charging cable
Charging cables fray or become defunct after prolonged usage. Therefore, it is advised to always use the Nokia 130 Music device’s original charging cable or purchase a good quality charging cord, which doesn’t damage your device or your adapter.
It is also very commonly observed that the charging end of the cable which gets connected to the charging port of the Nokia 130 Music device gets damaged and prevents the current from flowing to the phone/tablet.

2. Check/clean charging port
The charging port in your device is a small opening where the charging end of the cabbie is inserted for the current to flow to the phone/tablet. Very often, we notice that the charging port gets blocked with tiny particles of dirt. The charging port might also get clogged if dirt and dust get accumulated in it, preventing the sensors from receiving and forwarding the current to the Nokia 130 Music device.

The best way to take this problem is to clean the port with a blunt pin or a soft bristle unused toothbrush. Make sure you clean the port gently and do not damage it or its sensors.

3. Check/replace charging adapter
This method is fairly simple, and all you need to do is check whether or not the charging adapter is working properly as sometimes, the adapter itself is to be blamed for the charge. To make sure that you are not using a defective adapter, connect your charging cable/USB to another adapter. If your device charges normally, it means there is a problem is with your adapter, and you must replace it at the earliest to solve My Nokia 130 Music won’t charge the issue.

4. Try another power source
This technique is more like a quick trick. It means to switch from one power source to another or use a more efficient and suitable power source. Laptops and PCs charge slower than a direct power source, i.e., a wall socket. Sometimes, the charging speed is slower, and the battery is draining. In such a scenario, choose to charge your device by directly plugging it into a socket on the wall to never experience My Nokia 130 Music won’t charge problem.
5. Clear device Cache
Clearing Cache is a great technique as it cleans your device and all its partitions. By clearing the cache, all the unwanted data and files stored in your device get deleted, which may be causing glitches in the Nokia 130 Music device’s software, preventing it from recognizing the current.
Follow the steps given below to clear your device’s cache:
• Visit “Settings” and find “Storage”

• Now tap on “Cached Data”.

• Click “OK” to clear all unwanted cache from your device as shown above.
Try charging your phone after clearing the cache. If your phone doesn’t charge even now, do not worry. There are more ways to help you combat My Nokia 130 Music won’t charge problem.
6. Re-start/reboot your phone/tablet
Restarting your device to fix why won’t My Nokia 130 Music charge error is a very effective remedy. This method of rebooting your device not only fixes software glitches but other but also tackles other factors/operations that might be running in the background preventing your device from charging.
Restarting a device is simple and can be done by following the steps given below:
• Long press the power button of your device.
• From the options that appear, click on “Restart”/ “Reboot” as shown in the image below.

To restart your device, you may also press the power button for about 20-25 seconds for the phone/tablet to automatically reboot.
7. Download and install the Ampere App
The Ampere app can be downloaded from the Google Play Store. It is very helpful to fix the why won’t my charge error as it gives you real-time information about your device’s battery consumption, charging status, and other essential data.
If the App gives information in green color, it means all is wetland your device is charging normally, however, if the information before you is in orange, you need to take steps to fix the charging problem.


8. Install software updates
Installing your Android version updates is a good idea as the software is the interface that receives charge from the charging port sensors and gives a command for the phone/tablet to charge. People often continue to use older OS versions, which cause trouble and prevent the Nokia 130 Music device from charging.
To check for and install updates on your device, you must be connected to WiFi or a cellular network. Next, visit “Settings” and select “About device”. Now click on “Software Update”.

If there is an update available, you will be prompted to download it. Just follow the instructions given before you install a brand new Android OS version on your device.
9. Factory reset your device
Factory Reset is must be done after due deliberation. Remember to take a back-up of all your data and contents on the cloud or an external memory device, such as a pen drive before adopting this method because once you perform a factory reset on your device, all media, contents, data and other files are wiped out, including your device settings.
Follow the steps given below to factory reset your device:
• Visit “Settings” by clicking the settings icon as shown below.
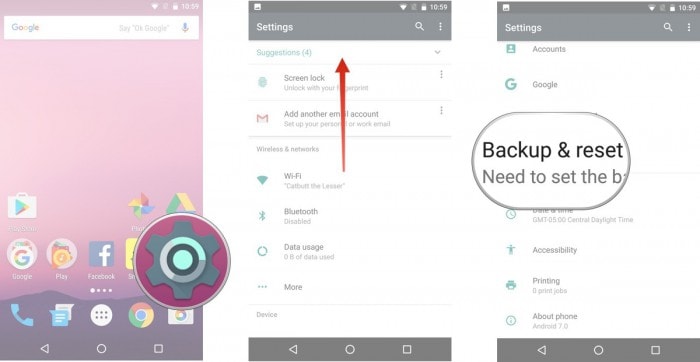
• Now select “Backup and Reset” and move on.
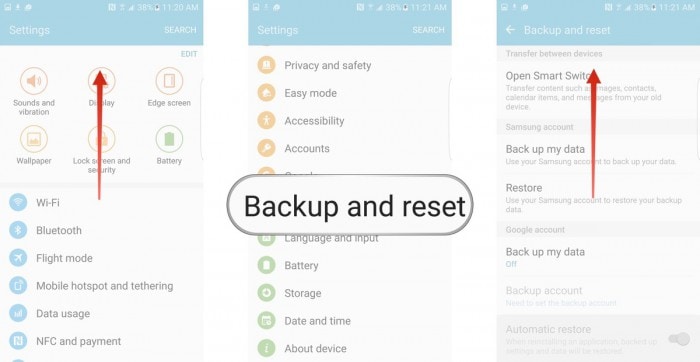
• In this step, select “Factory data reset” and then “Reset Device”.
• Finally, tap on “ERASE EVERYTHING” as shown below to Factory Reset your device.

Note: Once the factory reset process is complete, your device will automatically restart and you will have to set it up once again.
10. Replace your battery
This should be your last resort to fix My Nokia 130 Music won’t charge problem, and you should only attempt to replace your battery if none of the other techniques work. Also, please consult a technician before purchasing and installing a new battery in your device as different phones and tablets have a different type of battery requirements.

Finally, fixing the phone won’t charge the problem is simple, and therefore there is no need for you to worry as you are not the only one experiencing such an issue. Other Android users have tried, tested, and recommended the methods given above to solve why won’t My Nokia 130 Music charge or Nokia 130 Music tablet won’t charge error. So go ahead and try them out now.
Also read:
- [New] 2024 Approved Step-by-Step Shortcut for Easy Mac Screen Recording
- [New] Full Scene Preview A Complete PPro Manual
- 2024 Approved Revolutionize Unboxing on Instagram A Guide to Popularity
- 2024 Approved Seize Your Online Sessions The Ultimate Browser Recording Tools List
- 2024'S Ultimate Guide to Selecting a Superior Netgear Router
- 9 Solutions to Fix Process System Isnt Responding Error on Nubia Red Magic 9 Pro | Dr.fone
- Android Safe Mode - How to Turn off Safe Mode on OnePlus Ace 2 Pro? | Dr.fone
- App Wont Open on Your Oppo F25 Pro 5G? Here Are All Fixes | Dr.fone
- Authentication Error Occurred on Poco X5? Here Are 10 Proven Fixes | Dr.fone
- How to Fix It Tecno Spark 10 Pro Wont Turn On | Dr.fone
- Mastering Your iPhone Gallery: Top 8 Photography Tricks & Error Corrections
- Reasons for Vivo S17e Stuck on Boot Screen and Ways To Fix Them | Dr.fone
- Solved: Troubleshooting Steps for When MultiVersus Won't Start on Your Computer
- Vital Tips: Making an Informed Pre-Owned Tech Decision
- Title: What To Do When Nokia 130 Music Has Black Screen of Death? | Dr.fone
- Author: Ariadne
- Created at : 2024-12-17 00:21:51
- Updated at : 2024-12-24 00:09:58
- Link: https://howto.techidaily.com/what-to-do-when-nokia-130-music-has-black-screen-of-death-drfone-by-drfone-fix-android-problems-fix-android-problems/
- License: This work is licensed under CC BY-NC-SA 4.0.