
Why Does My ZTE Blade A73 5G Keep Turning Off By Itself? 6 Fixes Are Here | Dr.fone
Why Does My ZTE Blade A73 5G Keep Turning Off By Itself? 6 Fixes Are Here
Android users are usually very happy with their smartphones; however, sometimes they do complain about their phones switching off abruptly. This is a weird situation to be in because one moment you are using your phone, and the next moment it suddenly turns itself off, and when you happen to turn it back on, it functions smoothly, but only for a while.
Phones shutting off problem not only disrupts your work but also tests your patience if you are in the middle of executing an important task, playing your favorite game, typing an e-mail/message, or attending a business call, etc.
We often hear Android users ask for solutions for this problem at different forums. If you are one of them and clueless about why My ZTE Blade A73 5G keeps shutting off, here are ways that can help you.
So the next time you ask, “Why does My ZTE Blade A73 5G keep shutting off?”, refer to this article and follow the techniques given hereunder.
Part 1: Possible reasons for phone turning off by itself
We understand your trouble when you ask, “Why does My ZTE Blade A73 5G keep turning off?” thus, here we have four of the possible reasons that might be causing the glitch and help you understand the problem better.
The first one is related to updating the phone’s software or any of the Apps if the download process is interrupted and not duly completed, the phone can act abnormally causing it to switch off at frequent intervals.
Then there are certain Applications that are not supported by the Android software. While using such Apps, the phone may turn off abruptly. This usually happens when you install Apps from unknown sources which are not compatible with Android.
Also, if your battery is low or has become too old, your phone may shut off and not work as smoothly.
Lastly, you can also check if you use a protective cover for your phone. Sometimes, the cover is so tight that it presses the power button continuously turning the phone off.
Now, once you have analyzed the problem, it is easier to move on to the solutions.
Part 2: Check the battery status on Android
If your phone turns off now and then while you are using it and even refuses to start when you press the power button, we suspect that there is a problem with your phone’s battery. Well, Luckily for Android users, there is a test that can be run on the phone to check the battery’s operations and health. Not many users are aware of it, and thus, we have compiled what you need to do the next time you wonder why does My ZTE Blade A73 5G keeps shutting off itself.
First, open the dialer on your ZTE Blade A73 5G shown in the screenshot below.
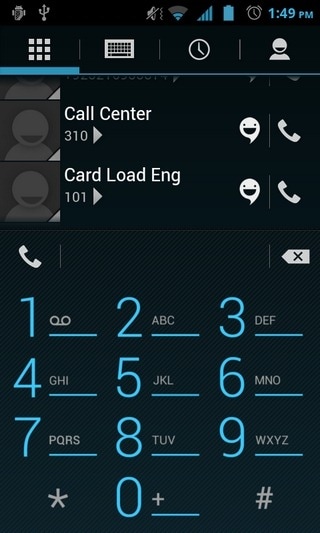
Now dial *#*#4636#*#* just like dialing a usual phone number and wait for the “Battery Info” screen to pop up.
Note: Sometimes, the above-mentioned code may not work. In such cases, try dialing *#*#INFO#*#*. The following screen will appear now.
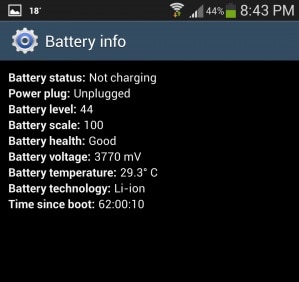
If the battery looks good as you can see in the screenshot above and everything else seems normal, it means that your battery is healthy and need not be replaced. You may now move on to the next step to cure your device.
Part 3: One-click to fix Android phone keeps turning off
We understand how annoying it is to find your ZTE Blade A73 5G turning off randomly on its own. So, when the age-old remedies to fix the phone keeps turning off turns futile, you need to go for a reliable tool like Dr.Fone - System Repair (Android) .
Apart from tackling the Android phone keeps turning off the issue, it can also resolve all Android problems. The issues include system update fail, device stuck on logo, unresponsive, or bricked device with a blue screen of death.
Your trouble with ‘why does My ZTE Blade A73 5G keep shutting off?’ can be resolved easily using Dr.Fone - System Repair (Android). But, before that, you need to ensure that the Android device has been backed up properly to eliminate the risk of data erasing.
![]()
Dr.Fone - System Repair (Android)
Repair Android System Errors without Any Trouble.
- Fix your Android to normal, no skills required.
- Fix various Android system issues, stuck in boot loop , black screen , or won’t turn on , looping on start, etc.
- The high success rate in resolving Android system issues.
- Compatible with a wide range of Android devices and OS versions
- User-friendly interface with easy-to-follow steps.
3981454 people have downloaded it
Below are the steps that help easily fix Android device keeps turning off on its own:
Phase 1: Preparing your ZTE Blade A73 5G and connecting it
Step 1: On your computer, install and launch Dr.Fone. Now, click the ‘System Repair’ button over Dr.Fone window and connect the Android device to your computer.

Step 2: Here, you need to press the ‘Start’ button right after hitting the ‘Android’.

Step 3: Pick your ZTE Blade A73 5G details over the ZTE Blade A73 5G device information interface. Click the ‘Next’ button afterward.

Phase 2: Enter ‘Download’ mode to repair and resolve ‘why does My ZTE Blade A73 5G keep turning off’
Step 1: On your ZTE Blade A73 5G, go to ‘Download’ mode following the instructions.
For a device with the ‘Home’ button – Turn off the mobile and then hold down the ‘Home’, ’Volume Down’, and ’Power’ buttons together nearly for 10 seconds. Leave them all and then click the ‘Volume Up’ button to get into the ‘Download’ mode.

For a device lacking ‘Home’ button – After switching off the Android mobile, hold down ‘Bixby’, ‘Power’, ‘Volume Down’ key still 10 seconds. Now, un-hold them and tap the ‘Volume Up’ button to enter the ‘Download’ mode.

Step 2: Hitting the ‘Next’ button will start the Android firmware download.

Step 3: Now, Dr.Fone - System Repair (Android) will verify the firmware once downloaded. Within some time the Android system gets repaired.

 safe & secure
Part 4: Update software to the latest version to fix Android phone keeps turning off
Software glitches or outdated operating systems can trigger automatic shutdowns on Android phones. Updating your ZTE Blade A73 5G’s software version can be an effective solution to fix the issue of the phone repeatedly turning off. Regular software updates provided by the phone manufacturer often include bug fixes, performance improvements, and security patches. These updates can address underlying problems that may be causing the random shutdowns, ensuring a more stable and reliable phone performance.
To update the software on your ZTE Blade A73 5G, follow these steps:
Go to “Settings” on your ZTE Blade A73 5G and navigate to the “System” or “Software Update” section (the exact wording may vary depending on your device model and Android version). Look for the option to “Check for updates” to see if any new software updates are available.

Part 5: Cool down your phone to avoid your phone keeps turning off
When a phone overheats, it can trigger an automatic shutdown as a protective mechanism to prevent damage to the ZTE Blade A73 5G device’s internal components. Overheating occurs when the phone’s internal temperature rises significantly, typically due to excessive heat generated by the processor and other hardware components during intensive tasks or prolonged usage.
To prevent the phone from turning off due to overheating, you can take various measures, such as limiting intensive usage, avoiding direct sunlight and hot environments, and using the phone on hard surfaces to aid heat dissipation.

Part 6: Narrow down the randomly turning off issue in Safe Mode
Starting your phone in Safe Mode is a good way to narrow down whether or not the problem is occurring because of some heavy and incompatible Apps as Safe Mode allows only built-in Apps to function. If you can use your phone in Safe Mode, consider deleting the unnecessary Apps which may be burdening the phone’s processor.
To boot into Safe Mode:
Long press the power button to see the following options on the screen.
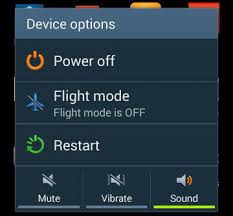
Now tap on “Power Off” for about 10 seconds and click “OK” on the message that pops-up as shown below.
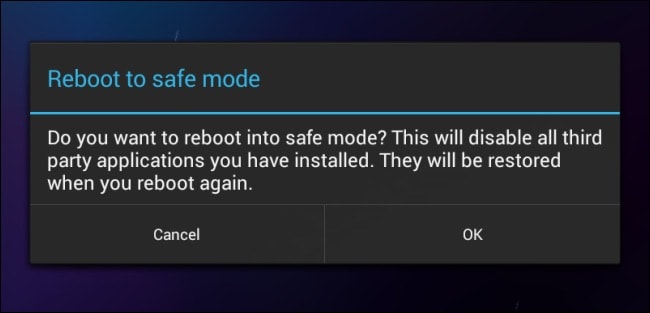
Once done, the phone will reboot and you will see “Safe Mode” on the main screen.
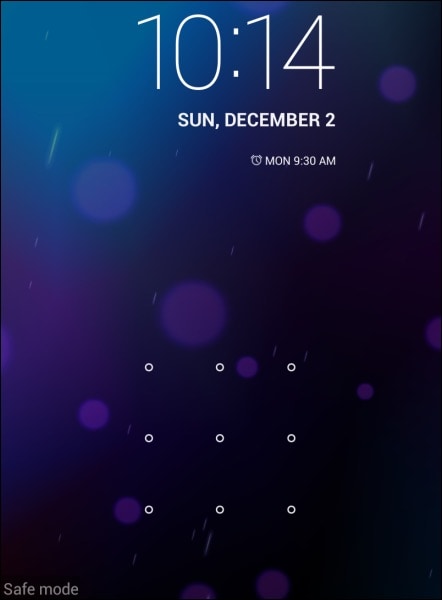
That’s all. Well, booting to Safe Mode is easy and it also helps you to identify the real problem.
Part 7: Back up your data and perform a factory reset
Note: You must take a back-up of all your data because once you perform a factory reset on your device, all media, contents, data, and other files are wiped out, including your device settings.
Wondershare Dr.Fone is a great way to back up all your data to prevent it from getting lost after resetting the phone. It works brilliantly as it backs up all data and allows users to retrieve it fully or selectively. You can backup all files from your Android to PC in just a click and restore them later. Try this software for free before purchasing it to understand it’s working better. It does not tamper with your data and only requires you to follow the simple steps given below to backup your Android data:
Wondershare Dr.Fone
Flexibly Back up and Restore Android Data
- Back up Android data to the computer with one click.
- Preview and selectively restore the backup to any Android device.
- Supports 8000+ Android devices.
- There is no data lost during backup, export, or restoration.
3,981,454 people have downloaded it
To start with, download and run the backup software on the PC.
Once you have the main screen of the software with multiple options that will appear before you, choose the “My Backup” option.
Now connect the Android phone to the PC and make sure that USB debugging is turned on. Then hit “Back Up Now” and wait for the next screen to open.

You will see the file types that will be backed up. Wait for the backup process to complete.

There you go, you have successfully backed up data.

safe & secure
Now moving on to factory reset your phone:
Simply visit “Settings” on your ZTE Blade A73 5G by clicking the settings icon as shown below.
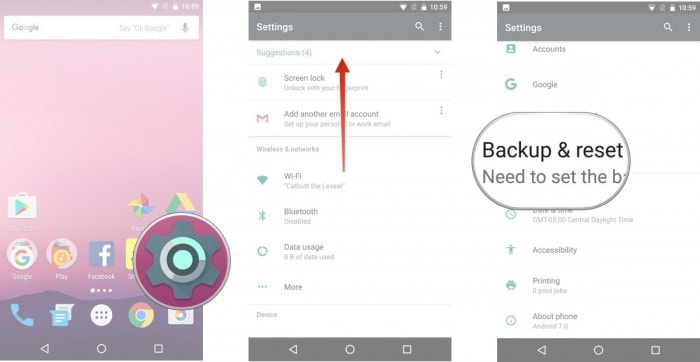
And then select the “Backup and Reset” option.
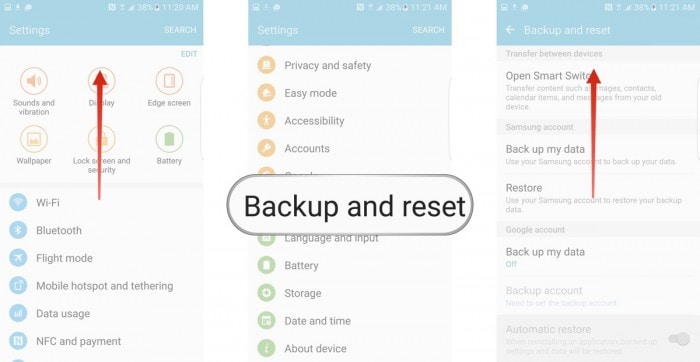
Once selected, tap on “Factory data reset” and then “reset device” as shown in the picture below.
Finally, tap on “ERASE EVERYTHING” as shown below to Factory Reset your device.
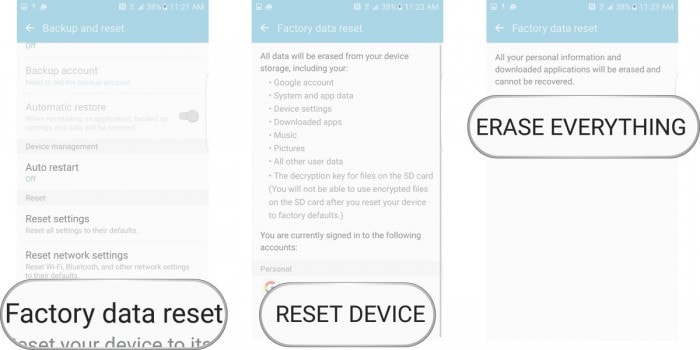
Note: Once the factory reset process is complete, your device will automatically restart and you will have to set it up once again. You can restore the backup data on your ZTE Blade A73 5G once you factory reset it, again using the Dr.Fone toolkit.
Now for all those of you who are wondering why does My ZTE Blade A73 5G keeps turning off by itself, please understand that the reasons behind the problem are simple, and so are its fixes. All you need to do is examine the problem carefully and move on to the fixes given in this article. Dr.Fone toolkit Android Data Backup & Restore feature provides an excellent platform for you to store all your data safely on your PC and retrieve it whenever you like so that you can go ahead to solve the error yourself without stressing about data loss.“Why does My ZTE Blade A73 5G keep shutting off?” might be common questions but can be dealt with ease if you follow the methods explained above.
So, do not hold back, go ahead, and try these tricks. They have helped many and will be useful for you too.
safe & secure
Fix App Not Available in Your Country Play Store Problem on ZTE Blade A73 5G
Mobile applications are important for smooth operations when it comes to smartphones. They offer convenience, entertainment, and functionality at your fingertips. However, encountering the “App Not Available in Your Country Play Store“ issue can be frustrating. It can quickly dampen the excitement of discovering a new app.
This is mainly due to geographical restrictions that are often imposed by developers. It poses a hurdle for users eager to access a particular application. However, there is no need to worry, as this article will help you in resolving this issue. It will delve into effective strategies and solutions to ensure the unavailability of an app is no longer an obstacle.
Part 1: Reasons Behind the App Not Available in Your Country Play Store Issue
Encountering the “Google Play App Not Available in Your Country“ issue can feel like hitting a roadblock. This restriction hampers your ability to explore and use valuable apps. It can also disrupt the smooth functioning of your daily digital activities. Before going for solutions, it is crucial to understand the reasons causing this restriction in installing apps on smartphones:
1. Regional Restrictions
One of the primary culprits behind this issue is the regional restrictions imposed by developers. Developers often roll out their apps gradually across different regions. It is done to adhere to legal and licensing requirements. This staggered release strategy ensures compliance with local laws. Moreover, it guarantees a smooth user experience tailored to specific geographical locations.
2. Licensing and Legal Constraints
Licensing agreements and legal constraints play an important role when it comes to the accessibility of apps. Developers may encounter licensing issues. This can prevent them from offering their apps in certain regions. It is due to copyright, trademark, or other legal considerations. Navigating the complex web of international laws and agreements is a big hassle. It becomes a determining factor in the availability of apps on the Play Store.
3. Localization Challenges
Apps are often designed with specific markets in mind. These incorporate language, cultural, and regulatory considerations to enhance user experience. The absence of proper localization can render an app incompatible with specific regions. It includes factors such as adapting the app for different languages, currencies, and cultural nuances. This can result in the app being excluded from the Play Store app not available in your country.
4. Device and OS Compatibility
The compatibility between the app, the user’s device, and its OS is another factor that contributes to this issue. Developers might restrict their app availability to certain devices or OS versions. It can restrict access for users whose devices or OS do not meet the app’s requirements. This technical limitation adds another layer to the complexity of app availability.
5. Political and Economic Factors
In some instances, political tensions or economic considerations can also be a factor. It may influence the accessibility of apps in certain countries. Geo-political factors, trade sanctions, or economic conditions can impact the distribution of apps. This leads developers to exclude specific regions from their app’s availability.
Part 2: 4 Tested Methods To Fix Google Play App Not Available in Your Country
The right app can make a major difference in work efficiency or personal enjoyment. That’s why facing the “Play Store app not available in your country“ issue can be frustrating. The positive aspect is that many solutions exist for addressing this issue. Presented below are the top 4 approaches to resolving this matter:
Method 1: Change Your Google Play Store Country
One of the most direct ways to address this issue is by manually adjusting your Google Play Store country settings. Google allows users to change their country or region. Remember that you can only do it once a year. To utilize this approach, it’s essential to reside in the specified country. The other option is to provide a payment method originating from that particular region. Below is a detailed walkthrough for this procedure:
- Step 1. Launch the Google Play Store on your ZTE Blade A73 5G and tap the “Profile” icon from the top right corner. Here, choose “Settings” and follow on to tap “General.”
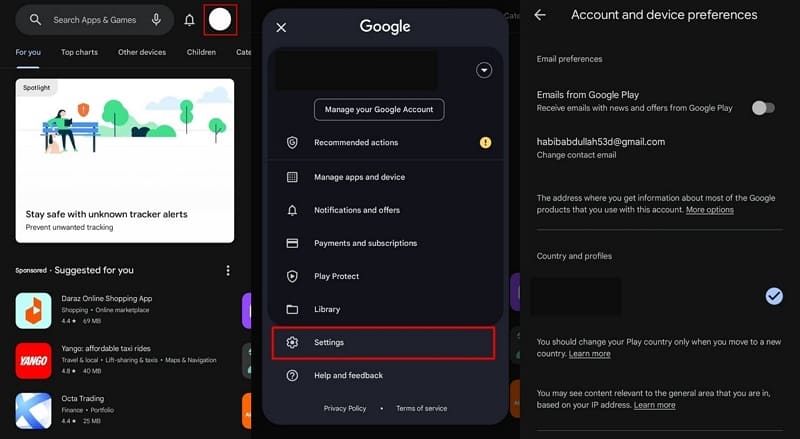
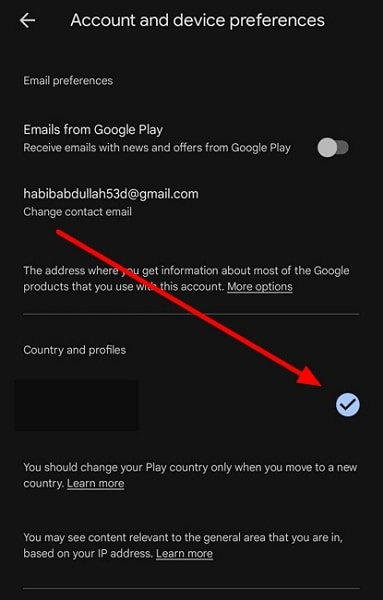
- Step 2. Within the “General” tab, move towards “Account and device preferences” and tap it. There, select “Country and profiles” and tap the country to change it. Now, follow the on-screen prompts to complete the procedure.
Method 2: Use a Reliable VPN
Confronting the message “This app is not accessible in your country” on the Play Store? Employing a Virtual Private Network (VPN) can be an effective strategy. It allows you to virtually transcend geographical restrictions. A VPN masks your actual location by routing your internet connection through servers in different regions.
You can utilize a reliable VPN to access the Play Store as though you were in a region where the desired app is accessible. Follow this step-by-step guide to address this concern:
- Step 1. Access the Google Play Store and download a reliable VPN for the procedure. Open the VPN you download and connect to the country of your choice. Once you have connected your device’s IP to another country using the VPN, continue to your home screen.

- Step 2. Look for Google Play Store on the home screen and long-press to open a menu. From the pop-up menu, choose “App Info,” and on the following screen, tap “Clear data.” Now, press “Clear cache” to wipe the cache.

- Step 3: Go back to the “App info” screen and press “Force Stop” to force close the app. Afterward, relaunch the Play Store and access your targeted apps.

Method 3: Download an APK File
One way to resolve the issue at hand is to sideload the app by downloading its APK file. It can be a viable and direct solution where other methods fail. This method involves installing the application manually, bypassing the Google Play Store. Follow these sequential instructions to download and install an APK file:
- Step 1. Before starting, ensure that you have enabled the installation from unknown sources. Afterward, find a reliable website and search for your targeted apps.
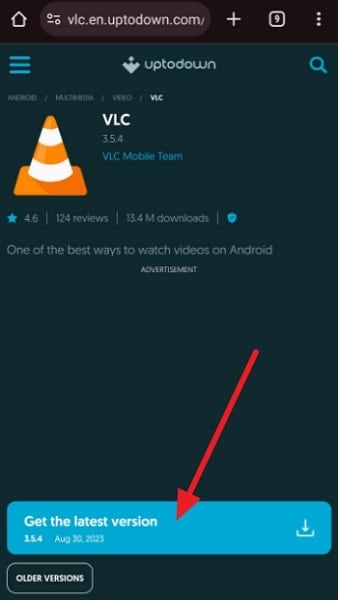
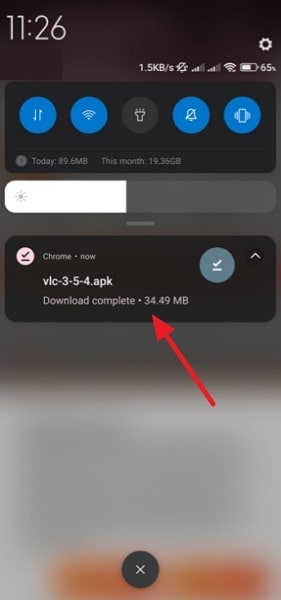
- Step 2. Once you have found the targeted app, download it on your ZTE Blade A73 5G. When the download process is complete, tap the file to start the installation process.
Method 4: Try a Third-Party App Store
Google Play Store isn’t the only apps and games store. There exist many options, and exploring them can help you find the apps you are looking for. Typically, third-party app marketplaces are not bound by geographical limitations. Here’s a guide on acquiring an app from a third-party store:
- Step 1. Use a web browser on your ZTE Blade A73 5G to look for a reliable third-party app store like Aptoide. Once it is downloaded, install it on your smartphone.

- Step 2. Open the third-party app store and look for your targeted apps. Now, you should be able to download them without any restrictions.
Pro Tip: Fix Play Store Available in Your Country but Not Working on All Android Smartphones
If the Play Store is not working on your ZTE Blade A73 5Gs or an application is not downloading from it, we have a tip for you. Wondershare Dr.Fone – System Repair (Android) is a perfect solution for all the issues for your ZTE Blade A73 5Gs. Whether it is the Play Store functionality issue or the downloading of applications problem, System Repair (Android) is there to resolve them.
It fixes various Android issues in a matter of a few seconds. This toolkit has a high success rate of fixing Android issues, including the Play Store Not Working issue. It can also resolve the issue of Apps Keep Crashing, Phone Stuck in a Boot Loop, and much more.
Key Features of Wondershare Dr.Fone
There are some prevalent pointers you should know about Wondershare Dr.Fone. Before you continue using the tool for resolving Android problems, look into these prominent features:
- System Repair (Android) tool is used to fix other issues, too, like the black screen of death in Android.
- This software is compatible with all the ZTE Blade A73 5G models, including the latest one, ZTE Blade A73 5G S23.
- With no technical expertise required, you can execute all tasks to repair your Android issues with a few clicks.
![]()
Dr.Fone - System Repair (Android)
Repair Android System Errors without Any Trouble.
- Fix your Android to normal, no skills required.
- Fix various Android system issues, stuck in boot loop , black screen , or won’t turn on , looping on start, etc.
- The high success rate in resolving Android system issues.
- Compatible with a wide range of Android devices and OS versions
- User-friendly interface with easy-to-follow steps.
3981454 people have downloaded it
Steps Included To Fix Play Store Not Working on All Android Smartphones
While you have learned much about Wondershare Dr.Fone, in situations where an app is available but the Play Store is not working properly, it comes pretty handy. Here is how you can fix the Play Store not working problem on Android devices with Dr.Fone:
- Step 1: Activate Dr.Fone – System Repair Tool
At first, you will have to run Wondershare Dr.Fone - System Repair (Android) on your system and head towards the “System Repair” section from the “Toolbox.” Next, click on the “Android” device to continue, and hit the “Start” button to start the repair process.
- Step 2: Put Android Phone on Download Mode
On the next window, you need to enter the ZTE Blade A73 5G device details, including the “Name, Model, Country, and Carrier,” and hit the “Next” button. Then, proceed to put your ZTE Blade A73 5G on the “Download Mode” by following the on-screen instructions.
- Step 3: Confirm the Installation and Conclude the Process
Once the phone has been put in the Download Mode, the firmware will download automatically. Install it on your device by selecting the “Fix Now” icon. Now, enter the “Code” and confirm installation, after which hit the “Done” button once the process concludes.
safe & secure
3,289,252 people have downloaded it
Frequently Asked Questions
- How do we resolve the inability to change the Play Store country problem?
If you are unable to change your Play Store country, ensure that your Google Play Store account has no pending transactions. Verify that the payment methods associated with your Google account are valid. Clear the cache and data of the Google Play Store app in your device settings to reset any potential issues.
- Can you use the Google Play Store balance after changing the country?
Your Google Play Balance is linked to the country setting on your Google Play account. If you possess a Google Play balance and decide to switch countries, the balance becomes unusable in the new location. Changing countries on your account results in the inability to access or utilize the existing balance.
- Is it safe to download Android applications from a third-party store?
It is risky to download Android applications from a third-party store because of the viral content. There could be issues like App Authenticity, Outdated Apps, Policy Violations, etc. It is better to download these apps from official platforms like Google Play Store since they are more secure.
Conclusion
To summarize, the pursuit of the perfect app sometimes encounters hurdles. One frustrating issue often reported by users is the “App Not Available in Your Country Play Store“ issue. However, armed with the knowledge, you can now navigate through these challenges. From changing your Play Store country to using VPNs, this guide has covered a range of methods. Each method provides a unique approach, catering to different preferences and circumstances.
As a parting recommendation, we introduce Wondershare Dr.Fone. It is a powerful tool designed to tackle Play Store malfunctions head-on. With support for even Android 13, this software offers a complete solution for Android. Its comprehensive approach and easy-to-use interface make it a valuable addition to your toolkit.
Full Guide: How To Fix Connection Is Not Private on ZTE Blade A73 5G
Are you encountering the “your connection is not private” issue on your phone? We found many Android users have increasingly expressed their frustrations with this recurring problem while browsing on the internet.
Usually, you can just reload the page to fix the error. But in case it doesn’t help, you may need to look for more advanced solutions. In the following discussion, we will delve into why this “your connection is not private” on Android happens and explore solutions that work for you.
Part 1: Addressing Your Connection Is Not Private on Android
First of all, what does “your connection is not private” on Android mean? To answer this question, it’s essential to understand that this error is often associated with Secure Socket Layer (SSL) protocol issues.
SSL is a cryptographic protocol created to establish a secure communication channel over the internet. Its primary purpose is to ensure the confidentiality and integrity of data exchanged between a user’s device and a website’s server.
The error message appears when there’s a problem with the SSL/TLS (Transport Layer Security) certificate of the website you are trying to access. This certificate is a digital document that authenticates the website and encrypts the data transmitted between the user’s device and the server.

Some common factors that could trigger the “your connection is not private” on Chrome Android error:
- Expired or invalid SSL certificate of the website;
Certificates are issued for a specific period, and if the website owner fails to renew it in time, your browser will detect it as not secure.
- There is a mismatch between the domain on the certificate and the actual domain you are trying to visit;
This discrepancy might occur due to a misconfiguration on the website or, in some cases, due to a man-in-the-middle attack where a third party intercepts the communication between your device and the server.
- No HTTPS enforcement;
Another reason for the issue is if the installed SSL certificate doesn’t turn on the “force HTTPS” option. This means visitors might be using the non-secure HTTP version of the site instead of the safe URL.
So, the error serves as a warning to users, indicating that the connection may not be secure and sensitive information could be at risk.
Browsers, including those on Android devices, prioritize user safety and privacy. They will block access to potentially compromised websites to prevent data theft or unauthorized access. That’s why when you get the “your connection is not private” message on Android, you can’t access the website.
Part 2: What The Error Codes in “Your Connection Is Not Private” Mean
When “your connection is not private” on Chrome Android error shows up, it often comes along with specific error codes that can indicate the root cause of the issue. Understanding these error codes is crucial for troubleshooting and resolving the problem effectively.
- ERR_CERT_SYMANTEC_LEGACY: Unsupported Symantec-issued certificate
This error code indicates that the website you are attempting to access is equipped with an unsupported Symantec-issued certificate. Symantec, a prominent Certificate Authority, had faced concerns about the security of its certificate issuance processes.
As a result, major browsers, including Google Chrome, no longer support certificates issued by Symantec. If you encounter this error, it implies that the website’s SSL certificate is outdated and needs to be updated with a certificate from a trusted Certificate Authority.
- NET::ERR_CERT_AUTHORITY_INVALID: Unauthenticated SSL certificate
The presence of this error code suggests that the SSL certificate of the website cannot be authenticated by your browser. This could occur if the certificate is self-signed or issued by an unrecognized Certificate Authority.
- NET::ERR_CERT_DATE_INVALID: Date and time mismatch
This error code points to a discrepancy between your ZTE Blade A73 5G’s date and time settings and the information on the website’s SSL certificate, as they have expiration dates. If the date and time settings on your device are incorrect, it may prevent the certificate from being validated. Correcting your device’s date and time settings should resolve this issue.
- SSL certificate error: Generic or unspecified problem
This is a more generic error message that indicates a problem with the website’s SSL certificate without specifying the exact nature of the issue. It could indicate various issues, such as an expired certificate, a misconfiguration in the certificate chain, or other SSL-related problems.
Part 3: How To Fix Your Connection Is Not Private on Android
Encountering the “your connection is not private” error on Android can be a frustrating experience. Fortunately, there are various methods to address and fix this issue, depending on its underlying cause.
In this section, we will explore some effective solutions to help you regain a secure and private connection.
Method 1: Clear your cache
When you use the internet, web browsers store information about your online activities in cached data and cookies to speed things up. However, having too much of this data can cause problems instead. It might even stop your browser from connecting securely.
So, clearing your browser cache and data can be a quick and simple “your connection is not private” Android fix. Follow the steps here:
- Step 1: Open and launch Chrome.
- Step 2: Access the Menu (the three dots button) to open the Settings. Select Privacy and Security > Clear Browsing Data.
- Step 3: Opt for the “All Time” option and click “Clear Data” to erase your cache.

After successfully clearing your browser cache and data, revisit the website to check if the problem persists.
Method 2: Repair the Android system
Addressing the “your connection is not private” to fix on Android involves examining both the ZTE Blade A73 5G device and the website. If clearing browser data doesn’t help, there might be an issue with your Android system. One solution is to use the Wondershare Dr.Fone system repair tool to fix the issues safely.
How to perform system repair with Dr.Fone:
- Step 1. Open the Repair Tool
Start by launching Wondershare Dr.Fone on your computer. Go to the Toolbox section and connect your ZTE Blade A73 5G. Choose System Repair and pick Android as your device type.
safe & secure
4,322,863 people have downloaded it
- Step 2. Begin Repair
Click Start on the new screen to kick off the repair. Since you’re dealing with a connection private issue on Android, select System Damage.
- Step 3. Fill in the ZTE Blade A73 5G device Details
The platform will detect your ZTE Blade A73 5G’s brand. Confirm the Name, Model, Country, and Carrier. If your device is unlocked, choose OPEN in the Carrier section. Agree to the warning, click Next, and proceed with the repair.
- Step 4. Activate Download Mode
Follow the instructions to put your ZTE Blade A73 5G into Download Mode. Once in Download Mode, you will start downloading the firmware.
- Step 5. Confirm Installation
Remember, the repair may erase data. It’s advisable to back up your data first before starting the repair. Enter “000000” to confirm the repair process, shown by a progress bar.

When done, click Done if your Android starts properly. If not, click Try Again to repeat the process.
Method 3: Check and fix the date and time on your Android
Since the error code “NET::ERR_CERT_DATE_INVALID” indicates a mismatch between the date and time on your device and your browser, you need to adjust the date and time settings on your Android to fix it.
The specific steps can vary based on your Android model, but the general approach involves locating the “date and time” settings on your phone. How to fix the date and time on Android to bypass “your connection is not private” on Chrome Android:
- Step 1: Go to your ZTE Blade A73 5G’s Settings > Date & Time.
- Step 2: Switch on the “Automatic Date & Time” to sync with the network-provided time.

Method 4: Perform factory reset
If nothing else works, there might be malware on your phone causing trouble. It’s crucial to eliminate this threat before further damage occurs. The recommended action is to perform a factory reset on your phone.
However, keep in mind that this process can result in data loss, so it’s essential to back up your data beforehand. Follow the steps to perform a factory reset on Android:
- Step 1: Go to your Android Settings.
- Step 2: Select Backup and Reset > Factory data reset. Then, opt to erase all data.

Most of the time, you won’t need to go to the extreme of a factory reset. The simpler solutions mentioned earlier should take care of the Security Certificate Error on your Android.
Conclusion
By now, you should have a good grasp of the “Your Connection Is Not Private” problem on Android. This issue typically arises from complications with the SSL certificate of the website, designed to ensure a secure connection.
When you see the error message, it often comes with specific codes that indicate the underlying problem. Several methods can be employed to fix the “Your Connection Is Not Private” on Android. Clearing the browser cache, repairing the Android system using tools like Dr.Fone, checking and fixing date and time settings, and performing a factory reset as a last resort are among the solutions.
By prioritizing user safety and following the step-by-step approach in this guide, you can navigate and resolve this common internet browsing challenge on your ZTE Blade A73 5Gs.
Also read:
- [New] 2024 Approved The Ultimate iPhone & iPad Podcast Recording Manual For Interviews
- [New] Assessing Negative Impacts of VR
- 4 Ways to Fix Android Blue Screen of Death On Samsung Galaxy M34 5G | Dr.fone
- 9 Quick Fixes to Unfortunately TouchWiz has stopped Of Vivo Y56 5G | Dr.fone
- Bricked Your Vivo Y100A? Heres A Full Solution | Dr.fone
- Fix the Error of Unfortunately the Process.com.android.phone Has Stopped on Realme Narzo 60 5G | Dr.fone
- Gmail Not Working on Nubia Red Magic 9 Pro 7 Common Problems & Fixes | Dr.fone
- How to Intercept Text Messages on Apple iPhone 7 Plus | Dr.fone
- How to Track Honor Magic 5 Location by Number | Dr.fone
- In 2024, Snicker Shelf Premium Collection of Gratuitous Gags
- Learn Key French Welcomes: Perfect 'Salut' And More
- Super Easy Ways To Deal with Nokia C22 Unresponsive Screen | Dr.fone
- The Art of Lyric Videos Using Lyric Video Maker Software
- Top 4 Android System Repair Software for Xiaomi Redmi Note 12 5G Bricked Devices | Dr.fone
- Troubleshooting Guide How to Fix an Unresponsive Xiaomi Redmi Note 12 Pro 4G Screen | Dr.fone
- Updated 2024 Approved How to Fade in and Fade Out Audio in iMovie?
- Upgrade to the Best ASUS Audio Driver Pack - Free Download
- Title: Why Does My ZTE Blade A73 5G Keep Turning Off By Itself? 6 Fixes Are Here | Dr.fone
- Author: Ariadne
- Created at : 2024-12-04 21:24:59
- Updated at : 2024-12-08 21:00:50
- Link: https://howto.techidaily.com/why-does-my-zte-blade-a73-5g-keep-turning-off-by-itself-6-fixes-are-here-drfone-by-drfone-fix-android-problems-fix-android-problems/
- License: This work is licensed under CC BY-NC-SA 4.0.