
Why Is My Nokia C110 Offline? Troubleshooting Guide | Dr.fone
Why Is My Nokia C110 Offline? Troubleshooting Guide
Ever had your Nokia C110 claim it’s offline, leaving you scratching your head about where it went wrong? We get it; it’s confusing. That’s why this article is here to untangle the mystery.
In the following sections, we’re diving into the “why is My Nokia C110 offline” dilemma that many Android users face. We’ll break down the possible reasons behind this common issue and guide you through simple steps on how to fix it. By the end of the article, you’ll be able to get back to smooth internet surfing on your Nokia C110. Let’s get started.
Part 1: Why Does My Nokia C110 Say Offline?
When you encounter the “offline” error message, it can disrupt your usual smartphone activities. Suddenly, you find yourself unable to browse the internet, send or receive emails, or stay connected through instant messages.
It’s a frustrating scenario, but let’s break down the potential reasons why your phone might be displaying this offline status:
- Enabling Airplane mode
Why is My Nokia C110 showing offline? Well, one common culprit behind the “offline” message is the accidental activation of Airplane Mode on your Nokia C110. When Airplane Mode is enabled, it disconnects your phone from all wireless networks, rendering it unable to connect to the internet or cellular networks.
- Internet connection issues
Fluctuations in your signal strength or unexpected data loss can also be the culprit behind the “Why is My Nokia C110 offline?” problem. Android devices rely on stable internet connections, and disruptions, whether temporary or prolonged, can lead to this error.
- Glitches or bugs
Sometimes, glitches or bugs in Google apps installed on your Nokia C110 can mislead it into thinking it’s offline. Google Play Services or other related applications may encounter issues, causing the phone to display an “offline” message.
- Firewall restrictions
In some cases, a firewall on your Nokia C110 might be overly restrictive, preventing the Nokia C110 device from establishing a connection to the internet. This security measure, intended to protect your device, can sometimes go overboard and disrupt normal online functionality.
Now, you have understood the potential causes as the first step toward resolving the issue. Next, we’ll guide you through the process of troubleshooting and getting your Nokia C110 back online.

Part 2: How To Fix “Phone Offline” With Internet Connection Problem
Now that we’ve figured out why your phone says it’s offline, let’s tackle the issue head-on. If you’re facing problems like downloads that won’t start, Google Play stuck on “Loading…,” or web pages refusing to load, chances are it’s an internet connection issue causing the problem.
Here are some easy solutions to get your connection back.
Solution 1: Change connection to mobile data
Switching to mobile data can be a quick fix if your Wi-Fi is acting up. It ensures a change in your connection source and might resolve the “Phone offline” issue. Follow these easy steps to change your connection to mobile data:
- Step 1: Swipe down from the top of your screen to access the Quick Settings menu.
- Step 2: Tap the Wi-Fi icon to turn off the Wi-Fi connection.
- Step 3: Tap Mobile Data to turn it on.

Solution 2: On and off Airplane mode
Airplane Mode can sometimes cause connectivity confusion. Turning it off and on essentially resets your phone’s wireless connections, which might resolve the offline issue.
How to on and off Airplane mode on Android:
- Step 1: Swipe down from the top of your screen to access the Quick Settings menu.
- Step 2: Look for the Airplane Mode icon and tap the icon to turn on Airplane Mode.
- Step 3: Wait a few seconds, then tap it again to turn off the Airplane Mode. Now, check if your phone is now online.

Solution 3: Reset network settings
Resetting network settings can help eliminate any configuration glitches that might be causing the phone offline problem. It’s like giving your phone’s connection settings a fresh start.
To reset your network settings, the steps may differ depending on the phone model you are using. However, you can generally do so by looking for the “Network” settings.
- Step 1: Open your phone’s Settings > Connection & sharing.
- Step 2: Find and select “Reset Wi-Fi, mobile networks, and Bluetooth.”
- Step 3: Tap “Reset Settings” and confirm the action and allow your phone to reset.
- Step 4: Reconnect to your Wi-Fi and check if the issue persists.

Solution 4: Restart your Wi-Fi router
Sometimes, the problem might not be with your phone but rather with the Wi-Fi router. Restarting it can refresh the connection and potentially resolve the connectivity problem.
How to restart your Wi-Fi router:
- Step 1: Locate your Wi-Fi router.
- Step 2: Turn off the router using the power button or unplug it.
- Step 3: Wait for about 10–15 seconds before plugging the router back in or turning it on.
- Step 4: Allow the router to restart and establish a connection. Then, check if your phone still shows the “Phone Offline” message.
These solutions should cover the most common connectivity issues. If the problem persists, we’ll explore further steps in the following sections.
Part 3: How To Fix “Phone Offline” Despite Having an Internet Connection
Ever found it odd to receive the frustrating offline error message when you’re sure your internet connection is up and running? If you’ve double-checked your internet connection and your phone still says it’s offline, the issue may lie within your browser, apps, or device settings.
In this part, we’ll answer the question “**Why does My Nokia C110 say offline android?**” despite a seemingly functional internet connection. Then, let’s see other solutions on how to get your device back to its online, fully functional self.
Solution 1: Clear Google Chrome’s cache and data
Sometimes, the answer to “Why is my Android phone offline” can be attributed to a buildup of corrupted or outdated data in your browser’s cache. Clearing the cache and data for Google Chrome can resolve this issue, allowing for a fresh start and potentially eliminating the offline status.
How to clear your browser’s cache and data on Android:
- Step 1: Open the Settings > Apps > Manage Apps.
- Step 2: Locate and tap “Google Chrome” or your preferred browser in the list of installed apps.
- Step 3: Tap “Storage” and select “Clear Cache” to remove temporary files.
- Step 4: Choose “Clear Data” to delete app data. Confirm the action if prompted.
Now, restart Google Chrome and check if the offline error persists.

Solution 2: Re-install Google Chrome
If clearing the cache and data didn’t solve the offline issue, reinstalling Google Chrome can be the next step. A fresh installation can eliminate any underlying glitches or corrupted files that might be causing the persistent offline status.
How to re-install Google Chrome:
- Step 1: Visit the Google Play Store and search for Google Chrome.
- Step 2: Tap “Uninstall” to remove the app from your device.
- Step 3: Wait until it has finished uninstalling your app. Then, tap “Install” to start reinstalling the app.
- Step 4: Once the installation is complete, open Google Chrome and check if the offline error persists while browsing.

Solution 3: Repair the system to fix the phone showing offline
When persistent offline issues seem deeply rooted in your device’s system, a comprehensive system repair may be the solution. Wondershare Dr. Fone’s system repair tool is designed to address a range of system problems, providing a reliable way to fix any problem you have with your phone.
With Dr. Fone’s system repair tool, you can diagnose and resolve “Why is My Nokia C110 offline on Android,” ensuring a smooth and functional Android experience.
Key Features:
- Comprehensive system repair for any devices
- User-friendly interface
- Efficient problem diagnosis
How to use Dr. Fone’s system repair tool:
- Step 1: Open Dr.Fone’s system repair tool
Start by launching Wondershare Dr.Fone on your computer. Go to the Toolbox section and connect your Nokia C110. Choose System Repair and pick Android as your device type.

 safe & secure
3,189,324 people have downloaded it
- Step 2: Start the repair
Click Start on the new screen to kick off the repair. Since you’re dealing with an offline connection issue on Android, select System Damage.

- Step 3: Confirm your device details
The platform will detect your Nokia C110’s brand. Confirm the Name, Model, Country, and Carrier. If your device is unlocked, choose OPEN in the Carrier section. Agree to the warning, click Next, and proceed with the repair.

- Step 4: Download firmware.
Follow the instructions to put your Nokia C110 into Download Mode. Once in Download Mode, you will start downloading the firmware.

- Step 5: Confirm Installation
Remember, the repair may erase data. It’s advisable to back up your data first before starting the repair. Enter “000000” to confirm the repair process, shown by a progress bar. Click Done once it is completed and see if your Android is back online.

Conclusion
Dealing with the “Phone Offline” hiccup on your Nokia C110 can be a real headache. But fear not – we’ve covered a range of solutions to get you back online smoothly. From troubleshooting internet connection problems to addressing browser and app-related glitches, the solutions provided in this guide are designed to cater to a variety of scenarios. If you find it troublesome to try solutions one by one, then we recommend using Dr.Fone directly which is a full toolkit for your phone and can help resolve most device glitches one-off.
Remember, technology can sometimes be tricky. But with patience and the right guidance, you can overcome these challenges.
8 Ultimate Fixes for Google Play Your Nokia C110 Isn’t Compatible
Nowadays, keeping yourself informed about the newest apps and features is essential. Have you encountered the error message “Google Play your device isn’t compatible with this version?” When attempting to download or update an application, this problem can pose a significant obstacle. The good news is that you can now alleviate those concerns.
In this article, we delve into how to resolve the “your device isn’t compatible with this version Google Play” error. It will discuss the top 8 ultimate fixes for this vexing issue that many Android users face. From practical tips to advanced solutions, this article aims to empower you with the knowledge to overcome this challenge.
Part 1: Reasons Behind Your Device Isn’t Compatible With This Version Play Store
Encountering the frustrating “your device isn’t compatible with this version Google Play“ error can be disruptive. That’s why it is essential to go through the underlying reasons causing this compatibility issue:
1. Outdated Operating System Firmware
One of the primary culprits behind the compatibility error is outdated OS firmware. App developers release updates to keep up with the latest features and security patches. That’s why an obsolete OS version on your device may render it incompatible with the newer app versions available on the Google Play Store.
2. Insufficient Hardware Requirements
Each application has specific hardware prerequisites that your device needs to fulfill. In case your smartphone does not meet the required specifications, you won’t be able to utilize the app. Thus, Google Play Store may restrict access to certain applications, citing compatibility issues.
3. Corrupted Cache Files
Cache files are designed to enhance the speed and efficiency of app loading. Yet, they can sometimes become corrupt. When this occurs, it disrupts the app’s normal operation. Clearing these corrupted cache files is often a crucial step.
4. Geographic Restrictions
In certain cases, app developers or Google Play itself may impose geographic restrictions. This could lead to compatibility issues if your device is located in an area where the app is restricted. Understanding the geographical availability of an app is vital in finding the root cause.
4. Beta Versions and Unstable Releases
Engaging with beta versions or unstable releases of an app can result in compatibility issues. These versions are typically in the testing phase. That’s why their compatibility with a wide range of devices may not be guaranteed. If you find yourself facing compatibility errors, it’s worth checking if you are in a beta program.
Part 2: 8 Reliable Fixes for Google Play Your Device Isn’t Compatible With This Version
Facing the “Play Store your device isn’t compatible with this version” error is an all-too-familiar setback. However, fear not, as this article will be your guide in resolving this issue. Summarized below are the top 8 solutions to fix this error with ease:
Fix 1: Force Quit Google Play Store
Force quitting the Google Play Store is a simple yet effective first step in resolving compatibility issues. Occasionally, the app may encounter glitches or background errors. These can hinder its proper functioning. Force quitting the Google Play Store and restarting it can often rectify these issues. You can use the following steps to force quit Google Play Store:
- Step 1. On your Nokia C110, find the Google Play Store and long-press its icon. Press “App info” from the pop-up menu to access the app information screen.
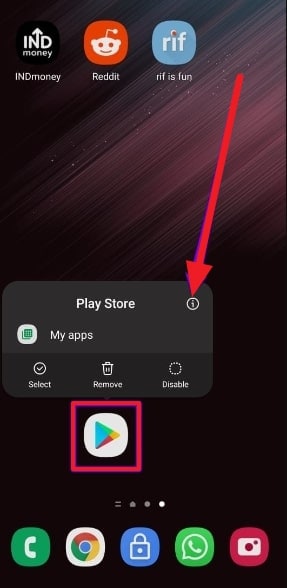
- Step 2. Here, tap the “Force Stop” option to force close the Google Play Store. After a while, relaunch the app to see if the issue is resolved.

Fix 2: Clear Google Play Store Cache
Clearing the cache of the Google Play Store is a targeted solution. It addresses potential compatibility issues arising from corrupted or outdated temporary files. The cache stores data that helps the app load faster. Yet, when these files become corrupted, it can lead to performance issues. Follow these steps to clear the Google Play Store cache and the “device not compatible Google Play” issue:
- Step 1. After finding the Google Play Store on your device, press and hold the icon until a pop-up menu appears. Here, touch the “App info” option to reach the screen displaying information about the app.

- Step 2. Here, press “Storage and Cache,” and on the following screen, tap “Clear cache.” Confirm your action to wipe the cache data. Afterward, access the targeted app again to check if the issue is resolved.

Fix 3: Remove the Google Services Framework’s Cache and Data
The Google Services Framework plays a crucial role in your Nokia C110. It is essential in the functioning of various Google services, including the Google Play Store. Clearing its cache and data can be an effective method to tackle compatibility issues. Here’s a step-by-step guide on how to remove the Google Services Framework’s cache and data:
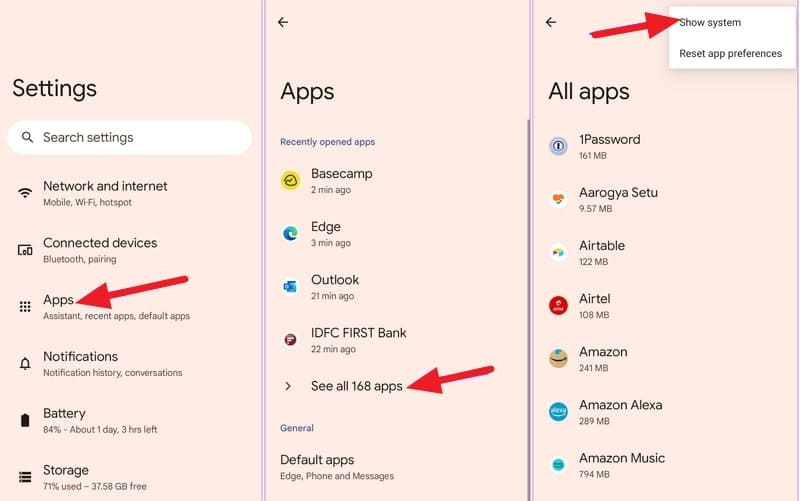
- Step 1. Open your device’s Settings and scroll down to tap “Apps.” There, press the “All Apps” options, and on the following screen, choose “Show System” from the top right corner.
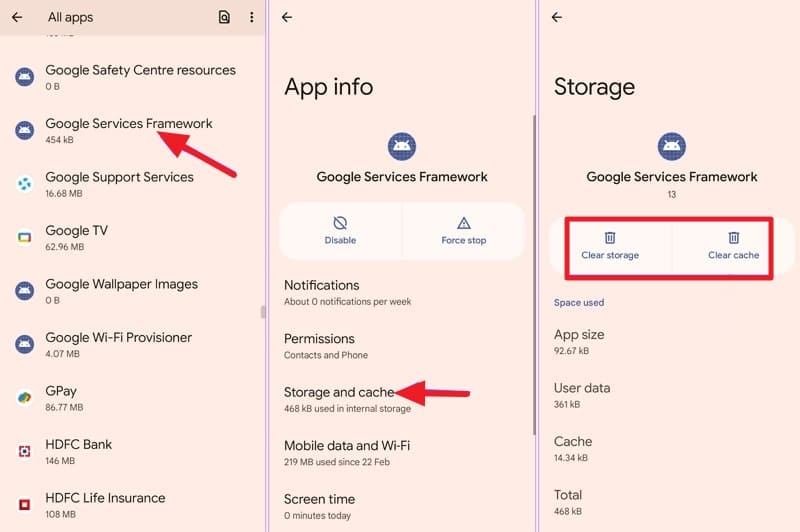
- Step 2. Now, find and tap the “Google Services Framework” app and go on to press “Storage and Cache.” Here, use “Clear Cache” and “Clear Storage” to clear its cache and data.
Fix 4: Update the Android OS Version
An outdated operating system is a common factor behind compatibility issues. This case is often used with Google Play Store and other important apps. Maintaining your Nokia C110’s compatibility with the latest app releases is essential. To ensure your Android operating system is up-to-date, please proceed with the following steps:
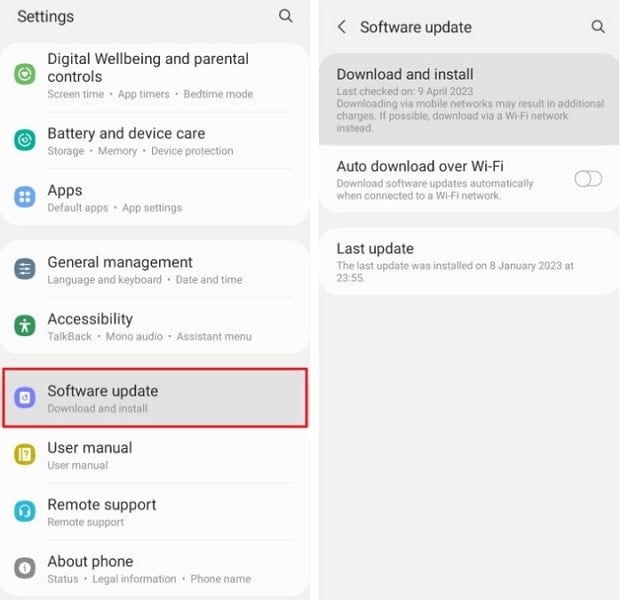
Instructions. You will need to start by accessing the Nokia C110 device’s “Settings.” Scroll down to find and press the “System” option. On the following screen, tap “Software Update” to check if an update is available. If there is one, follow the on-screen prompts to update your device’s OS.
Fix 5: Uninstall the Google Play Store Updates
In certain cases, issues with the Google Play Store itself may be contributing to compatibility errors. Uninstalling recent updates can revert the app to its default state. It can potentially resolve the problem. Follow these steps to uninstall updates for the Google Play Store and resolve “device not compatible Play Store” issues:
- Step 1. Using your Nokia C110’s Settings, access the Google Play Store app in the “Apps” tab. Once on its info page, tap the three dots icon from the top right corner.

- Step 2. From the available options, choose “Uninstall updates.” Then confirm your decision when prompted to delete the Google Play Store updates.

Fix 6: Sideload the Incompatible Android App
If all else fails and the compatibility issue persists, sideloading the app can be a workaround. It means installing the app manually without using the Google Play Store. This approach proves especially valuable for users with a strong determination to access a specific application. Below is a comprehensive, step-by-step tutorial on how to sideload an app:
- Step 1. Long-press the Google Chrome icon to open the app info menu. Navigate to the “Install unknown apps” section. Here, toggle the switch to enable “Allow from this source.”

- Step 2. Afterward, access a reliable, trusted website where the APK for the targeted app is available. Download and install the app to resolve the compatibility issues.

Fix 7: Install a Custom ROM
Have you exhausted other options and are still grappling with compatibility issues? Installing a custom ROM could be a more advanced but effective solution. Custom ROMs are modified versions of Android operating systems developed by the Android community. Engaging in this procedure entails large modifications to your device’s software. It is crucial to comprehend the potential consequences and proceed with caution.
Installing a custom ROM may void your device’s warranty. Moreover, it’s crucial to choose a ROM compatible with your device model. Installing a custom ROM is an advanced solution that should be approached with caution. It has the capability to address compatibility issues. Nevertheless, it demands a certain level of technical expertise and may not be suitable for all users.
Fix 8: Try Using a Third-Party App Store
The final solution to avoid compatibility issues on the Google Play Store is to use a different app store. Exploring alternative app stores can be a pragmatic workaround. Several third-party app stores offer a diverse range of applications. They might provide the desired app without encountering compatibility errors and help avoid the “device not compatible Google Play” error.
You can explore reputable third-party app stores such as Aptoide, Amazon Appstore, GetJar, or SlideME. Ensure the chosen app store is reputable and widely used, minimizing potential security risks. Exercise caution and ensure the legitimacy of the app store to avoid security risks.

Part 3: Is Your Play Store Not Working Properly? Fix It Now With Wondershare Dr.Fone
If you are unable to download any application on your Nokia C110, it might be because of your Play Store issue. Play Store is the crucial element in your device, providing your facility with many features and functions. Get it fixed by trying Wondershare Dr.Fone – System Repair (Android) tool within a few clicks.
The System Repair tool in Dr.Fone helps you to resolve this issue in your Android Phone with powerful mechanisms and efficient working. It provides a user-friendly interface to fix Play Store Not Working with much ease.
Key Features of Wondershare Dr.Fone
- Fone – System Repair (Android) allows you to repair your Nokia C110 easily in just a few clicks.
- This tool is also used to resolve the Black Screen of Death issue and Bricked Android devices problem.
- Users can fix their Android devices of any model or brand within minutes.
- With its easy-to-follow guide and steps, no technical expertise is required to use Dr.Fone’s software.
![]()
Dr.Fone - System Repair (Android)
Repair Android System Errors without Any Trouble.
- Fix your Android to normal, no skills required.
- Fix various Android system issues, stuck in boot loop , black screen , or won’t turn on , looping on start, etc.
- The high success rate in resolving Android system issues.
- Compatible with a wide range of Android devices and OS versions
- User-friendly interface with easy-to-follow steps.
3981454 people have downloaded it
Steps Involved To Fix Play Store Not Working Properly via Wondershare Dr.Fone
Now, we will be discussing the guide to resolve your “Google Play your device isn’t compatible with this version” errors. Here is how to fix the Play Store not working properly with Wondershare Dr.Fone – System Repair (Android):
- Step 1: Access Wondershare Dr.Fone on Computer
The first thing you need to do is to launch Wondershare Dr.Fone on your PC and access the “Toolbox” panel, followed by the “System Repair” section. Then, select the “Android” device and hit the “Start” button to proceed with the repair process.
- Step 2: Put Device Details and Download the Firmware
After that, you need to enter the Nokia C110 device details like the “Name, Model, Brand, etc.” and put your phone on a Download Mode. Following this step, the firmware will download on its own, and you need to click the “Fix Now” button to install it on your Nokia C110.
- Step 3: Confirm the Installation and End the Process
In the last step, you will have to put in the code and proceed with the “Confirm” button to initiate the repair process. This may delete all your data in the Nokia C110 device, and once it has ended, select the “Done” button to conclude the process.
safe & secure
3,120,524 people have downloaded it
Conclusion
To conclude, encountering compatibility issues like “Google Play your device isn’t compatible with this version,” can be a frustrating roadblock. However, this article has armed you with the knowledge through exploring various fixes. You now possess a toolkit of solutions to overcome the notorious issue. From forced quitting the Google Play Store to exploring the realm of custom ROMs, each fix has been crafted to cater to different user preferences.
For users seeking a comprehensive solution, Wondershare Dr.Fone emerges as a versatile and powerful tool. It goes beyond conventional troubleshooting methods. Its “Android Repair” feature is tailored to address various Android system issues, including those affecting the Google Play Store.
Want to Uninstall Google Play Service from Nokia C110? Here is How
In this article, you will learn the pros and cons of uninstalling Google Play services, as well as a free root tool to help you do this.
Acts as a one-stop destination to download various kinds of apps from the Play Store. The Play service also provides a way to manage these apps without much hassle. From uninstalling to updating an app, all of this can be done with Google Play service. Nevertheless, there are times when users wish to uninstall Google Play services. To start with, it takes a lot of storage and makes it pretty tough for users to manage their devices. To help you, we will let you know how to uninstall Google Play Store in this informative post.
Part 1: Reason you might want to get rid of Google Play Service
Before we proceed and discuss different ways on how to update Play Store after uninstalling updates, it is important to cover the basics. We have heard plenty of users who wish to uninstall Google Play services, but are not sure of the repercussions. One of the main reasons is that it consumes a lot of space on phone’s storage. Not just that, it only consumes plenty of battery as well.
If your device is giving the insufficient storage warning, then you need to start by clearing your phone’s data. It is observed that the Google Play Service accumulates most of the data in a device. This leads to users looking for different ways to how to uninstall Google Play Store.
Part 2: What will it affect to uninstall Google Play Service?
If you think that Google Play Service only provides a platform to download new apps, then you are wrong. It provides several other functions that might alter the way you use your smartphone. It is linked with other essential Google services as well, like Google Maps, Gmail, Google Music, etc. After uninstalling the Google Play Service, you might face trouble using various essential apps.
Furthermore, it might tamper with the overall functionality of your device as well. For instance, you could encounter network issues, messaging problems, app crashing, and more. Since the Play Service is closely associated with Android system, it might have a prominent effect on your phone. If you have a rooted device, then you can easily install custom ROM and resolve these issues. Though, for a non-rooted device, overcoming these problems could be a big hurdle.
Part 3: How to disable Google Play Service?
By now, you already know all the repercussions of getting rid of Google Play Services permanently. Before you learn how to update Play Store after uninstalling updates, be sure whether you wish to uninstall Google Play Services or not. You can also choose to simply disable the services as well. If you face any severe issue afterward, then you can always enable the services manually.
To disable the Google Play Services, just go to your phone’s Settings > Applications > All and open Google Play Services. You will get to know about the app’s detail and a few other options here. Just tap on the “Disable” button. It will generate another pop-up message. Confirm it by tapping on the “Ok” button. This will disable Google Play Services on your device. Later, you can follow the same drill to enable it as well.

Now when you know how to uninstall Google Play Store on your device, you can easily customize it. Get rid of any kind of problem you are facing due to lack of storage or battery issues related to Google Play services after following these instructions. Feel free to drop a comment below if you face any setback while following this tutorial.
Also read:
- [New] Elevate Your PC Best 8 Video Capture Tools for Windows 10
- [New] Expert Insights Mastering Your Game Recording on Windows 10
- [Updated] Online Income Tally for YouTube Stars
- [Updated] Testing Titans In-Depth Comparison of GoPro's Hero5B & Session
- 8 Quick Fixes Unfortunately, Snapchat has Stopped on Tecno Pop 7 Pro | Dr.fone
- 9 Solutions to Fix Nokia G42 5G System Crash Issue | Dr.fone
- Android Safe Mode - How to Turn off Safe Mode on Xiaomi Redmi Note 12 5G? | Dr.fone
- App Wont Open on Your Motorola Edge 40 Pro? Here Are All Fixes | Dr.fone
- Beheben Sie Den Fehlercode 0X80070643 Beim Aktualisierungsprozess Von Windows-Updates, Version KB5034441
- Capturing Magic in Microphones IPhone/iPad Tactics for Superior Recordings
- Cellular Network Not Available for Voice Calls On Infinix Hot 40i | Dr.fone
- Converting Videos to iPhone-Compatible Formats: A Comprehensive Guide
- Essential Ringtones A Chrome Companion Collection for 2024
- Fixes for Apps Keep Crashing on Honor 90 | Dr.fone
- Free Dell Inspiron G15 Driver Downloads and Easy Install Guide for Windows
- NASA's Insight Mission on Mars Wraps Up Extraordinary Journey
- Top 4 Android System Repair Software for Lava Yuva 2 Bricked Devices | Dr.fone
- Want to Uninstall Google Play Service from HTC U23 Pro? Here is How | Dr.fone
- What To Do if Your Infinix Smart 8 Auto Does Not Work | Dr.fone
- Title: Why Is My Nokia C110 Offline? Troubleshooting Guide | Dr.fone
- Author: Ariadne
- Created at : 2024-12-05 18:29:30
- Updated at : 2024-12-08 16:59:12
- Link: https://howto.techidaily.com/why-is-my-nokia-c110-offline-troubleshooting-guide-drfone-by-drfone-fix-android-problems-fix-android-problems/
- License: This work is licensed under CC BY-NC-SA 4.0.