
:max_bytes(150000):strip_icc():format(webp)/GettyImages-541916248-593842a43df78c537be2cf44.jpg)
Why Is My Vivo Y36i Offline? Troubleshooting Guide | Dr.fone
Why Is My Vivo Y36i Offline? Troubleshooting Guide
Ever had your Vivo Y36i claim it’s offline, leaving you scratching your head about where it went wrong? We get it; it’s confusing. That’s why this article is here to untangle the mystery.
In the following sections, we’re diving into the “why is My Vivo Y36i offline” dilemma that many Android users face. We’ll break down the possible reasons behind this common issue and guide you through simple steps on how to fix it. By the end of the article, you’ll be able to get back to smooth internet surfing on your Vivo Y36i. Let’s get started.
Part 1: Why Does My Vivo Y36i Say Offline?
When you encounter the “offline” error message, it can disrupt your usual smartphone activities. Suddenly, you find yourself unable to browse the internet, send or receive emails, or stay connected through instant messages.
It’s a frustrating scenario, but let’s break down the potential reasons why your phone might be displaying this offline status:
- Enabling Airplane mode
Why is My Vivo Y36i showing offline? Well, one common culprit behind the “offline” message is the accidental activation of Airplane Mode on your Vivo Y36i. When Airplane Mode is enabled, it disconnects your phone from all wireless networks, rendering it unable to connect to the internet or cellular networks.
- Internet connection issues
Fluctuations in your signal strength or unexpected data loss can also be the culprit behind the “Why is My Vivo Y36i offline?” problem. Android devices rely on stable internet connections, and disruptions, whether temporary or prolonged, can lead to this error.
- Glitches or bugs
Sometimes, glitches or bugs in Google apps installed on your Vivo Y36i can mislead it into thinking it’s offline. Google Play Services or other related applications may encounter issues, causing the phone to display an “offline” message.
- Firewall restrictions
In some cases, a firewall on your Vivo Y36i might be overly restrictive, preventing the Vivo Y36i device from establishing a connection to the internet. This security measure, intended to protect your device, can sometimes go overboard and disrupt normal online functionality.
Now, you have understood the potential causes as the first step toward resolving the issue. Next, we’ll guide you through the process of troubleshooting and getting your Vivo Y36i back online.

Part 2: How To Fix “Phone Offline” With Internet Connection Problem
Now that we’ve figured out why your phone says it’s offline, let’s tackle the issue head-on. If you’re facing problems like downloads that won’t start, Google Play stuck on “Loading…,” or web pages refusing to load, chances are it’s an internet connection issue causing the problem.
Here are some easy solutions to get your connection back.
Solution 1: Change connection to mobile data
Switching to mobile data can be a quick fix if your Wi-Fi is acting up. It ensures a change in your connection source and might resolve the “Phone offline” issue. Follow these easy steps to change your connection to mobile data:
- Step 1: Swipe down from the top of your screen to access the Quick Settings menu.
- Step 2: Tap the Wi-Fi icon to turn off the Wi-Fi connection.
- Step 3: Tap Mobile Data to turn it on.

Solution 2: On and off Airplane mode
Airplane Mode can sometimes cause connectivity confusion. Turning it off and on essentially resets your phone’s wireless connections, which might resolve the offline issue.
How to on and off Airplane mode on Android:
- Step 1: Swipe down from the top of your screen to access the Quick Settings menu.
- Step 2: Look for the Airplane Mode icon and tap the icon to turn on Airplane Mode.
- Step 3: Wait a few seconds, then tap it again to turn off the Airplane Mode. Now, check if your phone is now online.

Solution 3: Reset network settings
Resetting network settings can help eliminate any configuration glitches that might be causing the phone offline problem. It’s like giving your phone’s connection settings a fresh start.
To reset your network settings, the steps may differ depending on the phone model you are using. However, you can generally do so by looking for the “Network” settings.
- Step 1: Open your phone’s Settings > Connection & sharing.
- Step 2: Find and select “Reset Wi-Fi, mobile networks, and Bluetooth.”
- Step 3: Tap “Reset Settings” and confirm the action and allow your phone to reset.
- Step 4: Reconnect to your Wi-Fi and check if the issue persists.

Solution 4: Restart your Wi-Fi router
Sometimes, the problem might not be with your phone but rather with the Wi-Fi router. Restarting it can refresh the connection and potentially resolve the connectivity problem.
How to restart your Wi-Fi router:
- Step 1: Locate your Wi-Fi router.
- Step 2: Turn off the router using the power button or unplug it.
- Step 3: Wait for about 10–15 seconds before plugging the router back in or turning it on.
- Step 4: Allow the router to restart and establish a connection. Then, check if your phone still shows the “Phone Offline” message.
These solutions should cover the most common connectivity issues. If the problem persists, we’ll explore further steps in the following sections.
Part 3: How To Fix “Phone Offline” Despite Having an Internet Connection
Ever found it odd to receive the frustrating offline error message when you’re sure your internet connection is up and running? If you’ve double-checked your internet connection and your phone still says it’s offline, the issue may lie within your browser, apps, or device settings.
In this part, we’ll answer the question “**Why does My Vivo Y36i say offline android?**” despite a seemingly functional internet connection. Then, let’s see other solutions on how to get your device back to its online, fully functional self.
Solution 1: Clear Google Chrome’s cache and data
Sometimes, the answer to “Why is my Android phone offline” can be attributed to a buildup of corrupted or outdated data in your browser’s cache. Clearing the cache and data for Google Chrome can resolve this issue, allowing for a fresh start and potentially eliminating the offline status.
How to clear your browser’s cache and data on Android:
- Step 1: Open the Settings > Apps > Manage Apps.
- Step 2: Locate and tap “Google Chrome” or your preferred browser in the list of installed apps.
- Step 3: Tap “Storage” and select “Clear Cache” to remove temporary files.
- Step 4: Choose “Clear Data” to delete app data. Confirm the action if prompted.
Now, restart Google Chrome and check if the offline error persists.

Solution 2: Re-install Google Chrome
If clearing the cache and data didn’t solve the offline issue, reinstalling Google Chrome can be the next step. A fresh installation can eliminate any underlying glitches or corrupted files that might be causing the persistent offline status.
How to re-install Google Chrome:
- Step 1: Visit the Google Play Store and search for Google Chrome.
- Step 2: Tap “Uninstall” to remove the app from your device.
- Step 3: Wait until it has finished uninstalling your app. Then, tap “Install” to start reinstalling the app.
- Step 4: Once the installation is complete, open Google Chrome and check if the offline error persists while browsing.

Solution 3: Repair the system to fix the phone showing offline
When persistent offline issues seem deeply rooted in your device’s system, a comprehensive system repair may be the solution. Wondershare Dr. Fone’s system repair tool is designed to address a range of system problems, providing a reliable way to fix any problem you have with your phone.
With Dr. Fone’s system repair tool, you can diagnose and resolve “Why is My Vivo Y36i offline on Android,” ensuring a smooth and functional Android experience.
Key Features:
- Comprehensive system repair for any devices
- User-friendly interface
- Efficient problem diagnosis
How to use Dr. Fone’s system repair tool:
- Step 1: Open Dr.Fone’s system repair tool
Start by launching Wondershare Dr.Fone on your computer. Go to the Toolbox section and connect your Vivo Y36i. Choose System Repair and pick Android as your device type.

 safe & secure
3,189,324 people have downloaded it
- Step 2: Start the repair
Click Start on the new screen to kick off the repair. Since you’re dealing with an offline connection issue on Android, select System Damage.

- Step 3: Confirm your device details
The platform will detect your Vivo Y36i’s brand. Confirm the Name, Model, Country, and Carrier. If your device is unlocked, choose OPEN in the Carrier section. Agree to the warning, click Next, and proceed with the repair.

- Step 4: Download firmware.
Follow the instructions to put your Vivo Y36i into Download Mode. Once in Download Mode, you will start downloading the firmware.

- Step 5: Confirm Installation
Remember, the repair may erase data. It’s advisable to back up your data first before starting the repair. Enter “000000” to confirm the repair process, shown by a progress bar. Click Done once it is completed and see if your Android is back online.

Conclusion
Dealing with the “Phone Offline” hiccup on your Vivo Y36i can be a real headache. But fear not – we’ve covered a range of solutions to get you back online smoothly. From troubleshooting internet connection problems to addressing browser and app-related glitches, the solutions provided in this guide are designed to cater to a variety of scenarios. If you find it troublesome to try solutions one by one, then we recommend using Dr.Fone directly which is a full toolkit for your phone and can help resolve most device glitches one-off.
Remember, technology can sometimes be tricky. But with patience and the right guidance, you can overcome these challenges.
8 Workable Fixes to the SIM not provisioned MM#2 Error on Vivo Y36i
SIM cards are small chips that act as a connecting medium between your cell phone and your carrier. It is programmed to help your carrier identify your cell phone account with certain information. And eventually, you are enabled to make calls and to make use of mobile internet. Now, if your device is showing “SIM not provisioned” on Android then it signifies that the connection to carrier network cannot be established or perhaps, your carrier isn’t able to identify your cell phone account.
Part 1. Why does the error “SIM not provisioned MM#2” pop up?
There can be numerous reasons behind the pop up that reads “SIM not provisioned” on Android. But basically, it most probably affects the users who have registered a new SIM card. If you get to experience this issue in other situations or if the SIM is not working in Android, then the problem is with the SIM card and needs to be replaced. Anyways, here is a list of situations when the “SIM not provisioned” error may bother you.
- You got a new SIM card for your new phone.
- You are transferring your contacts into the new SIM card.
- In case, the carrier network provider’s authorization server is unavailable.
- Perhaps, you’re out of the reach of the carrier coverage area and that too, without active roaming agreement.
- Though new SIM cards work flawlessly. But it is often necessary to get your SIM card activated due to security reasons.
Just in case, you haven’t bought any new SIM card and the one you were using was working fine until now, then the most probable reasons behind it could be listed below:
- If your SIM card is too old, possibly it might have gone dead, try replacing it.
- Perhaps, the SIM card was not properly inserted into the slot or there might be some dirt between the SIM and smartphone pins.
A yet another reason could be that your SIM card got deactivated by your carrier provider as it could have been locked to a particular phone. Now, if you insert such a SIM card to another device or a new device even, you may get to witness a message that reads “SIM not valid”.
2.1 One click to fix the “SIM not provisioned MM#2” error on Android
Without talking any further, let’s straightly get to the first and the easiest way to repair SIM not provisioned issue on Android. For this purpose, we’re glad to introduce Dr.Fone - System Repair (Android) , one of its kind of tool that is capable of repairing almost all sort of Android OS issues in just a matter of few clicks. Whether it is SIM not provisioned on Android or SIM not working in Android or your device stuck in a boot loop or black/white screen of death. The most probable reason for these errors is Android OS corruption. And with Dr.Fone – Repair (Android) you can efficiently and effectively repair your Android OS in a hassle freeway.
Dr.Fone - System Repair (Android)
Android repair tool to fix “SIM not provisioned MM#2” error
- Fix any type of Android system issue with ease.
- Even novice users can use it without any hassle.
- Compatible with all major Vivo Y36i smartphone models.
- Highest success rate in the market for fixing Android issues.
- Supports all Android OS versions.
3981454 people have downloaded it
Step by step Tutorial to fix “SIM not provisioned MM#2” error
Step 1. Connect your Vivo Y36i
Download and launch the Dr.Fone toolkit on your computer and then opt for the “System Repair” option from the main interface. Meanwhile, get your Vivo Y36i connected with the computer using a genuine cable.
Step 2. Opt for Android Repair and key in important information
Now, hit on the “Android Repair” from the 3 options on the left, followed by hitting the “Start” button. From the upcoming screen, you’ll be asked to key in important device-related information, like brand, model, country, and carrier details. Hit “Next” afterward.
Step 3. Boot your device in Download mode
You must put your device in Download mode for better repairing of your Android OS. Simply follow the onscreen guide to boot your Android in DFU mode and hit “Next” thereafter. Once done, the software will automatically start downloading the most compatible and recent firmware for your device.
Step 4. Initiate Repairing
As soon as the download completes, the software verifies the firmware and automatically initiates repairing your Vivo Y36i. Within a short period, you’ll notice that your Vivo Y36i has been successfully repaired.

 safe & secure
2.2 Ensure the SIM card is not dirty or wet
At times, the issue can be as simple as cleaning your SIM card and SIM slot properly. Ensuring that SIM is not wet either and then putting it back into its place. If this works, then the SIM not working in Android was due to the dirt or moisture that was preventing proper contact between SIM card pins and smartphone circuit.
2.3 Insert the SIM card correctly
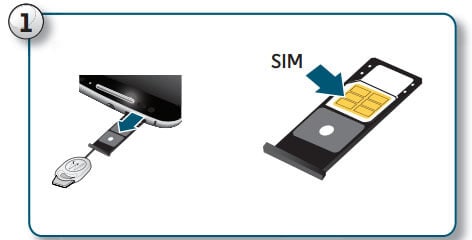
If your SIM card was working properly until yet, there is a good possibility that the SIM card may have moved a bit from its actual location. Eventually, there is poor contact between the SIM card pins and the circuit. Try inserting your SIM card properly with the following steps.
- Power off your Vivo Y36i and with the help of Q pin, eject the SIM card holder from the SIM slot of your device.
- Now, grab a soft rubber pencil eraser and gently rub it in on the gold pins of SIM card to clean them properly. Then, with the help of a soft cloth wipe away the rubber residue from the SIM card.
- Next, push the SIM back into the SIM card holder properly and push it back into the SIM slot now.
- Turn your device back on and look if your SIM not provisioned on the Android issue is resolved or not.
2.4 Activate the SIM card
Usually, when you buy a new SIM card, it gets automatically activated within 24 hours of being plugged into a new device. But if that’s not happening in your case and you’re wondering how to activate SIM card, make use of the three options below to enable activation:
- Call your carrier service provider
- Send an SMS
- Log on to your carrier’s website and look for the activation page over it.
Note: The aforementioned options are straightforward and are quick ways to enable activation. It depends on your carrier network whether they support them.
2.5 Contact your carrier
Even if your SIM isn’t activated, grab another working device to make a phone call to your carrier or network. Ensure, to explain the entire situation and the error message to them. Be patient while they investigate the issue. It may eat up a heck load of time or may get resolved in a few minutes that completely depend upon the complexity of the issue.

2.6 Try the other SIM card slot
A yet another reason why SIM not working in Android can be because of the SIM card slot might have gone corrupted. Thanks to the dual SIM technology, you do not have to rush immediately to get it to check or repair. You can simply rule out this possibility by ejecting the SIM card from its original SIM slot and then replacing it into the other SIM card slot. If this solution did work out for you then it is obvious that the problem was with the SIM card slot that got corrupted. And hence, it was triggering SIM not responding issue.
2.7 Try the SIM card in other phones
Or just in case, you’ve still no joy and the SIM not provisioned on Android message is bothering you. Try making use of another Android device. Eject the SIM card from the Vivo Y36i device which is creating problems and try plugging it into other Vivo Y36i] and other smartphones. Perhaps, this will let you know whether the issue is with your device only or with the SIM card itself.
2.8 Try a new SIM card
Still, wondering how to fix SIM not provisioned? Perhaps, nothing worked for you, right? Well, on that note, you must head to your carrier store and request a new SIM card. Also, inform them about the “SIM not provisioned MM2” error, they will be able to execute proper diagnostics over your old SIM card and hopefully get it resolved. Or else, they’ll equip you with a brand new SIM card and swap the new SIM card into your device and get it activated in the meantime. Eventually, restoring the normal functioning of your device.
Conclusion
In wrapping up, SIM not provisioned errors on Android can be troubling, but they’re certainly fixable. There are several methods, from a simple device restart to reaching out to your network provider. But if these don’t work, we suggest trying Dr.Fone - System Repair (Android) . This tool is known for its ability to handle an array of Android issues and could be just what your device needs. Navigate your tech challenges with ease using Dr.Fone.
safe & secure
How to Resolve Vivo Y36i Screen Not Working

Nothing is more frustrating than your phone’s touch screen becoming unresponsive. Given the importance of smartphones in daily work, a phone with a touch screen not working can badly affect your routine. It is an issue found in most smartphone brands, even among Vivo Y36i phones, known for their efficient performance. If your Vivo Y36i screen is not working, it can be an exhausting experience.
Luckily for your, multiple ways are available to resolve this issue. This article will list six fixes for resolving the Vivo Y36i not working issue. It will also discuss the reasons behind this issue in detail and provide a list of tips to avoid it in the future.
Part 1: What Causes Vivo Y36i Screen Unresponsive?
Answering what causes Vivo Y36i screen unresponsiveness is difficult. Many reasons, ranging from minor bugs to serious hardware issues, can cause it. To find out the exact or near exact reason, you will have to review your device’s activity before this issue occurs. You can use the following common reasons behind the Vivo Y36i 6T touch screen not working as the basis of your investigation:
1. Touchscreen Calibration
Excessive smartphone use can cause the touchscreen to go out of the required settings. It means until the touch screen is not recalibrated properly, the touch not working issues will continue to pop up.
2. Battery Issue
If your device’s battery is damaged or is at the end of its lifespan, it can cause the touch screen not responding issues. Moreover, the low battery and issue with the charging port can also lead to this problem.
3. Corrupted System Files
The presence of corrupted system files is also a significant cause of such issues. These corrupted files can also lead to serious performance issues on your phone.
4. Conflicting Settings
It is also possible that the conflicting settings in your device are causing this issue. These settings can range from touch sensitivity to screen refresh rate. Unless these conflicts are removed, the touchscreen performance will continue to degrade.
Part 2: The Common Solutions to Solve a Vivo Y36i Screen Unresponsive
Fixing the Vivo Y36iscreen not working is easy as long as it is not a serious hardware issue. While there are multiple ways to solve this problem, we have chosen the 6 most common and easy solutions. Listed below are the 6 common solutions to solve a Vivo Y36i screen unresponsive:
Solution 1. Restart the Vivo Y36i Phone
As with any other issue or device, the first fix you should always try first is to restart your device. It is the best solution to fix the Vivo Y36i not working issue if temporary bugs and glitches are the reason behind it. When you restart your device, it flushes out all temporary bugs and glitches while resetting your device’s processes. Use this guide to restart your Vivo Y36i device:
Instruction: Press and hold the “Power” button for a couple of seconds until it turns off. Wait a few moments and then use the “Power” button to turn on the Vivo Y36i device. In some of the Vivo Y36i devices, you also have to use the “Volume Down” button along with the “Power” button to restart the Vivo Y36i device.
Solution 2. Check the Charging Port and Battery
The issues with the battery of your Vivo Y36i 5 can also lead to Vivo Y36i not working. It can be due to your device’s low or near-empty battery. While in some cases, serious issues with the battery can also be behind this problem. Similarly, the reason behind your phone’s touch not working can be charging port issues.
Thus, you should check and clean your device’s charging port and see if it resolves the problem. Moreover, turn off your device, charge it, and then restart it to check if the touch screen not working issue is gone.
Solution 3. Contact the Vivo Y36i Customer Support
Contacting Vivo Y36i customer support can also help resolve the Vivo Y36i screen not working problem. It is especially helpful if you are unable to find the cause and want to seek an expert opinion. The Vivo Y36i customer support will help you find the issue and recommend a solution.
It is an excellent option if your Vivo Y36i device’s touch is not working due to hardware issues. They can help guide you to a suitable service center to fix your phone and resolve this issue.

Solution 4. Wipe the Cache of Your Vivo Y36i Device
A common reason for Vivo Y36i Nord being stuck on the loading screen is the filled cache partition. If you do not clean out the cache partition of your Vivo Y36i device, its performance will degrade. As a result, your device will experience issues like the touch screen not working or getting stuck at the loading screen. Here is how you can clear the cache of your Vivo Y36i device:
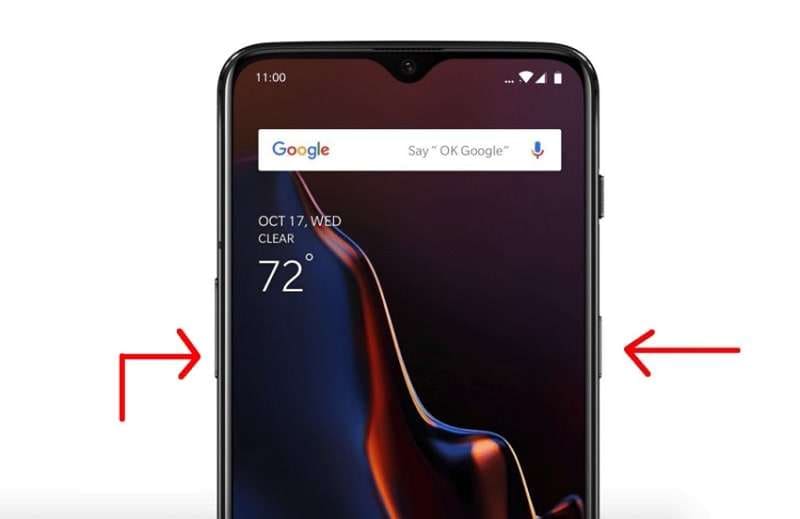
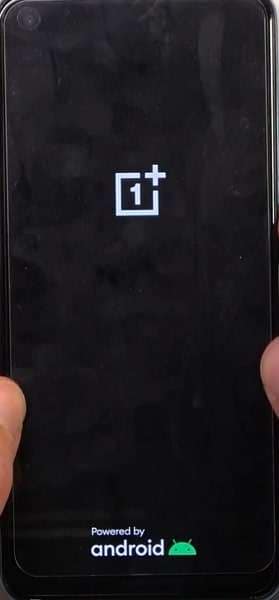
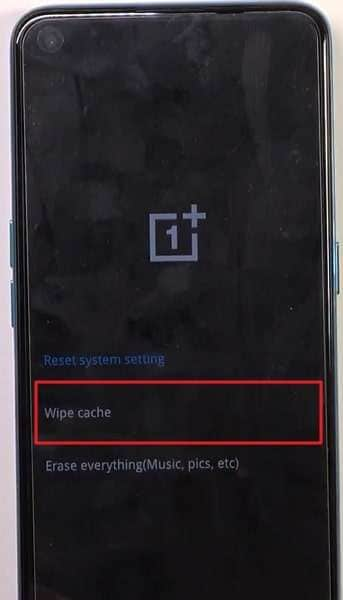
Step 1: Turn off your device by pressing and holding the “Power” button. Once it is turned off, press and hold the “Power” and “Volume Down” buttons until you see the Vivo Y36i logo.
Step 2: Now, enter your phone’s PIN or pattern and choose a language. After selecting the language, choose “Wipe data and cache.”
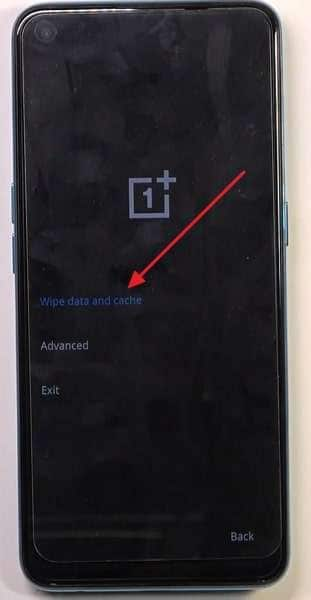
Step 3: Select “Wipe cache” on the next screen and confirm the action through “Yes” in the ensuing window. Once the process is complete, choose “Reboot” to restart your device.
Solution 5. Reset to Factory Settings
Sometimes, clearing the cache partition doesn’t help resolve the touchscreen issue. In that case, You have to factory reset your Vivo Y36i device. It is the best and last solution if other fixes haven’t worked and you can’t pinpoint the reason. Factory resetting your Vivo Y36i will delete all phone data. Thus, you should create a proper backup before trying this fix. Follow these steps to factory reset your Vivo Y36i in no time:
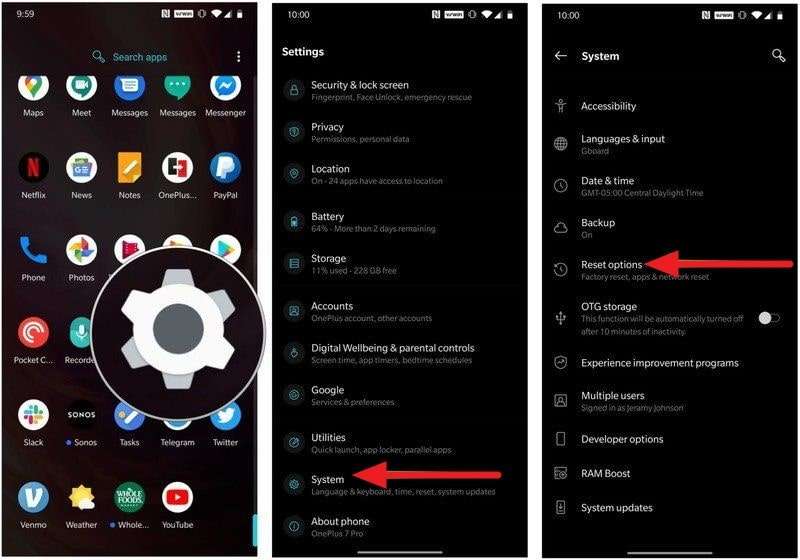
Step 1: Launch Settings on your Vivo Y36i device and tap “System” to select “Reset Options.”
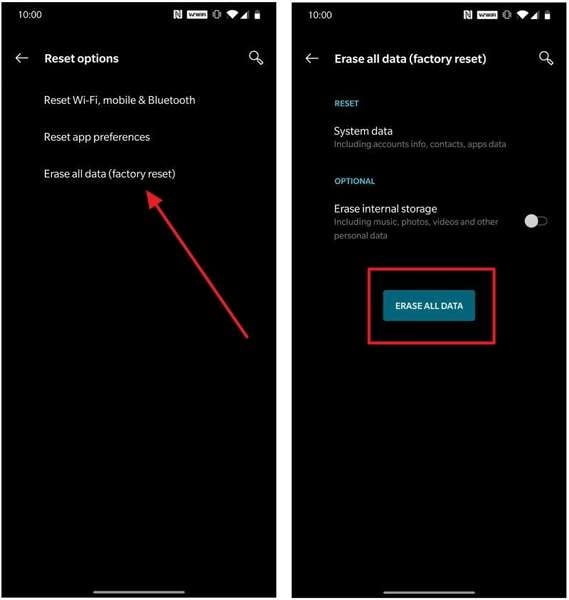
Step 2: In the “Reset Options,” select “Erase all data (factory reset)” and confirm the action by again pressing “Erase All Data.” It will start the factory reset process.
Solution 6. Replace the Old Screen with A New Screen
If none of the above-mentioned fixes have worked so far, you should replace the touch screen. Replacing the touch screen is recommended in case of hardware and severe software issues. However, it can be quite an expensive fix as new touch screens aren’t cheap. The prices for new touchscreens differ depending on the model. These prices start from $20 and go up to hundreds of dollars.
Part 3: How to Avoid Vivo Y36i Screen being Unresponsive?
Protecting your Vivo Y36i device against system issues like touch not working is not difficult. While it is true that you can’t 100% avoid such problems, the risks can still be reduced to a great extent. To prevent your Vivo Y36i screen from being unresponsive, here are some tips you can follow:
- ****Regular Updates:****You should always ensure that your Vivo Y36i device runs on the latest software version available. It can help prevent bugs or glitches that might cause the screen to become unresponsive.
- ****Device Protection:****It is also essential that you use a good quality phone case and screen protector. These will protect your Vivo Y36i device from physical damage. Drops, bumps, or scratches can damage the screen and make it unresponsive.
- ****Delete Unnecessary Apps:****If you have too many apps on your Vivo Y36i devices, it can cause screen unresponsiveness issues. Thus, you should only install the apps you need and delete the apps that are no longer needed.
- ****Use Dr.Fone 13:****Having a professional tool like Fone in your arsenal helps a lot in protecting against system issues. If a system issue is able to pass through, Dr.Fone has the ability to resolve the issue in a matter of seconds. Moreover, it is a complete smartphone tool with data transfer, location changer, and system repair features.
A new version of Dr.Fone is expected to release in the latter half of this month. The new version will include many improvements, advanced features, and increased device support. Furthermore, it will also have a better and more user-friendly interface.

Conclusion
To sum up this article, it can be said that issues like Vivo Y36i not working are part of life. These issues can occur anytime and are hard to completely protect against. Thus, having a problem solver like Wondershare Dr.Fone is the best choice. It will not only help you safeguard against system issues but also resolve them if they occur.
- Title: Why Is My Vivo Y36i Offline? Troubleshooting Guide | Dr.fone
- Author: Ariadne
- Created at : 2024-03-20 22:46:38
- Updated at : 2024-03-21 10:54:46
- Link: https://howto.techidaily.com/why-is-my-vivo-y36i-offline-troubleshooting-guide-drfone-by-drfone-fix-android-problems-fix-android-problems/
- License: This work is licensed under CC BY-NC-SA 4.0.
