
Why Your Nokia C32 Screen Might be Unresponsive and How to Fix It | Dr.fone
Why Your Nokia C32 Screen Might be Unresponsive and How to Fix It
This article aims to provide practical solutions for troubleshooting an unresponsive Nokia C32 screen. Whether you’re facing a software glitch or hardware damage, this guide will offer useful tips and tricks to help you resolve the issue and get your device back up and running smoothly.
5 Solutions to Solve Nokia C32 Screen Unresponsive Issues
An unresponsive Nokia C32 screen can be frustrating, but several potential solutions can help. This article will explore five methods for troubleshooting an unresponsive Nokia C32 screen. From force restarting your device to contacting customer service, we’ll cover everything you need to know to get your device back up and running.
1. Force Restart

If your Nokia C32 screen is unresponsive, the first thing to try is a force restart. This can help refresh the system and clear any temporary files causing the issue.
Step 1. Press and hold the power button on your Nokia C32 device.
Step 2. When the power options appear, tap “Restart.”
Step 3. Hold the power button if the screen is completely unresponsive until the Nokia C32 device shuts down. Then, press and hold the power button to turn the Nokia C32 device back on.
2. Drain the Battery Completely
If force restarting doesn’t work, let the battery drain completely. This can help reset the Nokia C32 device and clear any temporary files or processes causing the issue.
Step 1. Leave your Nokia C32 device on until the battery completely drains and the Nokia C32 device shuts down.
Step 2. Connect your device to a power source and turn it back on.
3. Check for Software Updates

Sometimes, an unresponsive Nokia C32 screen can be caused by outdated software. Checking for software updates ensures your device runs the latest and most stable operating system version.
Step 1. Go to “Settings“ on your Nokia C32 device.
Step 2. Scroll down and tap “Software Updates.”
Step 3. If an update is available, tap “Download and Install.”
4. Using Dr. Fone Repair

Dr. Fone Repair is a professional tool that can help fix a wide range of software issues on your Nokia C32 device. Dr. Fone Repair can be a good option to protect your data and files while troubleshooting an unresponsive Nokia C32 screen.
 safe & secure
Step 1. Download and install Dr. Fone Repair software on your computer.
Step 2. Connect your Nokia C32 phone to your computer using a USB cable.
Step 3. Launch Dr. Fone Repair and select the “System Repair“ option.
Step 4. Choose the “Android Repair“ option from the available choices.
Step 5. Click on “Start“ to begin the repair process.
Step 6. Provide the necessary device information on the screen, including your name and model.
Step 7. Click “Next“ to proceed to the next step.
Step 8. Follow the on-screen instructions to complete the repair process for your Nokia C32 phone’s touchscreen.
5. Contact Customer Service
If none of the above solutions work, it may be time to contact Nokia C32 customer service. They can provide additional support and help troubleshoot the issue.
Step 1. Go to the Nokia C32 website and navigate to the “Support“ section.
Step 2. Select your device model and click “Contact Us.”
Step 3. Choose your preferred method of contact, such as phone or email, and describe the issue you’re experiencing.
Common Causes of Nokia C32 Screen Unresponsiveness
While Nokia C32 devices offer reliable performance, users may encounter situations where the screen becomes unresponsive or stuck on boot. Soft-bricked software or corrupted firmware can cause an Nokia C32 device to become unresponsive, including the screen stuck on the boot. This can happen to various models, such as the Nokia C32, A37, A5, and A5s. Software updates and resets can help fix these issues.
Over time, the touch screen of an Nokia C32 device may become unresponsive due to wear and tear. This can happen to models like the Nokia C32 F1s and F3. In this case, replacing the touch screen or seeking professional assistance may be necessary.
Dropping or impacting an Nokia C32 device can cause physical damage to the touch screen, resulting in unresponsiveness. This can happen to various models like the Nokia C32 Reno and Find X. In some cases, the damage may be repairable, but the screen replacement or the Nokia C32 device itself may be necessary in severe cases. Protecting the Nokia C32 device with a case and handling it carefully to prevent physical damage is important.
While Nokia C32 devices are generally reliable, various factors can contribute to screen unresponsiveness. Users can effectively troubleshoot and resolve issues by identifying these potential causes and seeking appropriate solutions.
How to Avoid Nokia C32 Screen Unresponsiveness Issue
One of the most effective ways to prevent Nokia C32 Screen unresponsiveness is by keeping the Nokia C32 device software up-to-date. Regularly checking for system updates and installing them promptly can prevent software issues and potential bugs that may cause unresponsiveness. Additionally, updating device apps can help prevent conflicts that affect the touch screen’s functionality.
Another way to avoid Nokia C32 Screen unresponsiveness is by protecting the Nokia C32 device from physical damage. Using a protective case or screen protector can help prevent cracks or scratches on the screen that can lead to unresponsiveness. Avoiding impacts or drops can also reduce the risk of physical damage to the touch screen.
Installing apps from unknown sources or suspicious websites can expose the Nokia C32 device to malware and viruses, which can cause unresponsiveness and other issues. To avoid this, it’s recommended to only install apps from trusted sources such as the Google Play Store or the Nokia C32 App Store.
Using a reliable tool like Dr. Fone can help prevent Nokia C32 Screen unresponsiveness by allowing you to manage and repair your device’s software and data. With features such as System Repair and Data Backup & Restore, you can quickly diagnose and fix software issues that may cause unresponsiveness and safely back up important data to prevent loss in case of device damage or malfunction.
Conclusion
Nokia C32 Screen unresponsiveness can be a frustrating issue to deal with, but there are solutions available. Force restarting the Nokia C32 device, checking for software updates, using Dr. Fone Repair, and contacting customer service are all effective ways to solve the problem. However, it’s also important to understand the possible causes of the issue, such as soft-bricking or equipment wearing out, and take preventative measures, such as updating your phone on time and avoiding malware. These tips can help prevent Nokia C32 Screen unresponsiveness and keep your device running smoothly.
safe & secure
7 Solutions to Fix Error Code 963 on Google Play Of Nokia C32
People are increasingly complaining about Google Play Error Codes which pop-up during downloading, installing or updating an App via Google Play Store. Amongst these, the most recent and common one being Error Code 963.
Google Play Error 963 is a typical error which shows up not only when you try to download and install an App but also during App update.
Error 963 cannot be attributed to a particular App or its update. It is a Google Play Store error and is experienced by Android users across the world.
Error Code 963, just like any other Google Play Store errors, is not something difficult to deal with. It’s a minor glitch which can be fixed easily. There is no need to worry or panic if you see Error 963 on Google Play Store preventing your favorite App from downloading or updating.
Read on to find out more about the Google Play Error 963 and best ways to fix it.
Part 1: What is Error Code 963?
Error 963 is a common Google Play Store error which basically hinders Apps from downloading and updating. Many people get worried when Error Code 963 does not let them install new Apps or update existing ones. However, please understand that Google Play Error is not such a big deal as it may sound and can be overcome easily.
Error 963 pop-up message reads as follows: “cannot be downloaded due to an error (963)” as shown in the image below.

A similar message shows up even while you are trying to update an App, as shown in the screenshot below.

Error Code 963 is basically an outcome of data crash which mostly is seen in cheaper smartphones. There might another reason for Error 963 preventing Apps from downloading and updating, which is Google Play Store Cache being corrupted. People also speculate SD Card related issues as many-a-times external memory enhancer chips do not support large Apps and their updates. Also, Error 963 is very common with HTC M8 and HTC M9 smartphones.
All these reasons and more can handle with ease and you can continue to use Google play services smoothly. In the following segment, we will discuss various fixes to cure the problem to enable to you download, install and update Apps on your device normally.
Part 2: Easiest solution to fix Error Code 963 on Android
When it comes to the most convenient solution to fix error 963, Dr.Fone - System Repair (Android) cannot be missed. It is the most productive program that covers a wide range of Android issues. It ensures full safety while performing and one can fix the Android issues in a hassle-free way.
Dr.Fone - System Repair (Android)
One click to fix Google Play error 963
- The tool is recommended for its higher success rate.
- Not just Google Play error 963, it can fix a large number of system issues including app crashing, black/white screen etc.
- It’s considered as the first tool that offers one-click operation for Android repairing.
- There’s no technical expertise needed to use this tool.
4,997,014 people have downloaded it
This section will provide you the tutorial guide for how to fix error code 963.
Note: Before moving to solve the error 963, we would like to inform you that the process may result in wiping away your data. And therefore, we suggest you to make backup of your Nokia C32 prior to fixing this Google Play error 963.
Phase 1: Connecting and preparing the Nokia C32 device
Step 1 – To begin fixing error 963, run Dr.Fone after downloading and installing it on your PC. Now, pick out the ‘System Repair’ tab from the main screen. Thereupon, with the help of a USB cable, make connection between your Nokia C32 and PC

Step 2 – On the left panel, you’re supposed to choose ‘Android Repair’ and then click the ‘Start’ button.
Step 3 – On the following screen, you need to choose the appropriate details for your device like the name, brand, model, country/region etc. Later, go for warning confirmation and hit ‘Next’.

Phase 2: Taking Android device in Download mode for repairing
Step 1 – It is essential to get your Nokia C32 or tablet entered in Download mode. For this, following are the steps to be taken:
If the Nokia C32 device contains Home button:
- Turn the Nokia C32 device off and then keep holding the ‘Power’, ‘Volume Down’ and ‘Home’ buttons altogether for about 10 seconds. Next, release them all and push the ‘Volume Up’ key. This way, your device will enter the Download mode.

If the Nokia C32 device contains no Home button:
- Switch off your phone/tablet and press the ‘Volume Down’, ‘Bixby’ and ‘Power’ buttons for 10 seconds. Leave the buttons and then press the ‘Volume Up’ button for entering download mode.

Step 2 – Press the ‘Next’ button and then the program will commence the firmware downloading.

Step 3 – Upon successful downloading and verification of the firmware, the process of Android device repairing will begin automatically.

Step 4 – Within a while, the Google play error 963 will be vanished.

Part 3: 6 Common Solutions to fix Error Code 963

Since there is no specific reason for Error Code 963 to occur, similarly there is no one solution to the problem. You may use any one of them below or try them all to never see Error Code 963 on your device.
1. Clear Play Store Cache and Play Store Data
Clearing Google Play Store Cache and Data basically means keeping Google Play Store clean and free from trouble-making data stored in respect of it. It is advisable to carry out this process regularly to prevent Errors like Error Code 963 from occurring.
Follow the steps given below to fix Error Code 963:
Visit “Settings” and select “Application Manager”.

Now select “All” to see all downloaded and built-in Apps on your device.
Select “Google Play Store” and from the options that appear, tap on “Clear Cache” and “Clear Data”.

Once you are done clearing Google Play Store Cache and Data, try to download, install or update the App facing Google Play Error 963 again.
2. Uninstall updates for Play Store
Uninstalling Google Play Store updates is an easy and quick task. This method is known to have helped many as it brings back the Play Store to its original state, free from all updates.
Visit “Settings” and select “Application Manager”.
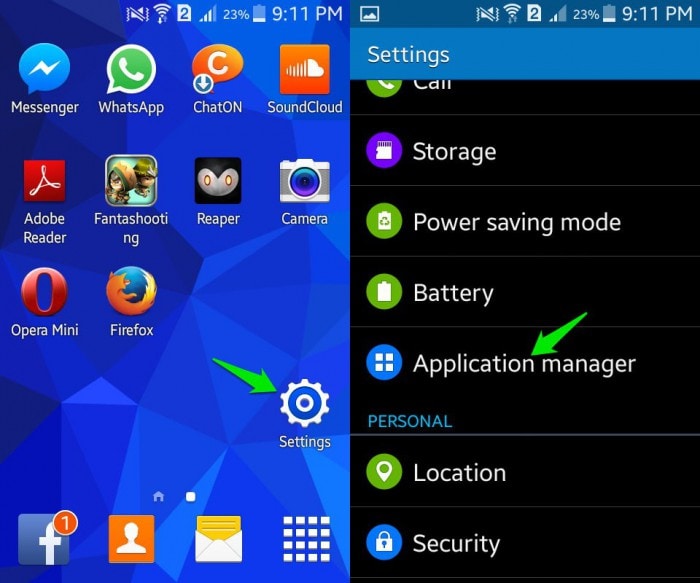
Now select “Google Play Store” from “All” Apps.

In this step, click on “Uninstall Updates” as shown below.

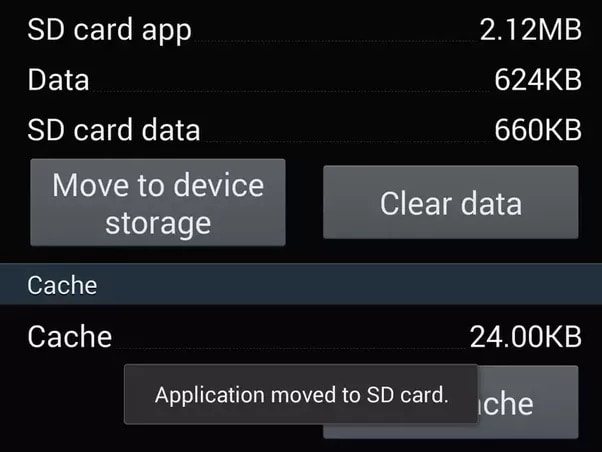
3. Shift the App from SD Card to device’s memory
This method is strictly for certain Apps which cannot be updated because they are stored on an external memory card, i.e., SD Card. Such memory enhancing chips do not support large Apps and due to a shortage of space prevents them from updating. It advisable to move such Apps from the SD Card to the Nokia C32 device’s internal memory and then try to update it.
Visit “Settings” and select “Apps”.

From “All” Apps click on the App which is unable to update.
Now click on “Move to Phone” or “Move to internal storage” and try to download its update again from the Google Play Store.
Try updating the App now. If the Apps’s update does not download even now, DO NOT worry. There are three more ways to help you.
4. Unmount your external Memory Card
Error Code963 may also occur due to an external memory chip used in your device to enhance its storage capacity. This is very common and can be dealt with by unmounting the SD Card temporarily.
To unmount your SD Card:
Visit “Settings” and keep scrolling downwards.
Now select “Storage”.
From the options that appear, select “Unmount SD Card” as explained in the screenshot below.

Note: If the App or its update downloads successfully now, do not forget to mount the SD Card back.
5. Remove and Re-add your Google account
Deleting and re-adding your Google account in might sound a little tedious but it does not take much of your precious time. Moreover, this technique is very effective when it comes to fixing Error Code 963.
Carefully follow the steps given below to remove and then re-add your Google account:
Visit “Settings”, under “Accounts” select “Google”.
Select your account and from the “Menu” select “Remove account” as shown below.

Once your account is removed, follow the steps given hereunder to add it back again after a few minutes:
Go back to “Accounts” and select “Add Account”.

Select “Google” as shown above.
In this step feed in your account details and your Google account will be configured once again.
6. Special technique for HTC users
This technique is specially crafted fro HTC smartphone users who frequently face Google Play Error 963.
Follow the step-by-step instructions given below to uninstall all updates for your HTC One M8 Lock Screen App:
Visit “Settings” and find “HTC Lock Screen” under “Apps”.
Now click on “Force Stop”.
In this step, Click on “Uninstall Updates”.
This remedy is as simple as it sounds and has helped many HTC users to get rid of Error 963.
Google Play Errors are a very common phenomenon these days, especially Error Code 963 which usually occurs in the Google Play Store when we try to download, install or update an App. There is no need to worry if you see Error Code 963 pop-up on your screen as your device and its software are not to be blamed for Error 963 to suddenly surface. It is a random error and can be fixed easily by you. You do not need any technical assistance to deal with the issue. All you need to do is follow the steps introduced in this article to use Google Play Store and its services smoothly.
Why Does My Nokia C32 Keep Turning Off By Itself? 6 Fixes Are Here
Android users are usually very happy with their smartphones; however, sometimes they do complain about their phones switching off abruptly. This is a weird situation to be in because one moment you are using your phone, and the next moment it suddenly turns itself off, and when you happen to turn it back on, it functions smoothly, but only for a while.
Phones shutting off problem not only disrupts your work but also tests your patience if you are in the middle of executing an important task, playing your favorite game, typing an e-mail/message, or attending a business call, etc.
We often hear Android users ask for solutions for this problem at different forums. If you are one of them and clueless about why My Nokia C32 keeps shutting off, here are ways that can help you.
So the next time you ask, “Why does My Nokia C32 keep shutting off?”, refer to this article and follow the techniques given hereunder.
Part 1: Possible reasons for phone turning off by itself
We understand your trouble when you ask, “Why does My Nokia C32 keep turning off?” thus, here we have four of the possible reasons that might be causing the glitch and help you understand the problem better.
The first one is related to updating the phone’s software or any of the Apps if the download process is interrupted and not duly completed, the phone can act abnormally causing it to switch off at frequent intervals.
Then there are certain Applications that are not supported by the Android software. While using such Apps, the phone may turn off abruptly. This usually happens when you install Apps from unknown sources which are not compatible with Android.
Also, if your battery is low or has become too old, your phone may shut off and not work as smoothly.
Lastly, you can also check if you use a protective cover for your phone. Sometimes, the cover is so tight that it presses the power button continuously turning the phone off.
Now, once you have analyzed the problem, it is easier to move on to the solutions.
Part 2: Check the battery status on Android
If your phone turns off now and then while you are using it and even refuses to start when you press the power button, we suspect that there is a problem with your phone’s battery. Well, Luckily for Android users, there is a test that can be run on the phone to check the battery’s operations and health. Not many users are aware of it, and thus, we have compiled what you need to do the next time you wonder why does My Nokia C32 keeps shutting off itself.
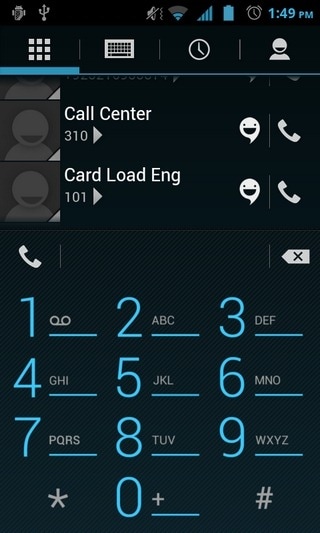
First, open the dialer on your Nokia C32 shown in the screenshot below.
Now dial *#*#4636#*#* just like dialing a usual phone number and wait for the “Battery Info” screen to pop up.
Note: Sometimes, the above-mentioned code may not work. In such cases, try dialing *#*#INFO#*#*. The following screen will appear now.
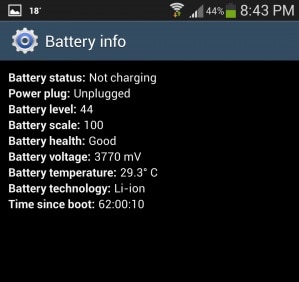
If the battery looks good as you can see in the screenshot above and everything else seems normal, it means that your battery is healthy and need not be replaced. You may now move on to the next step to cure your device.
Part 3: One-click to fix Android phone keeps turning off
We understand how annoying it is to find your Nokia C32 turning off randomly on its own. So, when the age-old remedies to fix the phone keeps turning off turns futile, you need to go for a reliable tool like Dr.Fone - System Repair (Android) .
Apart from tackling the Android phone keeps turning off the issue, it can also resolve all Android problems. The issues include system update fail, device stuck on logo, unresponsive, or bricked device with a blue screen of death.
Your trouble with ‘why does My Nokia C32 keep shutting off?’ can be resolved easily using Dr.Fone - System Repair (Android). But, before that, you need to ensure that the Android device has been backed up properly to eliminate the risk of data erasing.
![]()
Dr.Fone - System Repair (Android)
Repair Android System Errors without Any Trouble.
- Fix your Android to normal, no skills required.
- Fix various Android system issues, stuck in boot loop , black screen , or won’t turn on , looping on start, etc.
- The high success rate in resolving Android system issues.
- Compatible with a wide range of Android devices and OS versions
- User-friendly interface with easy-to-follow steps.
3981454 people have downloaded it
Below are the steps that help easily fix Android device keeps turning off on its own:
Phase 1: Preparing your Nokia C32 and connecting it
Step 1: On your computer, install and launch Dr.Fone. Now, click the ‘System Repair’ button over Dr.Fone window and connect the Android device to your computer.
Step 2: Here, you need to press the ‘Start’ button right after hitting the ‘Android’.
Step 3: Pick your Nokia C32 details over the Nokia C32 device information interface. Click the ‘Next’ button afterward.
Phase 2: Enter ‘Download’ mode to repair and resolve ‘why does My Nokia C32 keep turning off’
Step 1: On your Nokia C32, go to ‘Download’ mode following the instructions.
For a device with the ‘Home’ button – Turn off the mobile and then hold down the ‘Home’, ’Volume Down’, and ’Power’ buttons together nearly for 10 seconds. Leave them all and then click the ‘Volume Up’ button to get into the ‘Download’ mode.
For a device lacking ‘Home’ button – After switching off the Android mobile, hold down ‘Bixby’, ‘Power’, ‘Volume Down’ key still 10 seconds. Now, un-hold them and tap the ‘Volume Up’ button to enter the ‘Download’ mode.
Step 2: Hitting the ‘Next’ button will start the Android firmware download.
Step 3: Now, Dr.Fone - System Repair (Android) will verify the firmware once downloaded. Within some time the Android system gets repaired.
safe & secure
Part 4: Update software to the latest version to fix Android phone keeps turning off
Software glitches or outdated operating systems can trigger automatic shutdowns on Android phones. Updating your Nokia C32’s software version can be an effective solution to fix the issue of the phone repeatedly turning off. Regular software updates provided by the phone manufacturer often include bug fixes, performance improvements, and security patches. These updates can address underlying problems that may be causing the random shutdowns, ensuring a more stable and reliable phone performance.
To update the software on your Nokia C32, follow these steps:
Go to “Settings” on your Nokia C32 and navigate to the “System” or “Software Update” section (the exact wording may vary depending on your device model and Android version). Look for the option to “Check for updates” to see if any new software updates are available.

Part 5: Cool down your phone to avoid your phone keeps turning off
When a phone overheats, it can trigger an automatic shutdown as a protective mechanism to prevent damage to the Nokia C32 device’s internal components. Overheating occurs when the phone’s internal temperature rises significantly, typically due to excessive heat generated by the processor and other hardware components during intensive tasks or prolonged usage.
To prevent the phone from turning off due to overheating, you can take various measures, such as limiting intensive usage, avoiding direct sunlight and hot environments, and using the phone on hard surfaces to aid heat dissipation.

Part 6: Narrow down the randomly turning off issue in Safe Mode
Starting your phone in Safe Mode is a good way to narrow down whether or not the problem is occurring because of some heavy and incompatible Apps as Safe Mode allows only built-in Apps to function. If you can use your phone in Safe Mode, consider deleting the unnecessary Apps which may be burdening the phone’s processor.
To boot into Safe Mode:
Long press the power button to see the following options on the screen.
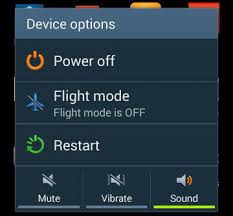
Now tap on “Power Off” for about 10 seconds and click “OK” on the message that pops-up as shown below.
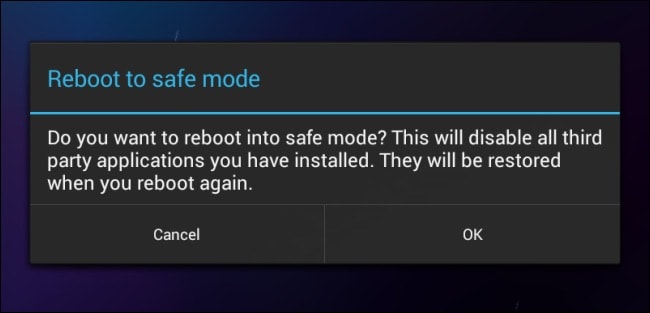
Once done, the phone will reboot and you will see “Safe Mode” on the main screen.
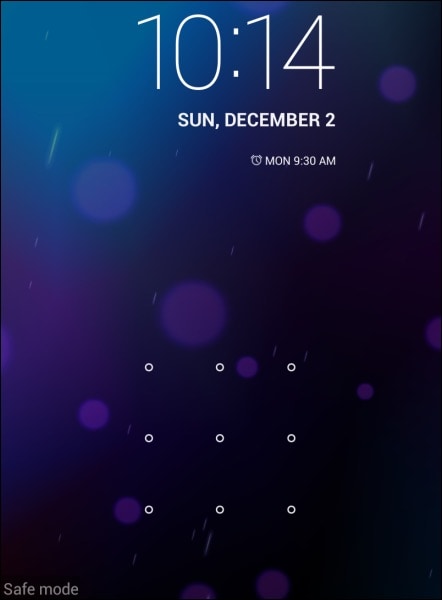
That’s all. Well, booting to Safe Mode is easy and it also helps you to identify the real problem.
Part 7: Back up your data and perform a factory reset
Note: You must take a back-up of all your data because once you perform a factory reset on your device, all media, contents, data, and other files are wiped out, including your device settings.
Wondershare Dr.Fone is a great way to back up all your data to prevent it from getting lost after resetting the phone. It works brilliantly as it backs up all data and allows users to retrieve it fully or selectively. You can backup all files from your Android to PC in just a click and restore them later. Try this software for free before purchasing it to understand it’s working better. It does not tamper with your data and only requires you to follow the simple steps given below to backup your Android data:
Wondershare Dr.Fone
Flexibly Back up and Restore Android Data
- Back up Android data to the computer with one click.
- Preview and selectively restore the backup to any Android device.
- Supports 8000+ Android devices.
- There is no data lost during backup, export, or restoration.
3,981,454 people have downloaded it
To start with, download and run the backup software on the PC.
Once you have the main screen of the software with multiple options that will appear before you, choose the “My Backup” option.
Now connect the Android phone to the PC and make sure that USB debugging is turned on. Then hit “Back Up Now” and wait for the next screen to open.

You will see the file types that will be backed up. Wait for the backup process to complete.

There you go, you have successfully backed up data.

safe & secure
Now moving on to factory reset your phone:
Simply visit “Settings” on your Nokia C32 by clicking the settings icon as shown below.
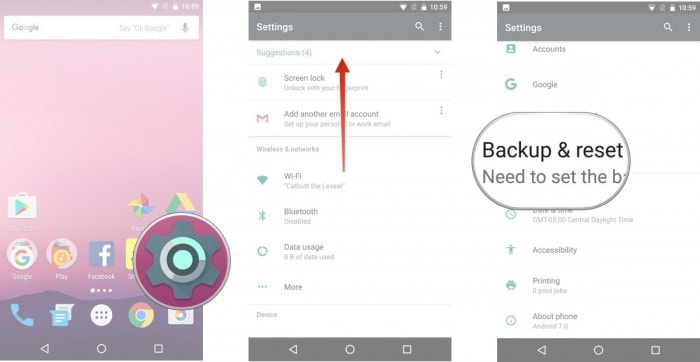
And then select the “Backup and Reset” option.
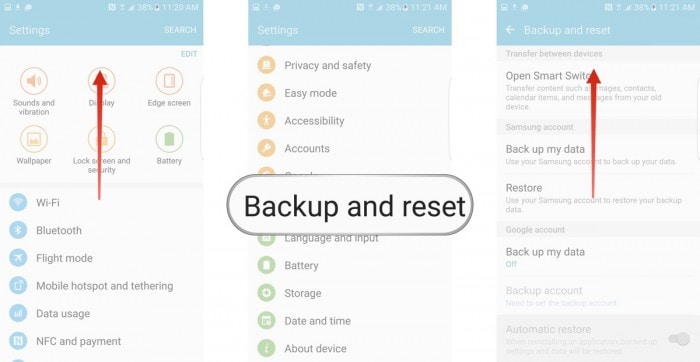
Once selected, tap on “Factory data reset” and then “reset device” as shown in the picture below.
Finally, tap on “ERASE EVERYTHING” as shown below to Factory Reset your device.
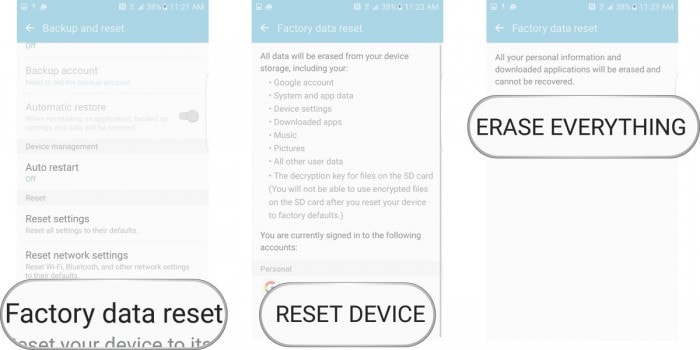
Note: Once the factory reset process is complete, your device will automatically restart and you will have to set it up once again. You can restore the backup data on your Nokia C32 once you factory reset it, again using the Dr.Fone toolkit.
Now for all those of you who are wondering why does My Nokia C32 keeps turning off by itself, please understand that the reasons behind the problem are simple, and so are its fixes. All you need to do is examine the problem carefully and move on to the fixes given in this article. Dr.Fone toolkit Android Data Backup & Restore feature provides an excellent platform for you to store all your data safely on your PC and retrieve it whenever you like so that you can go ahead to solve the error yourself without stressing about data loss.“Why does My Nokia C32 keep shutting off?” might be common questions but can be dealt with ease if you follow the methods explained above.
So, do not hold back, go ahead, and try these tricks. They have helped many and will be useful for you too.
safe & secure
Also read:
- [New] Pathway to Facebook Success Livestreaming Recorded Visual Narratives for 2024
- [Updated] Add a Professional Touch YouTube Video Image Crafting for 2024
- [Updated] Avoid Facebook's Targeted Video Promotions
- [Updated] In 2024, Affordable Audio Capture Tools Ranked #1 to #10
- 6 Fixes to Unfortunately WhatsApp has stopped Error Popups On Samsung Galaxy S23+ | Dr.fone
- 7 Fixes for Unfortunately, Phone Has Stopped on Oppo A18 | Dr.fone
- A Working Guide For Pachirisu Pokemon Go Map On Tecno Pova 6 Pro 5G | Dr.fone
- Examining Filter Bubble Transparency Act Details
- Exploring the Features of the Motorola One Hyper: Why It Outshines Other Mid-Range Options
- Fix App Not Available in Your Country Play Store Problem on Nokia C22 | Dr.fone
- Fix Nokia G22 Android System Webview Crash 2024 Issue | Dr.fone
- Fix the Error of Unfortunately the Process.com.android.phone Has Stopped on Vivo V27e | Dr.fone
- How to Outsmart Youtube Sanctions for 2024
- In 2024, Top 9 Vivo Y200e 5G Monitoring Apps for Parental Controls | Dr.fone
- Stuck at Android System Recovery Of Vivo V27 ? Fix It Easily | Dr.fone
- Super Easy Ways To Deal with OnePlus Nord CE 3 Lite 5G Unresponsive Screen | Dr.fone
- The primal horoscope of the modern stock exchange. | Free Book
- Troubleshooting Guide How to Fix an Unresponsive Infinix Note 30 Pro Screen | Dr.fone
- Why Is My Samsung Galaxy M34 5G Offline? Troubleshooting Guide | Dr.fone
- Title: Why Your Nokia C32 Screen Might be Unresponsive and How to Fix It | Dr.fone
- Author: Ariadne
- Created at : 2024-11-17 01:28:06
- Updated at : 2024-11-22 06:41:42
- Link: https://howto.techidaily.com/why-your-nokia-c32-screen-might-be-unresponsive-and-how-to-fix-it-drfone-by-drfone-fix-android-problems-fix-android-problems/
- License: This work is licensed under CC BY-NC-SA 4.0.