
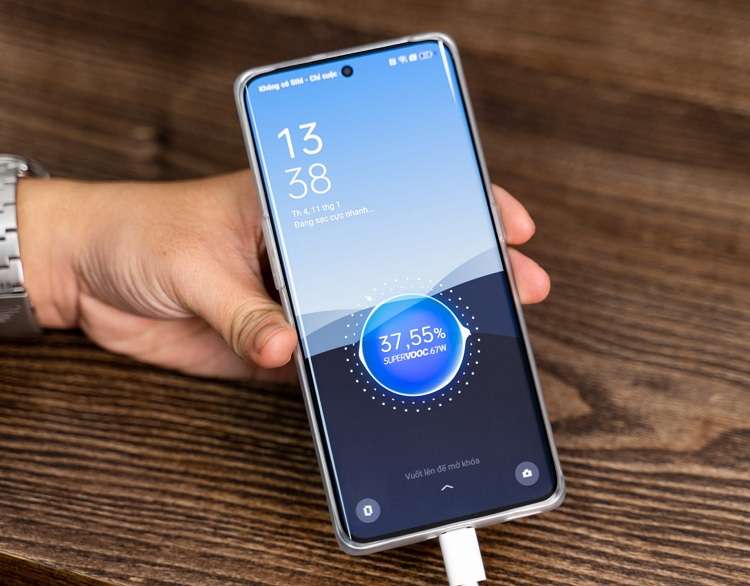
Why Your Vivo S18e Screen Might be Unresponsive and How to Fix It | Dr.fone
Why Your Vivo S18e Screen Might be Unresponsive and How to Fix It
This article aims to provide practical solutions for troubleshooting an unresponsive Vivo S18e screen. Whether you’re facing a software glitch or hardware damage, this guide will offer useful tips and tricks to help you resolve the issue and get your device back up and running smoothly.
5 Solutions to Solve Vivo S18e Screen Unresponsive Issues
An unresponsive Vivo S18e screen can be frustrating, but several potential solutions can help. This article will explore five methods for troubleshooting an unresponsive Vivo S18e screen. From force restarting your device to contacting customer service, we’ll cover everything you need to know to get your device back up and running.
1. Force Restart

If your Vivo S18e screen is unresponsive, the first thing to try is a force restart. This can help refresh the system and clear any temporary files causing the issue.
Step 1. Press and hold the power button on your Vivo S18e device.
Step 2. When the power options appear, tap “Restart.”
Step 3. Hold the power button if the screen is completely unresponsive until the Vivo S18e device shuts down. Then, press and hold the power button to turn the Vivo S18e device back on.
2. Drain the Battery Completely
If force restarting doesn’t work, let the battery drain completely. This can help reset the Vivo S18e device and clear any temporary files or processes causing the issue.
Step 1. Leave your Vivo S18e device on until the battery completely drains and the Vivo S18e device shuts down.
Step 2. Connect your device to a power source and turn it back on.
3. Check for Software Updates

Sometimes, an unresponsive Vivo S18e screen can be caused by outdated software. Checking for software updates ensures your device runs the latest and most stable operating system version.
Step 1. Go to “Settings“ on your Vivo S18e device.
Step 2. Scroll down and tap “Software Updates.”
Step 3. If an update is available, tap “Download and Install.”
4. Using Dr. Fone Repair

Dr. Fone Repair is a professional tool that can help fix a wide range of software issues on your Vivo S18e device. Dr. Fone Repair can be a good option to protect your data and files while troubleshooting an unresponsive Vivo S18e screen.
 safe & secure
Step 1. Download and install Dr. Fone Repair software on your computer.
Step 2. Connect your Vivo S18e phone to your computer using a USB cable.
Step 3. Launch Dr. Fone Repair and select the “System Repair“ option.
Step 4. Choose the “Android Repair“ option from the available choices.
Step 5. Click on “Start“ to begin the repair process.
Step 6. Provide the necessary device information on the screen, including your name and model.
Step 7. Click “Next“ to proceed to the next step.
Step 8. Follow the on-screen instructions to complete the repair process for your Vivo S18e phone’s touchscreen.
5. Contact Customer Service
If none of the above solutions work, it may be time to contact Vivo S18e customer service. They can provide additional support and help troubleshoot the issue.
Step 1. Go to the Vivo S18e website and navigate to the “Support“ section.
Step 2. Select your device model and click “Contact Us.”
Step 3. Choose your preferred method of contact, such as phone or email, and describe the issue you’re experiencing.
Common Causes of Vivo S18e Screen Unresponsiveness
While Vivo S18e devices offer reliable performance, users may encounter situations where the screen becomes unresponsive or stuck on boot. Soft-bricked software or corrupted firmware can cause an Vivo S18e device to become unresponsive, including the screen stuck on the boot. This can happen to various models, such as the Vivo S18e, A37, A5, and A5s. Software updates and resets can help fix these issues.
Over time, the touch screen of an Vivo S18e device may become unresponsive due to wear and tear. This can happen to models like the Vivo S18e F1s and F3. In this case, replacing the touch screen or seeking professional assistance may be necessary.
Dropping or impacting an Vivo S18e device can cause physical damage to the touch screen, resulting in unresponsiveness. This can happen to various models like the Vivo S18e Reno and Find X. In some cases, the damage may be repairable, but the screen replacement or the Vivo S18e device itself may be necessary in severe cases. Protecting the Vivo S18e device with a case and handling it carefully to prevent physical damage is important.
While Vivo S18e devices are generally reliable, various factors can contribute to screen unresponsiveness. Users can effectively troubleshoot and resolve issues by identifying these potential causes and seeking appropriate solutions.
How to Avoid Vivo S18e Screen Unresponsiveness Issue
One of the most effective ways to prevent Vivo S18e Screen unresponsiveness is by keeping the Vivo S18e device software up-to-date. Regularly checking for system updates and installing them promptly can prevent software issues and potential bugs that may cause unresponsiveness. Additionally, updating device apps can help prevent conflicts that affect the touch screen’s functionality.
Another way to avoid Vivo S18e Screen unresponsiveness is by protecting the Vivo S18e device from physical damage. Using a protective case or screen protector can help prevent cracks or scratches on the screen that can lead to unresponsiveness. Avoiding impacts or drops can also reduce the risk of physical damage to the touch screen.
Installing apps from unknown sources or suspicious websites can expose the Vivo S18e device to malware and viruses, which can cause unresponsiveness and other issues. To avoid this, it’s recommended to only install apps from trusted sources such as the Google Play Store or the Vivo S18e App Store.
Using a reliable tool like Dr. Fone can help prevent Vivo S18e Screen unresponsiveness by allowing you to manage and repair your device’s software and data. With features such as System Repair and Data Backup & Restore, you can quickly diagnose and fix software issues that may cause unresponsiveness and safely back up important data to prevent loss in case of device damage or malfunction.
Conclusion
Vivo S18e Screen unresponsiveness can be a frustrating issue to deal with, but there are solutions available. Force restarting the Vivo S18e device, checking for software updates, using Dr. Fone Repair, and contacting customer service are all effective ways to solve the problem. However, it’s also important to understand the possible causes of the issue, such as soft-bricking or equipment wearing out, and take preventative measures, such as updating your phone on time and avoiding malware. These tips can help prevent Vivo S18e Screen unresponsiveness and keep your device running smoothly.
safe & secure
Vivo S18e Camera Not Working Unexpected Error? Fix It Now
For all its glory and goodness, the Android OS often has its users pulling their hair in frustration at just how buggy the OS can be at times. So, if you’re having one of those days today, we are here to help. Camera app is one of the most used apps on smartphones today. People only launch the app when they want to take a photo, for everything else there’s a dedicated photo gallery app. What happens when you launch the camera app only to realize it threw an error and you missed your photo moment? Don’t throw the phone, not yet. Let us help you out.

Part I: Why Is Android Camera Not Working?
There are a few reasons why the camera app is not working on your Vivo S18e.
Low Memory
Camera app does rely heavily on system resources, so in case you have too many apps open and for some reason the OS is not able to manage the resources appropriately for the camera app to function as it should, you will get a camera error.
Low Storage
The camera app needs storage space to save the photos it takes. So, in case your phone is running low on storage space, the camera app would likely malfunction as it would have no way to store the photos it would be taking.
General Bugs And Glitches
OS bugs and general glitches within the OS and the camera app can cause camera not working issue anytime during everyday operation. This is part and parcel of any technology.
Hardware Issues
In the rarest cases, there might have developed an actual hardware issue with the camera system on your Vivo S18e. The likely culprit is misuse and abuse, such as a dropped phone or maybe the phone was too hot for extended periods of time, causing hardware issues.
Part II: How To Fix Android Camera Not Working Issue?
So, how to get the Android camera not working problem solved? There are a few ways you can try fixing the camera not working issue on your Vivo S18e right where you are, without needing to take the Vivo S18e device to the manufacturer’s service center.
II.I: Restart The Handset
One of the first things to do any time an app or your phone or tablet does not work like it should, restarting the Vivo S18e device refreshes everything just enough to resolve most commonly occurring issues.

Use the power button on your smartphone to restart your Android handset and see if this resolves the issue.
II.II: Close And Relaunch The Camera App
If the camera app (or any app for that matter) has been in the background for a while and then it is brought to the foreground, there are always chances of it crashing for any reason, or not working as expected. So, closing the app completely and relaunching it is recommended.
Step 1: Launch the app switcher on your specific Android device the way your device manufacturer suggests you to. Usually, it is a swipe up and hold gesture to get into the app switcher.

Step 2: Next, you can choose to close just the camera app or, better yet, close all apps by tapping the Close All button. Flicking any app upwards (quick upward swipe) is how you close an app. If there is no Close All button anywhere, repeat the gesture for all open apps.
II.III: Check App Permissions
These days, thanks to strides in the privacy initiatives, apps need permissions before they can function the way they do. Most of the times, apps such as camera do have the necessary permissions, but sometimes it is possible that the permissions are set incorrectly. To check if the camera app has the requisite permissions, do the following:
Step 1: Go to Settings > Apps > Camera > Permissions.

Step 2: Tap Camera.

Step 3: See if the selected option is Allow Only While Using This App. If not, select it.
II.IV: Clear The Camera App Cache
Clearing the camera app cache is sometimes helpful. To do that:
Step 1: Go to Settings > Apps > Camera and tap Storage Usage.

Step 2: Tap Clear Cache.

II.V: Clear The Photo Gallery App Cache
The camera app is closely tied to the photo gallery app that comes baked in into Android OS. That is because photos that the camera app takes are stored in the photo gallery app. Consequently, if there were any issues in the photo gallery app, that could lead to the camera app not working on Android problem. Here’s how to clear the photo gallery app cache:
Step 1: Go to Settings > Apps > Photos > Storage Usage.

Step 2: Tap Clear Cache.
II.VI: Check For App Updates
This does not happen always, but sometimes, with known bugs and issues, there may be an update released that fixes those bugs and issues that prevent some users from using a given app reliably. Checking for updates is a good step to make sure that your camera app is updated to the latest version possible.
Step 1: Go to Play Store and tap your profile picture on the right.

Step 2: Tap Manage Apps and Device.

Step 3: If there are updates available, Tap Update All to update all apps.
II.VII: Cool The Phone Down
We do not realize the immense power that is packed into the thin smartphone form factor these days. If you have been using the phone to video chat for a while now, you might not realize that the phone has become hot, especially if you are using a desk stand. Same for shooting high-resolution videos; the phone does get quite hot shooting high-resolution videos.
If this is the case, close all apps and let the phone cool down. You might even want to shut the phone off to help cool it faster.
II.VIII: Nudge The Camera System
You may want to tap your camera system (the lenses and surrounding area) gently to see if that gets the camera working. In case it did, this is indicative of a hardware issue, and you should get it checked at the service center at your earliest convenience.
II.IX: Fix Android Camera Not Working Issue In One Click (With Dr.Fone)
Now, if the above fixes have not worked, you might want to repair your Android OS once before you make that appointment with the service centre. And, we have just the app to help you fix your camera not working on Android problem quickly.
Wondershare Dr.Fone is a multi-module app that works on both Windows and macOS and is the only app you will ever need to resolve nearly all of your smartphone and tablet issues that you are likely to encounter. Need to take backups? Dr.Fone Phone Backup has you covered with the ability to take and restore even selective backups, and to any location such as your computer or an external disk as well. Want to transfer WhatsApp chats to a new phone? Use WhatsApp Transfer to do just that! Bought a new phone? Use Phone Transfer to transfer contents from old phone to new, and then use Dr.Fone Data Eraser to securely wipe your old phone before giving it away!
Today, we will use Dr.Fone’s System Repair (Android) module to fix Android camera not working issue quickly.
Download Dr.Fone here.
safe & secure
Step 1: Launch Dr.Fone app on your PC or Mac.

Step 2: Click System Repair module and then Android.

Step 3: For now, don’t bother with the scenarios given and click Start to go to the next screen.
Step 4: Your Android device will be detected by Dr.Fone. If anything seems incorrect, use the dropdown options to change it, and click Next.

Step 5: Your phone needs to be put into Download mode before it can be repaired. Follow the instructions shown onscreen and click Next.

Step 6: Dr.Fone automatically downloads the most recent firmware for your device and when it is ready, waits for your input. Click Fix Now to start the repair process.

Step 7: You will need to enter a 6-digit code (digit zero, six times – 000000) to confirm and begin the repair process.

When the repair is complete, Dr.Fone shows the final screen as below:

safe & secure
Conclusion
The camera app on your smartphone is one of the most important apps you use. This is not a game; this is an app that makes previous memories possible for you. So, when you get any of those incorrigible errors that are impossible to make sense of, what do you do? This guide gives you 9 fixes to fix Android camera not working error quickly and easily.
7 Solutions to Fix Error Code 963 on Google Play Of Vivo S18e
People are increasingly complaining about Google Play Error Codes which pop-up during downloading, installing or updating an App via Google Play Store. Amongst these, the most recent and common one being Error Code 963.
Google Play Error 963 is a typical error which shows up not only when you try to download and install an App but also during App update.
Error 963 cannot be attributed to a particular App or its update. It is a Google Play Store error and is experienced by Android users across the world.
Error Code 963, just like any other Google Play Store errors, is not something difficult to deal with. It’s a minor glitch which can be fixed easily. There is no need to worry or panic if you see Error 963 on Google Play Store preventing your favorite App from downloading or updating.
Read on to find out more about the Google Play Error 963 and best ways to fix it.
Part 1: What is Error Code 963?
Error 963 is a common Google Play Store error which basically hinders Apps from downloading and updating. Many people get worried when Error Code 963 does not let them install new Apps or update existing ones. However, please understand that Google Play Error is not such a big deal as it may sound and can be overcome easily.
Error 963 pop-up message reads as follows: “cannot be downloaded due to an error (963)” as shown in the image below.

A similar message shows up even while you are trying to update an App, as shown in the screenshot below.

Error Code 963 is basically an outcome of data crash which mostly is seen in cheaper smartphones. There might another reason for Error 963 preventing Apps from downloading and updating, which is Google Play Store Cache being corrupted. People also speculate SD Card related issues as many-a-times external memory enhancer chips do not support large Apps and their updates. Also, Error 963 is very common with HTC M8 and HTC M9 smartphones.
All these reasons and more can handle with ease and you can continue to use Google play services smoothly. In the following segment, we will discuss various fixes to cure the problem to enable to you download, install and update Apps on your device normally.
Part 2: Easiest solution to fix Error Code 963 on Android
When it comes to the most convenient solution to fix error 963, Dr.Fone - System Repair (Android) cannot be missed. It is the most productive program that covers a wide range of Android issues. It ensures full safety while performing and one can fix the Android issues in a hassle-free way.
Dr.Fone - System Repair (Android)
One click to fix Google Play error 963
- The tool is recommended for its higher success rate.
- Not just Google Play error 963, it can fix a large number of system issues including app crashing, black/white screen etc.
- It’s considered as the first tool that offers one-click operation for Android repairing.
- There’s no technical expertise needed to use this tool.
4,997,014 people have downloaded it
This section will provide you the tutorial guide for how to fix error code 963.
Note: Before moving to solve the error 963, we would like to inform you that the process may result in wiping away your data. And therefore, we suggest you to make backup of your Vivo S18e prior to fixing this Google Play error 963.
Phase 1: Connecting and preparing the Vivo S18e device
Step 1 – To begin fixing error 963, run Dr.Fone after downloading and installing it on your PC. Now, pick out the ‘System Repair’ tab from the main screen. Thereupon, with the help of a USB cable, make connection between your Vivo S18e and PC
Step 2 – On the left panel, you’re supposed to choose ‘Android Repair’ and then click the ‘Start’ button.
Step 3 – On the following screen, you need to choose the appropriate details for your device like the name, brand, model, country/region etc. Later, go for warning confirmation and hit ‘Next’.
Phase 2: Taking Android device in Download mode for repairing
Step 1 – It is essential to get your Vivo S18e or tablet entered in Download mode. For this, following are the steps to be taken:
If the Vivo S18e device contains Home button:
- Turn the Vivo S18e device off and then keep holding the ‘Power’, ‘Volume Down’ and ‘Home’ buttons altogether for about 10 seconds. Next, release them all and push the ‘Volume Up’ key. This way, your device will enter the Download mode.

If the Vivo S18e device contains no Home button:
- Switch off your phone/tablet and press the ‘Volume Down’, ‘Bixby’ and ‘Power’ buttons for 10 seconds. Leave the buttons and then press the ‘Volume Up’ button for entering download mode.
Step 2 – Press the ‘Next’ button and then the program will commence the firmware downloading.

Step 3 – Upon successful downloading and verification of the firmware, the process of Android device repairing will begin automatically.

Step 4 – Within a while, the Google play error 963 will be vanished.
Part 3: 6 Common Solutions to fix Error Code 963

Since there is no specific reason for Error Code 963 to occur, similarly there is no one solution to the problem. You may use any one of them below or try them all to never see Error Code 963 on your device.
1. Clear Play Store Cache and Play Store Data
Clearing Google Play Store Cache and Data basically means keeping Google Play Store clean and free from trouble-making data stored in respect of it. It is advisable to carry out this process regularly to prevent Errors like Error Code 963 from occurring.
Follow the steps given below to fix Error Code 963:
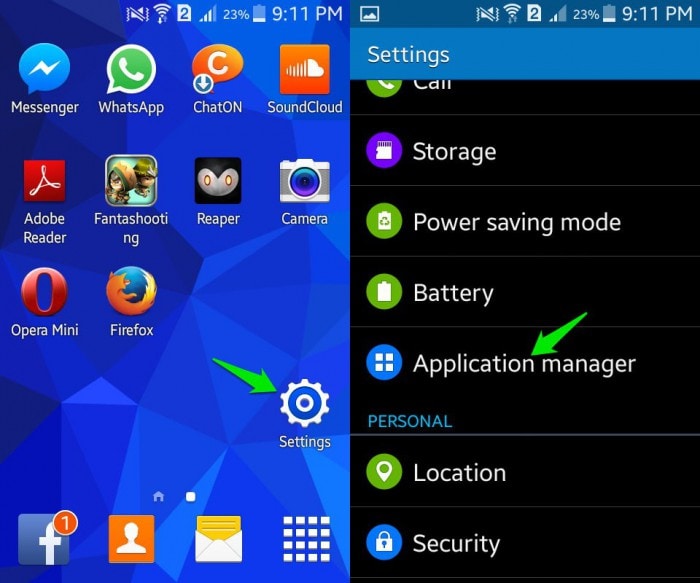
Visit “Settings” and select “Application Manager”.

Now select “All” to see all downloaded and built-in Apps on your device.
Select “Google Play Store” and from the options that appear, tap on “Clear Cache” and “Clear Data”.

Once you are done clearing Google Play Store Cache and Data, try to download, install or update the App facing Google Play Error 963 again.
2. Uninstall updates for Play Store
Uninstalling Google Play Store updates is an easy and quick task. This method is known to have helped many as it brings back the Play Store to its original state, free from all updates.
Visit “Settings” and select “Application Manager”.
Now select “Google Play Store” from “All” Apps.

In this step, click on “Uninstall Updates” as shown below.

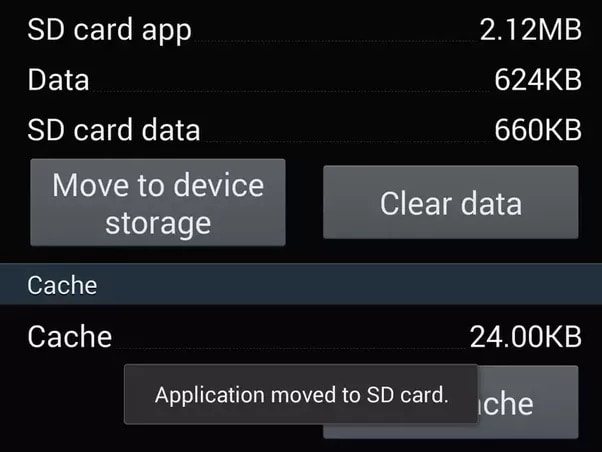
3. Shift the App from SD Card to device’s memory
This method is strictly for certain Apps which cannot be updated because they are stored on an external memory card, i.e., SD Card. Such memory enhancing chips do not support large Apps and due to a shortage of space prevents them from updating. It advisable to move such Apps from the SD Card to the Vivo S18e device’s internal memory and then try to update it.
Visit “Settings” and select “Apps”.

From “All” Apps click on the App which is unable to update.
Now click on “Move to Phone” or “Move to internal storage” and try to download its update again from the Google Play Store.
Try updating the App now. If the Apps’s update does not download even now, DO NOT worry. There are three more ways to help you.
4. Unmount your external Memory Card
Error Code963 may also occur due to an external memory chip used in your device to enhance its storage capacity. This is very common and can be dealt with by unmounting the SD Card temporarily.
To unmount your SD Card:
Visit “Settings” and keep scrolling downwards.
Now select “Storage”.
From the options that appear, select “Unmount SD Card” as explained in the screenshot below.

Note: If the App or its update downloads successfully now, do not forget to mount the SD Card back.
5. Remove and Re-add your Google account
Deleting and re-adding your Google account in might sound a little tedious but it does not take much of your precious time. Moreover, this technique is very effective when it comes to fixing Error Code 963.
Carefully follow the steps given below to remove and then re-add your Google account:
Visit “Settings”, under “Accounts” select “Google”.
Select your account and from the “Menu” select “Remove account” as shown below.

Once your account is removed, follow the steps given hereunder to add it back again after a few minutes:
Go back to “Accounts” and select “Add Account”.

Select “Google” as shown above.
In this step feed in your account details and your Google account will be configured once again.
6. Special technique for HTC users
This technique is specially crafted fro HTC smartphone users who frequently face Google Play Error 963.
Follow the step-by-step instructions given below to uninstall all updates for your HTC One M8 Lock Screen App:
Visit “Settings” and find “HTC Lock Screen” under “Apps”.
Now click on “Force Stop”.
In this step, Click on “Uninstall Updates”.
This remedy is as simple as it sounds and has helped many HTC users to get rid of Error 963.
Google Play Errors are a very common phenomenon these days, especially Error Code 963 which usually occurs in the Google Play Store when we try to download, install or update an App. There is no need to worry if you see Error Code 963 pop-up on your screen as your device and its software are not to be blamed for Error 963 to suddenly surface. It is a random error and can be fixed easily by you. You do not need any technical assistance to deal with the issue. All you need to do is follow the steps introduced in this article to use Google Play Store and its services smoothly.
Also read:
- [New] 2024 Approved Public Perceptions Unveiling VLLO Realities
- [New] Amazon's Favorite Originals - Twitter Top Picks for 2024
- [New] Auditory Aesthetics for Slides Infusing Your PPT with Tunes
- [New] In 2024, Taking Flight in Content Creation DJI Drones & FB Live
- [Updated] Harmony and Hype Perfecting Film Teaser Tunes
- 2024 Approved GIF Galore Mastering TikTok Visuals Conversion
- No WiFi? No Problem! How to Manually Install Windows Drivers at Home
- Restore Missing App Icon on Oppo F25 Pro 5G Step-by-Step Solutions | Dr.fone
- Samsung Galaxy A34 5G Bootloop Problem, How to Fix it Without Data Loss | Dr.fone
- Solved Warning Camera Failed on Nubia Red Magic 8S Pro | Dr.fone
- Solved Warning Camera Failed on Xiaomi Redmi Note 12 4G | Dr.fone
- Spotify Keeps Crashing A Complete List of Fixes You Can Use on Nubia Red Magic 8S Pro | Dr.fone
- Stuck at Android System Recovery Of Honor X50 ? Fix It Easily | Dr.fone
- Top 10 Telegram Spy Tools On Oppo Find X6 Pro for Parents | Dr.fone
- Ultimate Charger Systems for Black GoPro Hero5 Official Sources
- Unboxing the Samsung Galaxy Fit - Ideal Gadget for Active Lifestyles Explored
- Title: Why Your Vivo S18e Screen Might be Unresponsive and How to Fix It | Dr.fone
- Author: Ariadne
- Created at : 2024-11-20 03:27:22
- Updated at : 2024-11-21 20:01:12
- Link: https://howto.techidaily.com/why-your-vivo-s18e-screen-might-be-unresponsive-and-how-to-fix-it-drfone-by-drfone-fix-android-problems-fix-android-problems/
- License: This work is licensed under CC BY-NC-SA 4.0.